> ## Documentation Index
> Fetch the complete documentation index at: https://docs.talview.com/llms.txt
> Use this file to discover all available pages before exploring further.
# Moodle LMS -Installation Guide
> Follow these steps to install and configure the two moodle plugins on to your instance.
## **Introduction**
Talview's proctoring solutions for Moodle LMS include two essential plugins: the Quiz Access Proctor plugin and the Local Proview plugin. These plugins work together to enhance the security and integrity of online quizzes by integrating advanced proctoring features directly into Moodle's quiz module.
The **Quiz Access Proctor plugin** allows educators to apply specific proctoring settings to their quizzes, ensuring a controlled testing environment. With this plugin, different types of proctoring can be configured, and Talview's Secure Browser can be utilized to prevent unauthorized access and maintain exam integrity. **Install the “quiz access proctor” plugin first**
Complementing this, the **Local Proview plugin** injects the necessary Proview JavaScript into Moodle quizzes. It ensures that the proctoring session is initiated correctly when a quiz starts and manages integration aspects such as fetching session playback URLs for post-exam review. This comprehensive approach allows for seamless monitoring and reviewing of proctored sessions, enhancing the overall assessment process. **Install the “local proview” plugin second**
\[[*****These plugins are free to download, but a subscription is needed to fully use it. For any query on the subscription, please contact Talview Sales Team or technical support, you can reach out to Talview Tech Support.*****](https://talview.freshdesk.com/en/support/home)]\([https://www.talview.com/contact?hsCtaTracking=6b06eef3-21df-4508-826e-0c77f9922d17%7Cede73d3b-fccd-45f2-abfa-73d38e575dec](https://www.talview.com/contact?hsCtaTracking=6b06eef3-21df-4508-826e-0c77f9922d17%7Cede73d3b-fccd-45f2-abfa-73d38e575dec))
## Capabilities
* **Versatile and Flexible**: Proview is compatible with major web browsers, providing a consistent user experience across different devices and operating systems.
* **Live Remote Proctoring :** Live Remote Proctoring offers an end-to-end platform that supports holding multiple low to high-stakes online exams concurrently monitored by live proctors. The proctors help in authenticating test takers, monitoring exams, intervening, raising flags, terminating exams, and more.
* **Automated AI Proctoring:** Through advanced video & audio analytics, the Proview system monitors the feeds for any suspicious activity. It ensures candidate focuses on test screen during the test and checks for suspicious objects in video and background voice activity to red flag the test.
* **Record & Review:** This fully automated, AI-enabled application authenticates test takers, tracks, and records their behaviors, and flags critical events. After the exam concludes, our highly trained proctors, or those provided by you, can quickly review and confirm any event flags before certifying the validity of the exam and authenticity of test takers.
## Steps - **Quiz Access Proctor Plugin**
Install the “quiz access proctor” plugin first
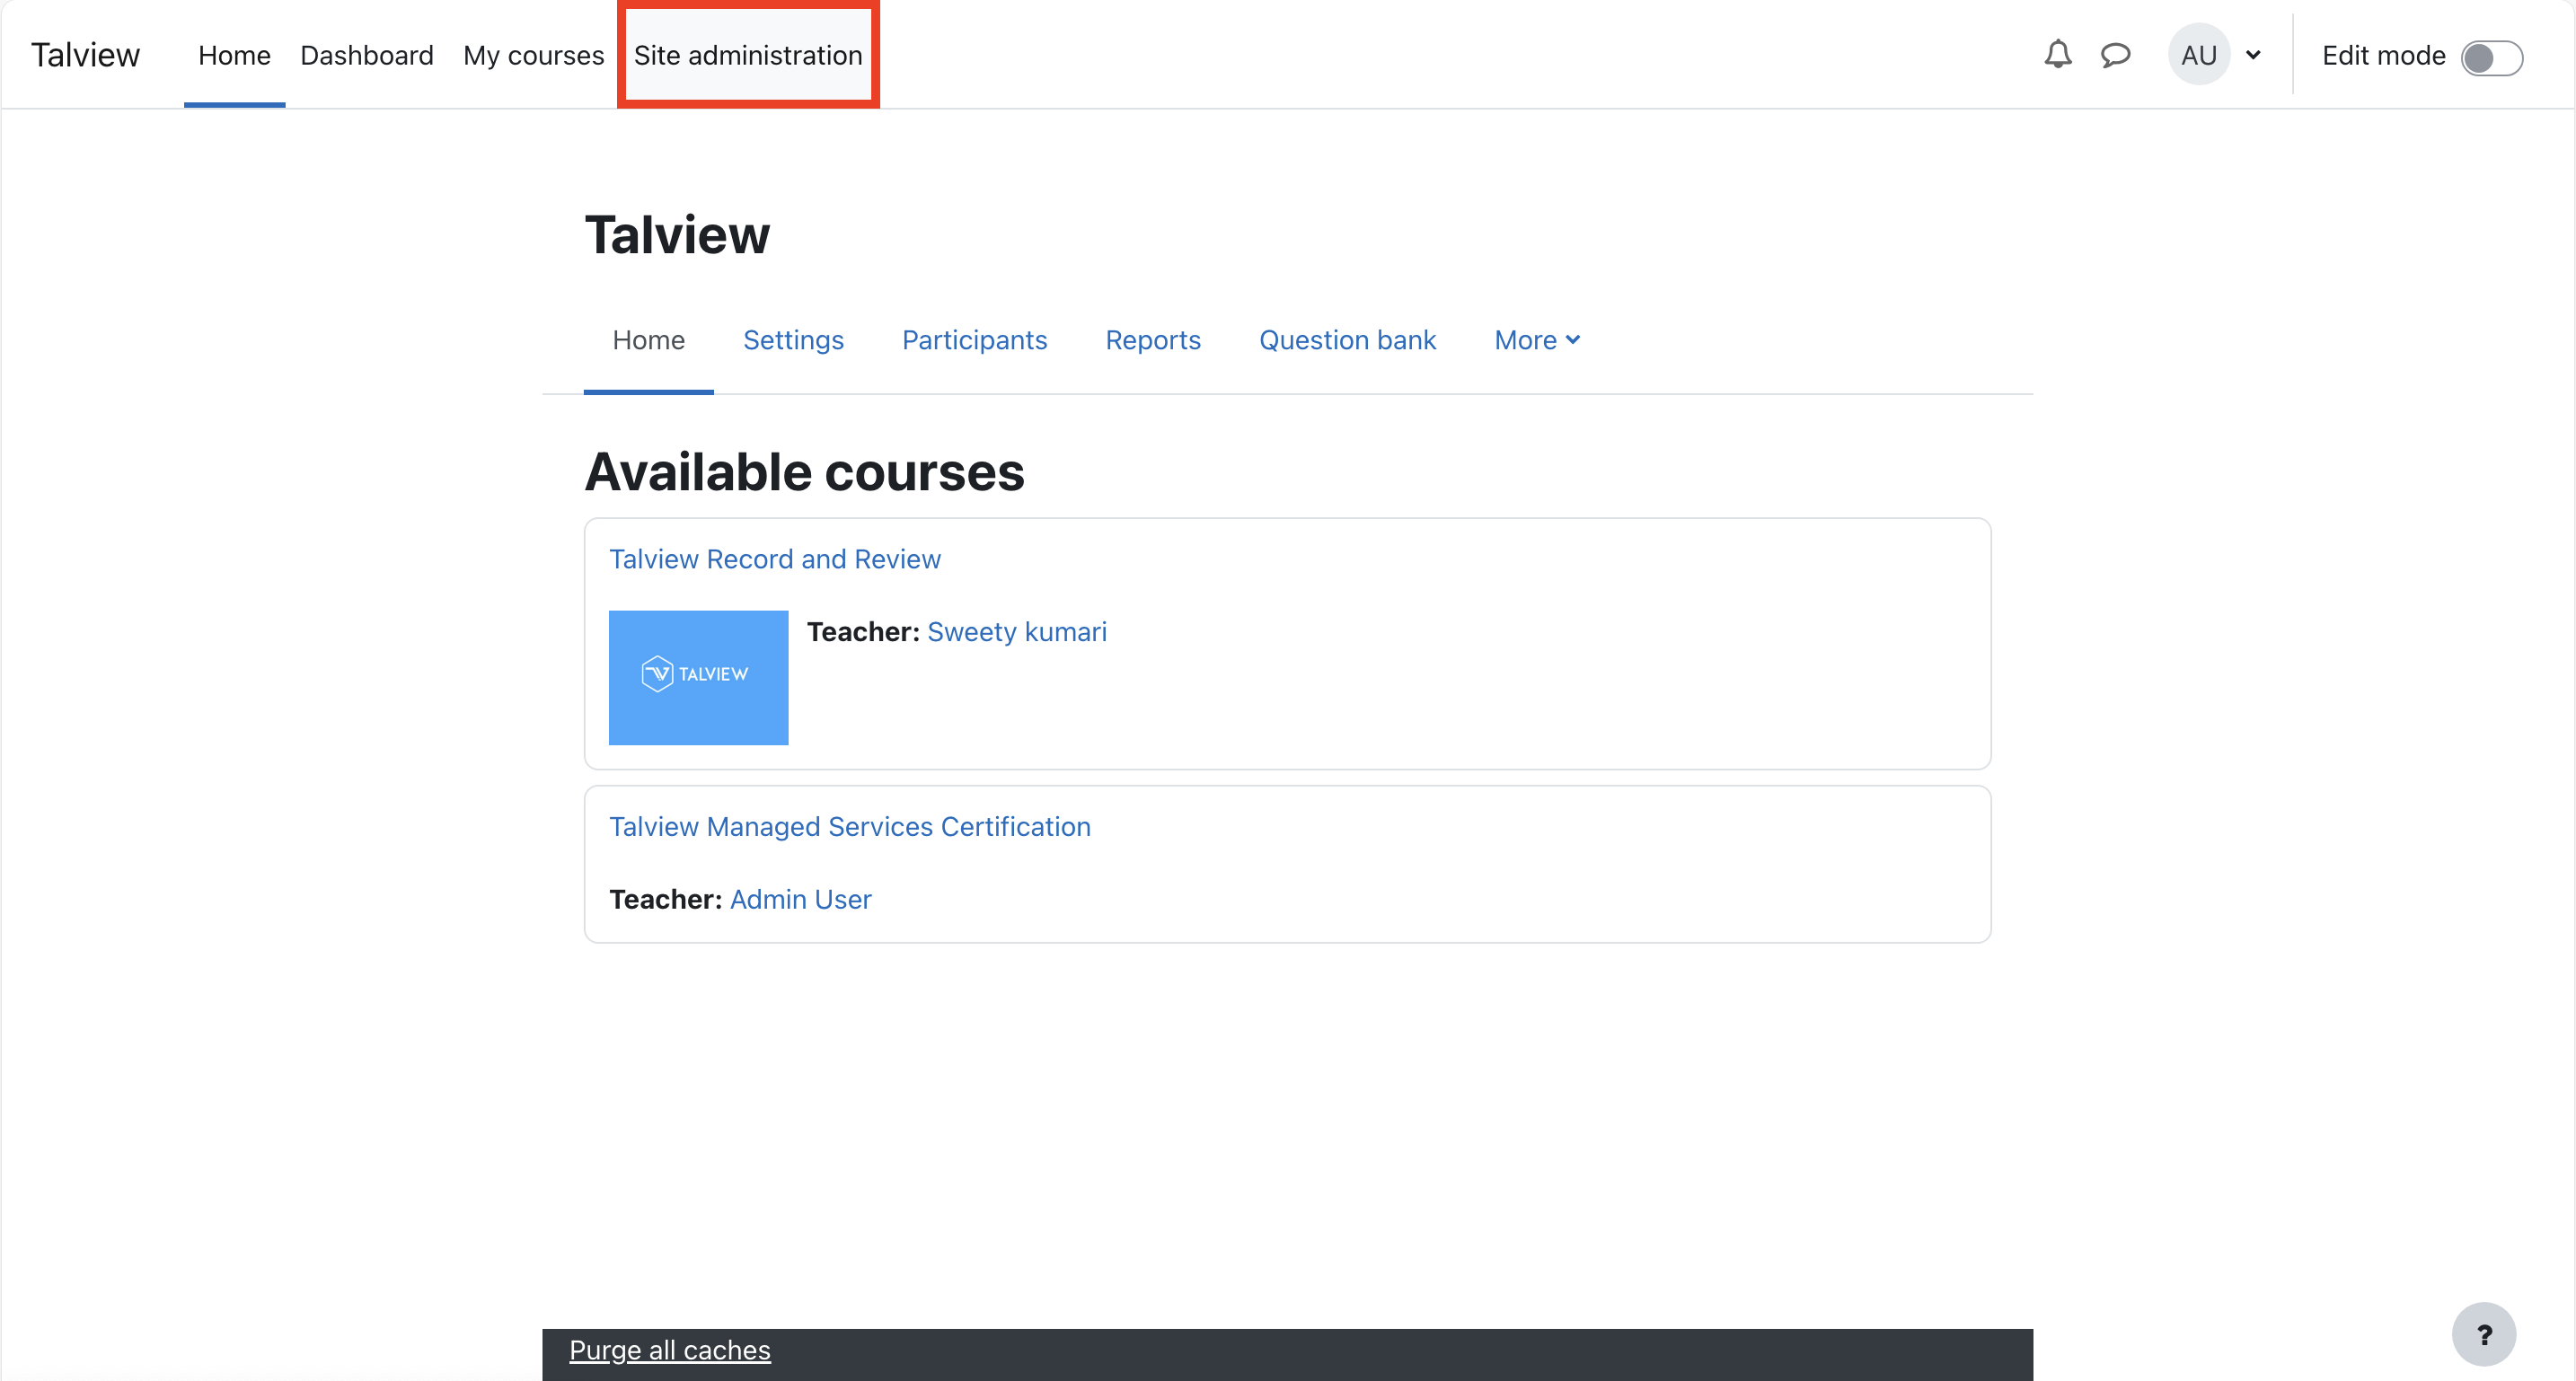
### **1. Accessing site administration**
* Log in to Moodle as an admin. In the admin view, go to **Site Administration**.
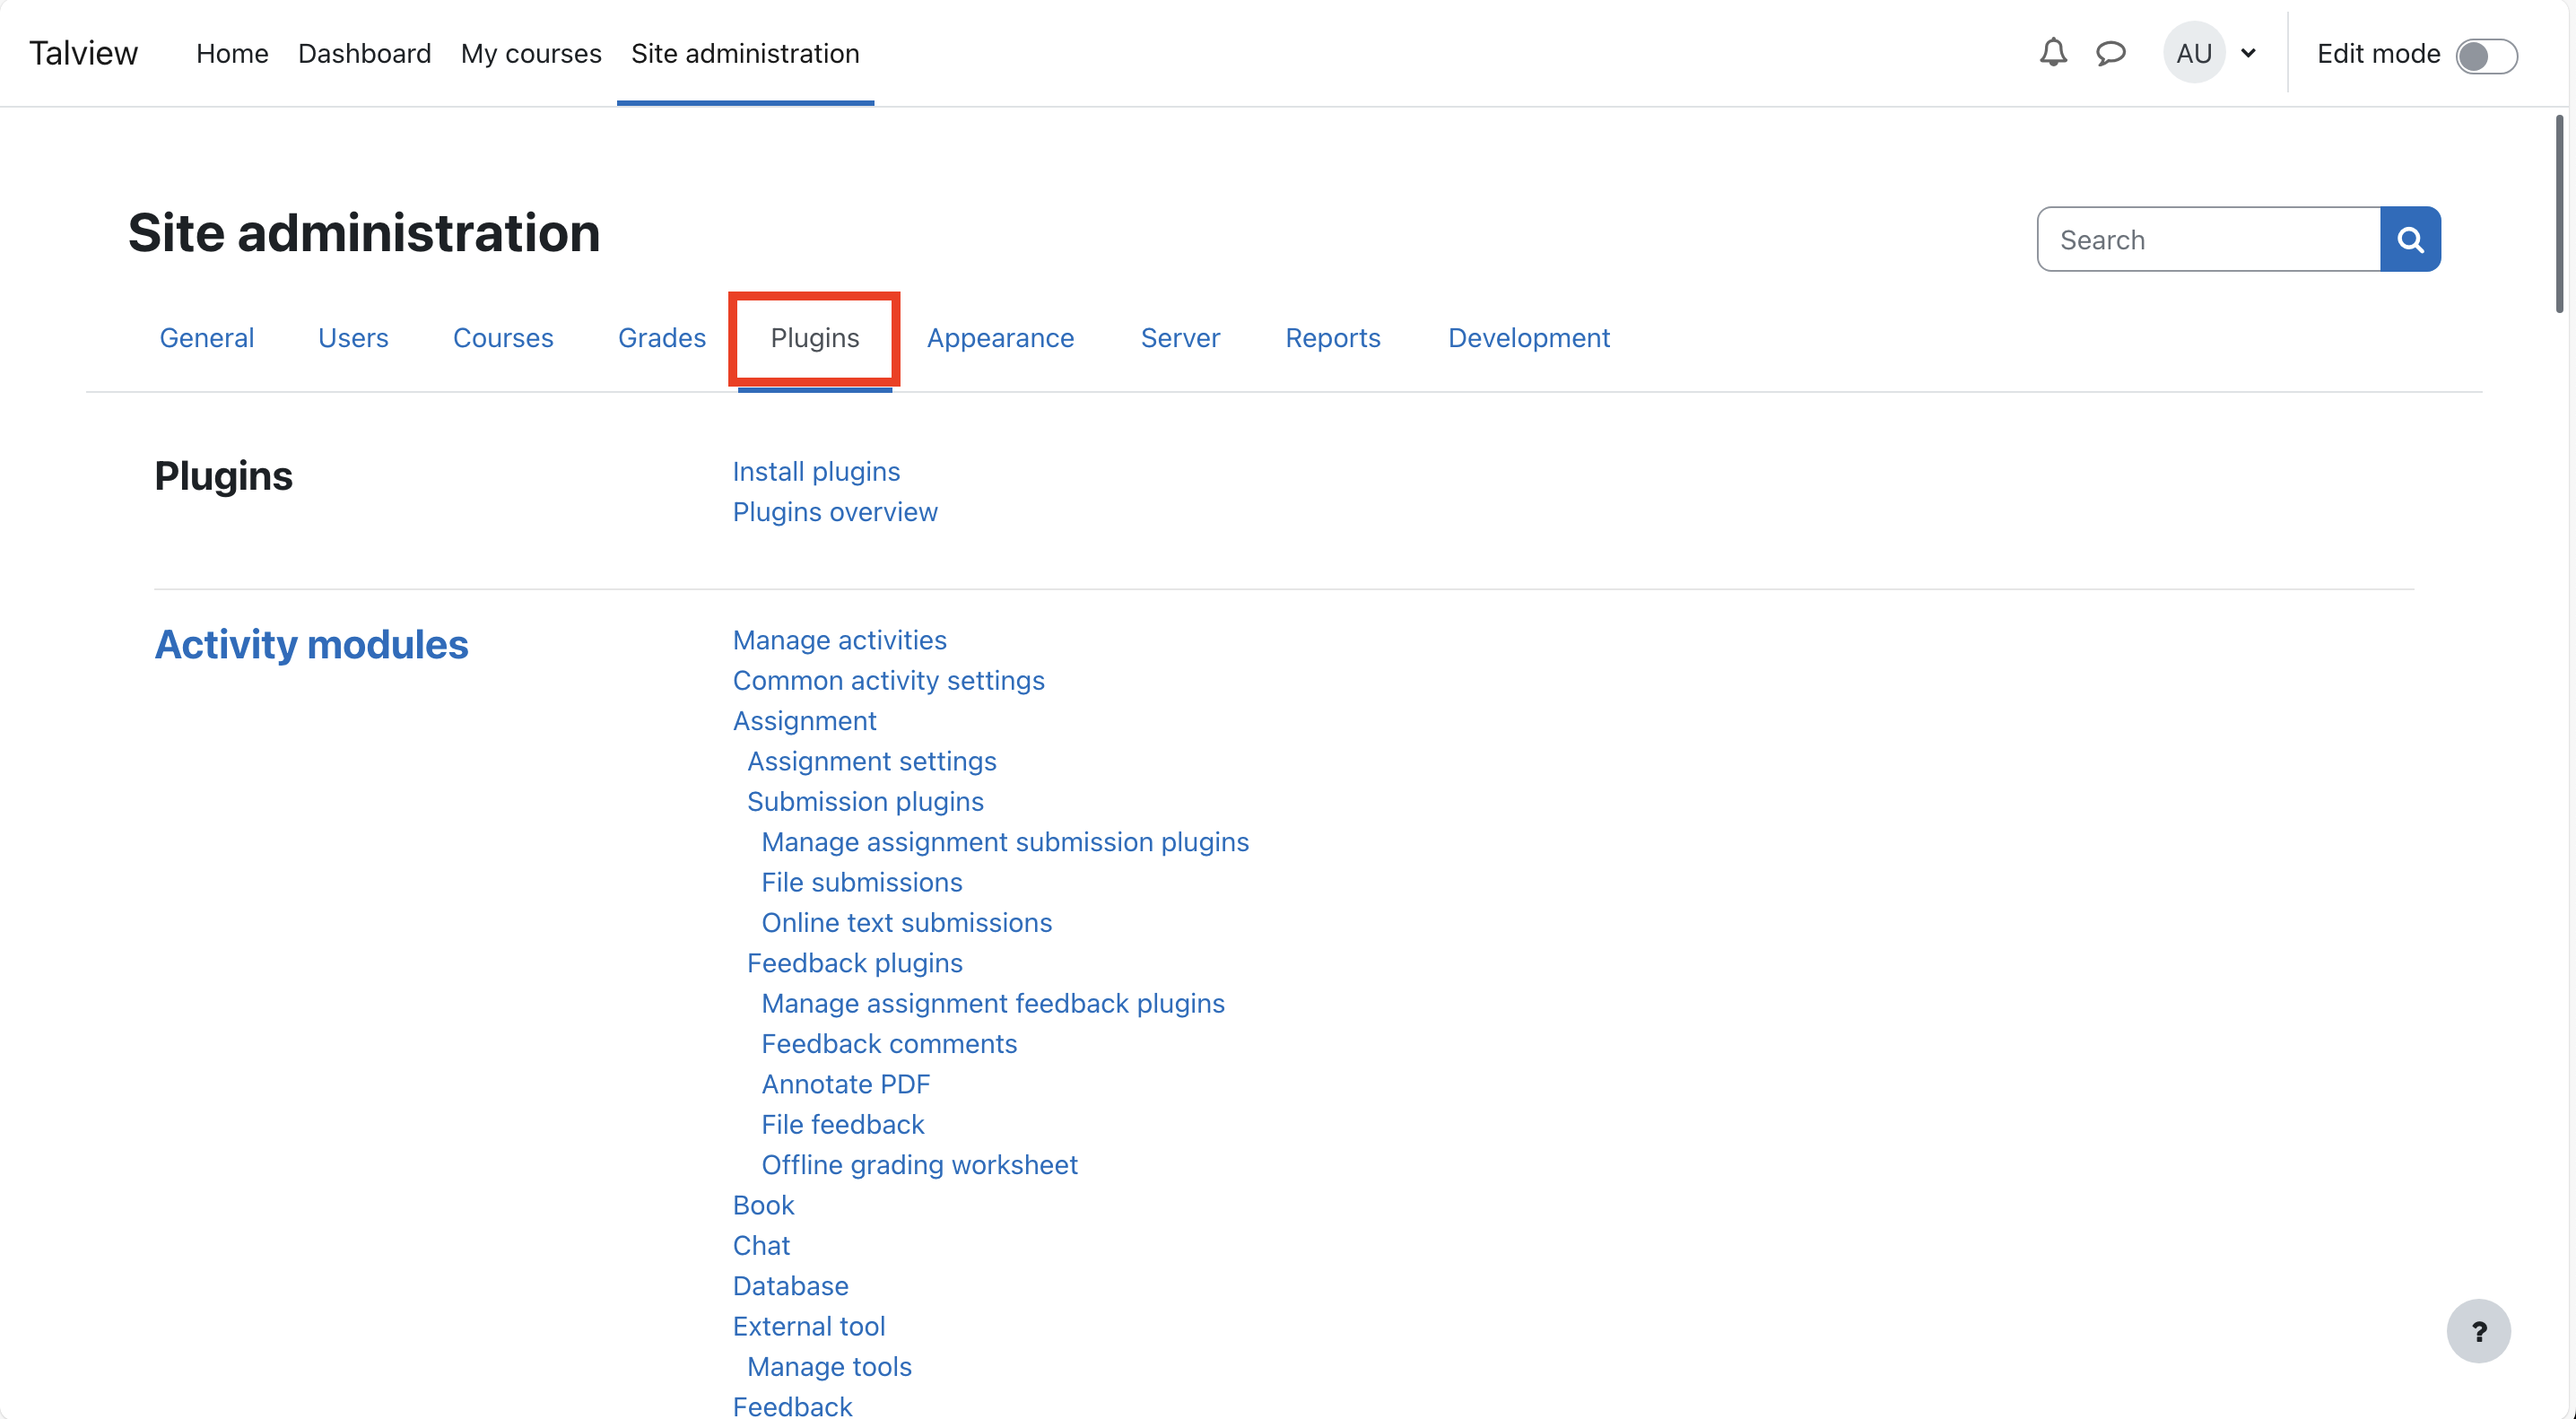
 ### **2. Installing the plugin**
* Click on **Plugins** in the Site Administration menu.
* Choose **Install Plugin** from the plugin options.
### **2. Installing the plugin**
* Click on **Plugins** in the Site Administration menu.
* Choose **Install Plugin** from the plugin options.
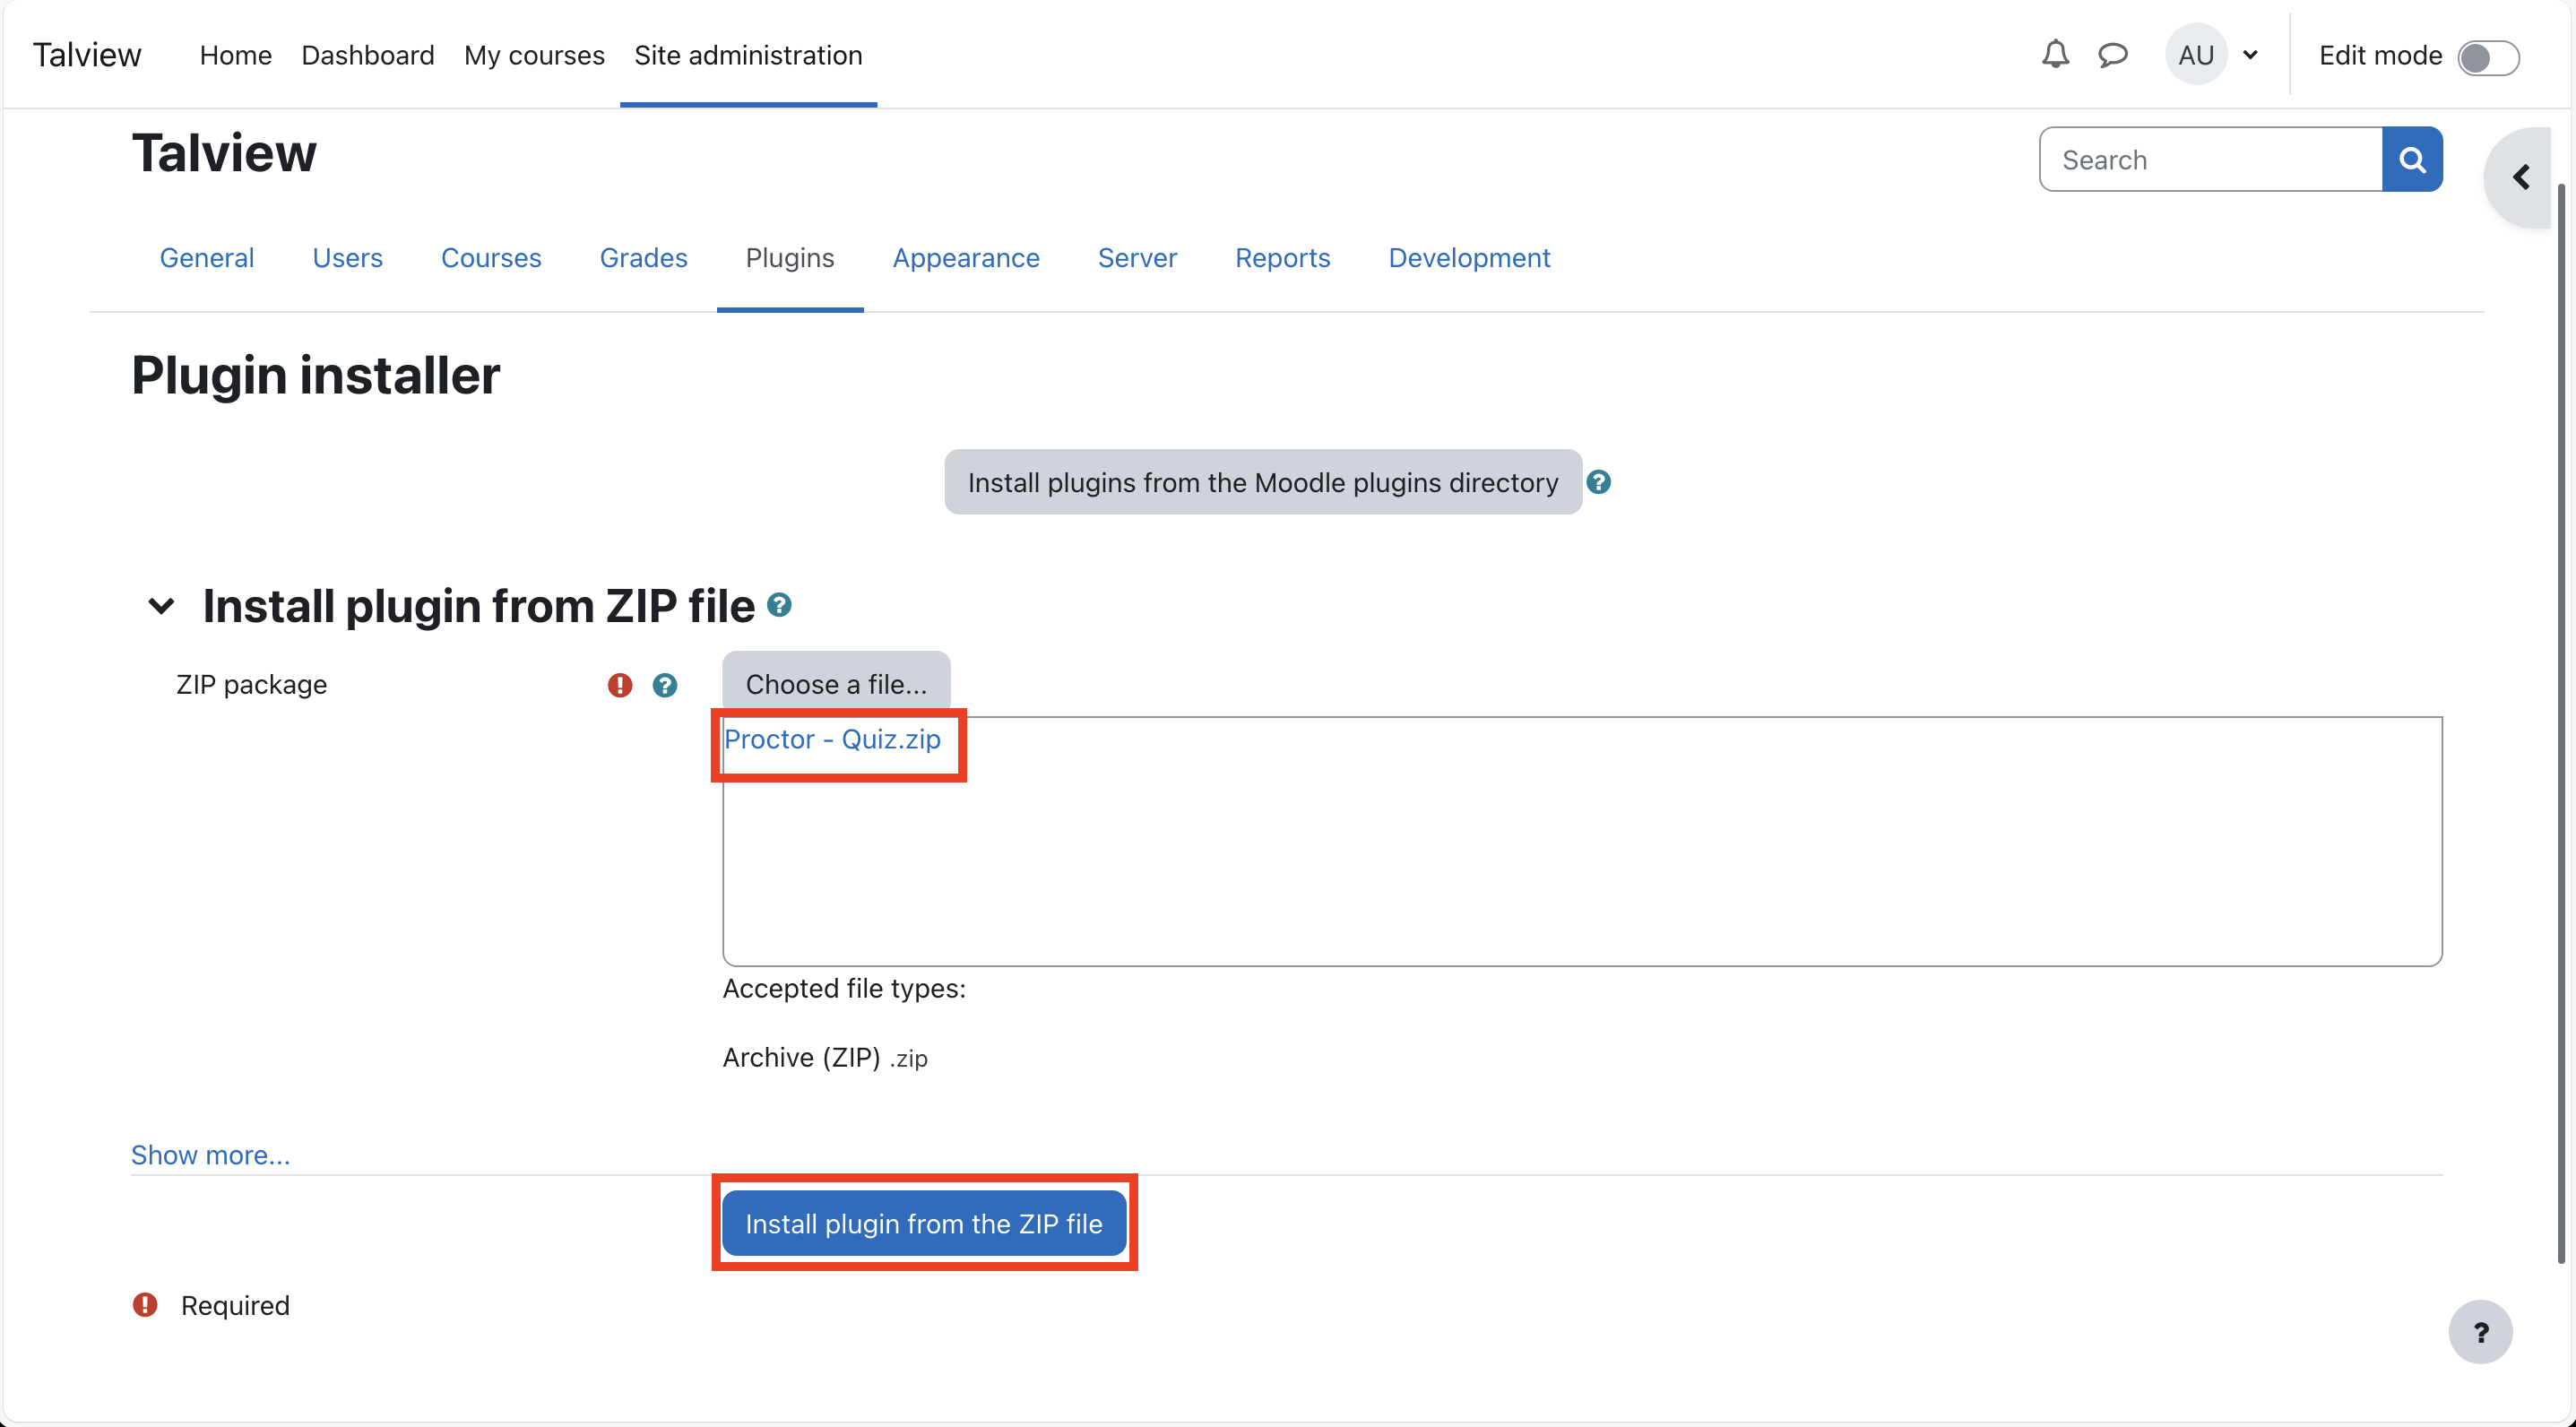
 ### **3. Downloading and uploading the plugin**
* Download the latest plugin from [https://github.com/talview/moodle-quizaccess\_proctor/releases/tag/v1.5.0-Quiz\_Access\_Proctor](https://github.com/talview/moodle-quizaccess_proctor/releases/tag/v1.5.0-Quiz_Access_Proctor)
* Use the **File Picker** option to upload the downloaded plugin zip file. Once uploaded, click on **Install Plugin from ZIP file**.
### **3. Downloading and uploading the plugin**
* Download the latest plugin from [https://github.com/talview/moodle-quizaccess\_proctor/releases/tag/v1.5.0-Quiz\_Access\_Proctor](https://github.com/talview/moodle-quizaccess_proctor/releases/tag/v1.5.0-Quiz_Access_Proctor)
* Use the **File Picker** option to upload the downloaded plugin zip file. Once uploaded, click on **Install Plugin from ZIP file**.
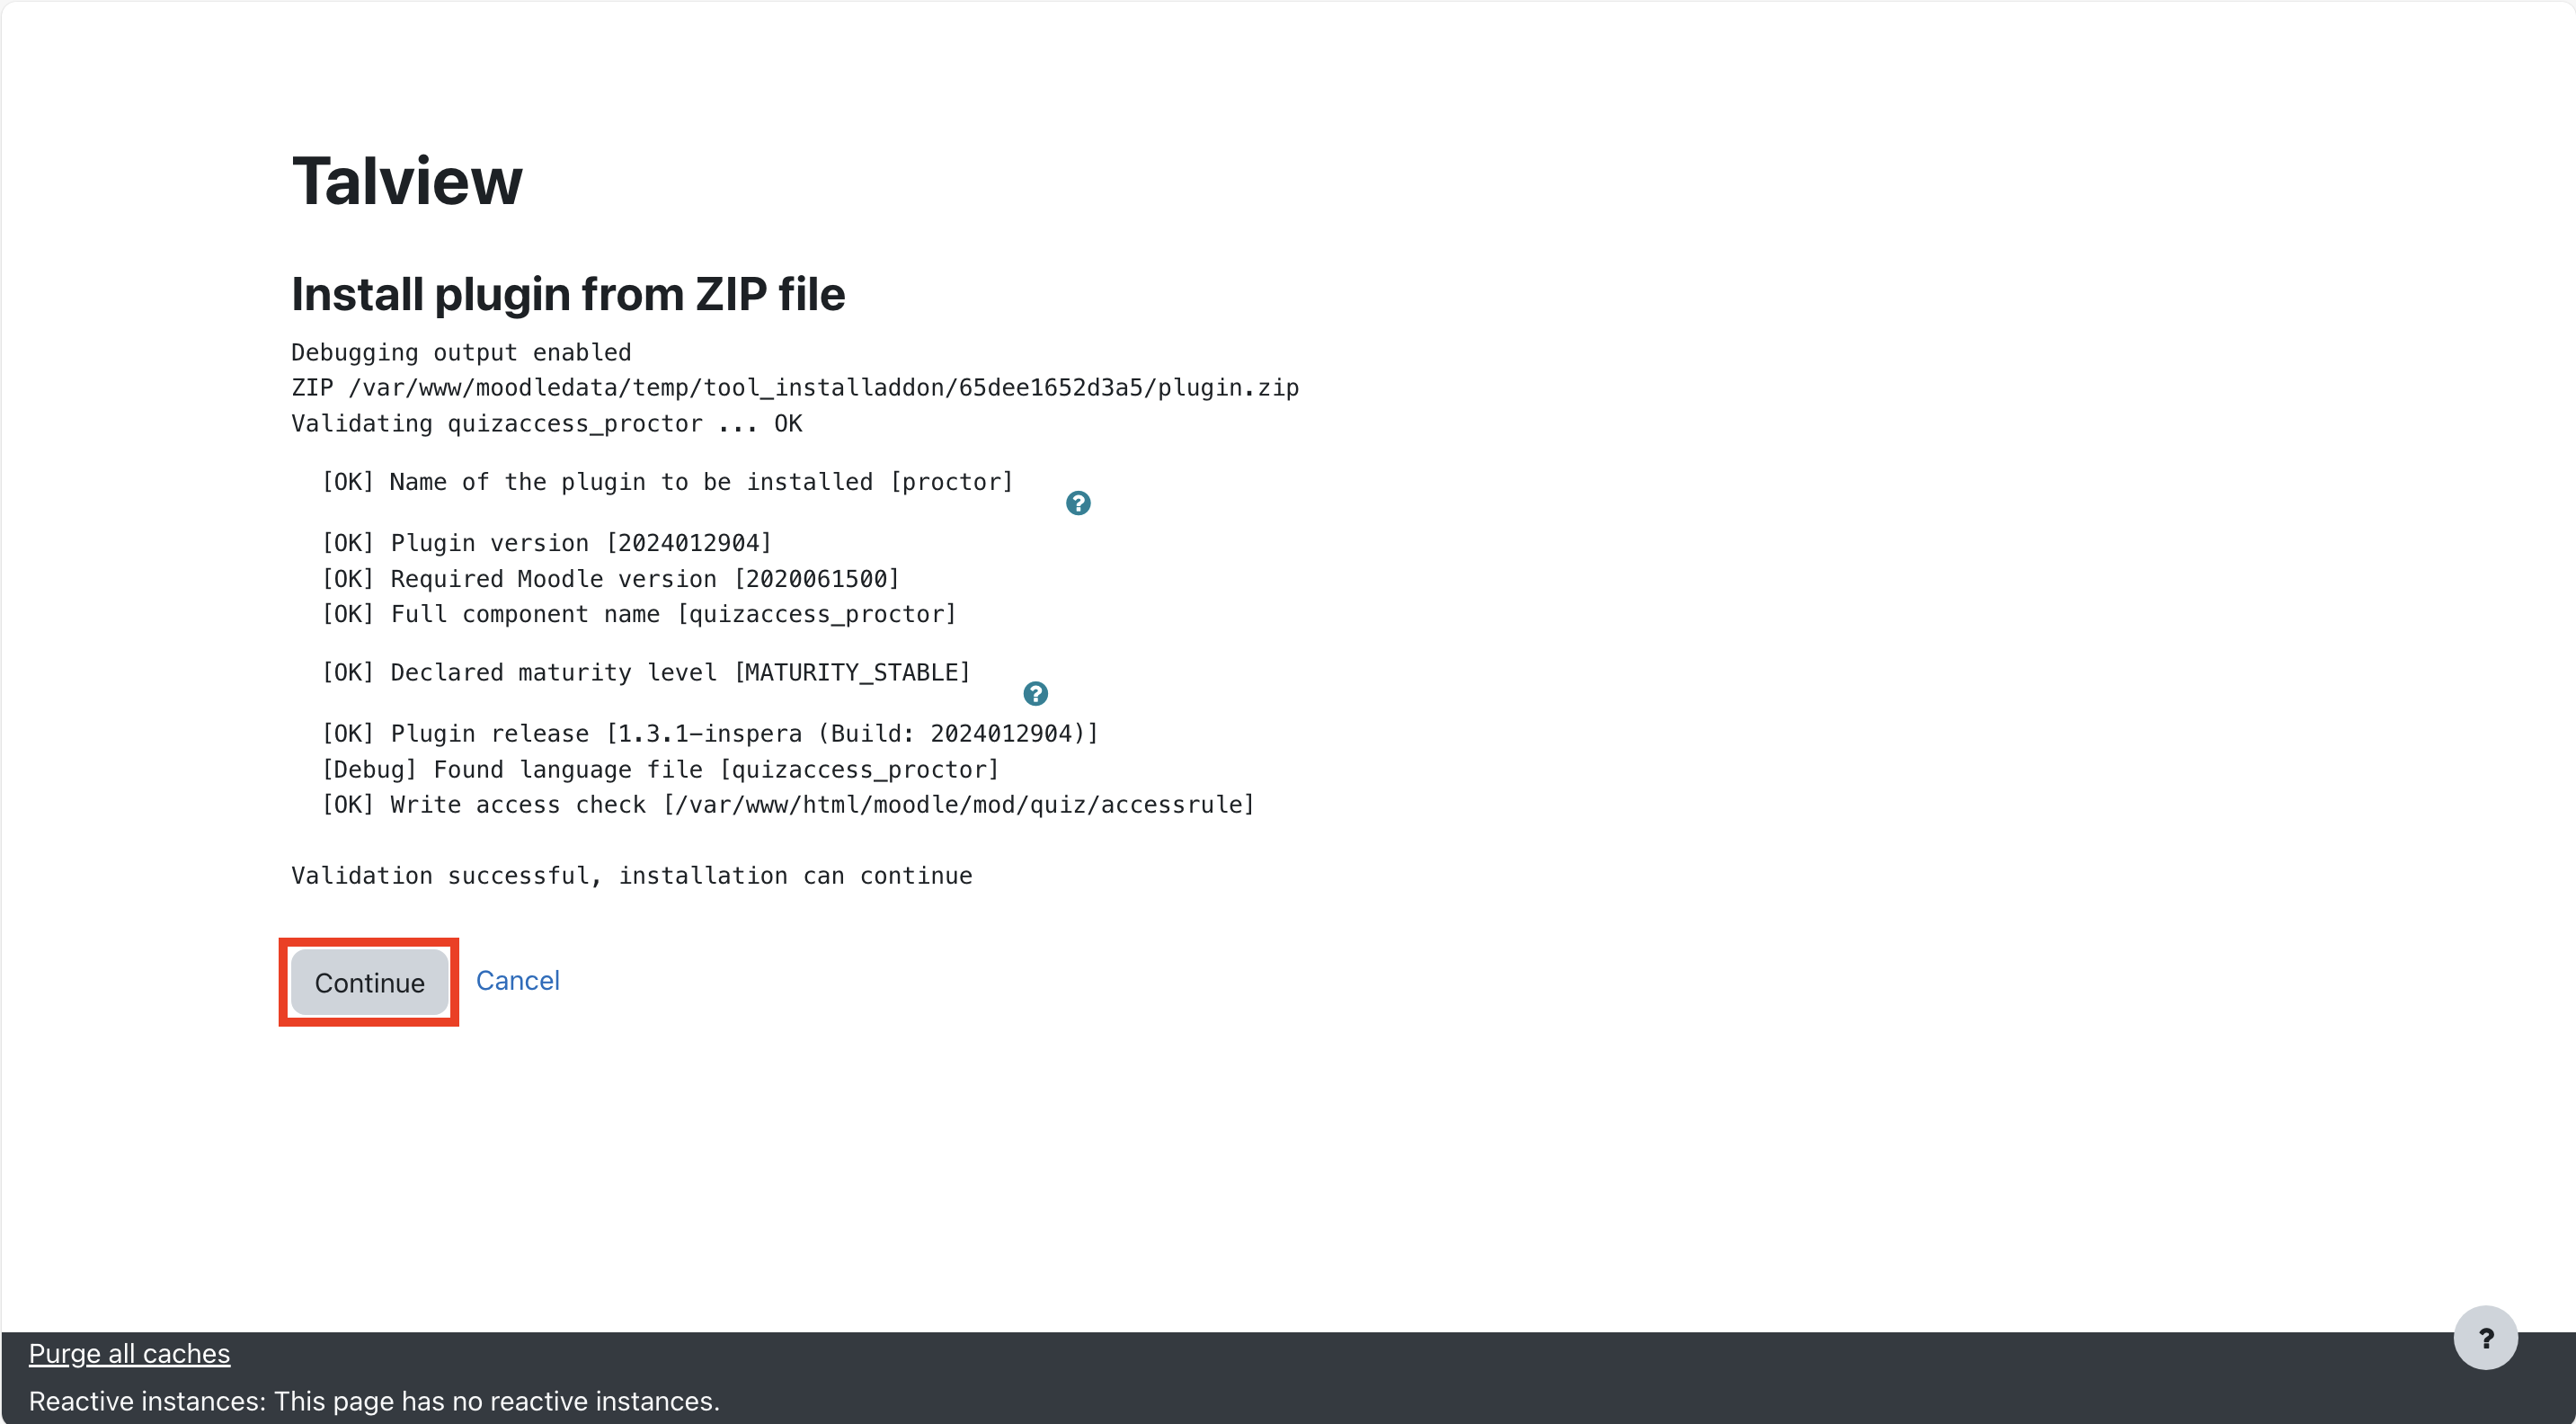
 ### **4. Validating and continuing installation**
* You will see a message stating "Validation successful, installation can continue". Click on the **Continue** button.
### **4. Validating and continuing installation**
* You will see a message stating "Validation successful, installation can continue". Click on the **Continue** button.
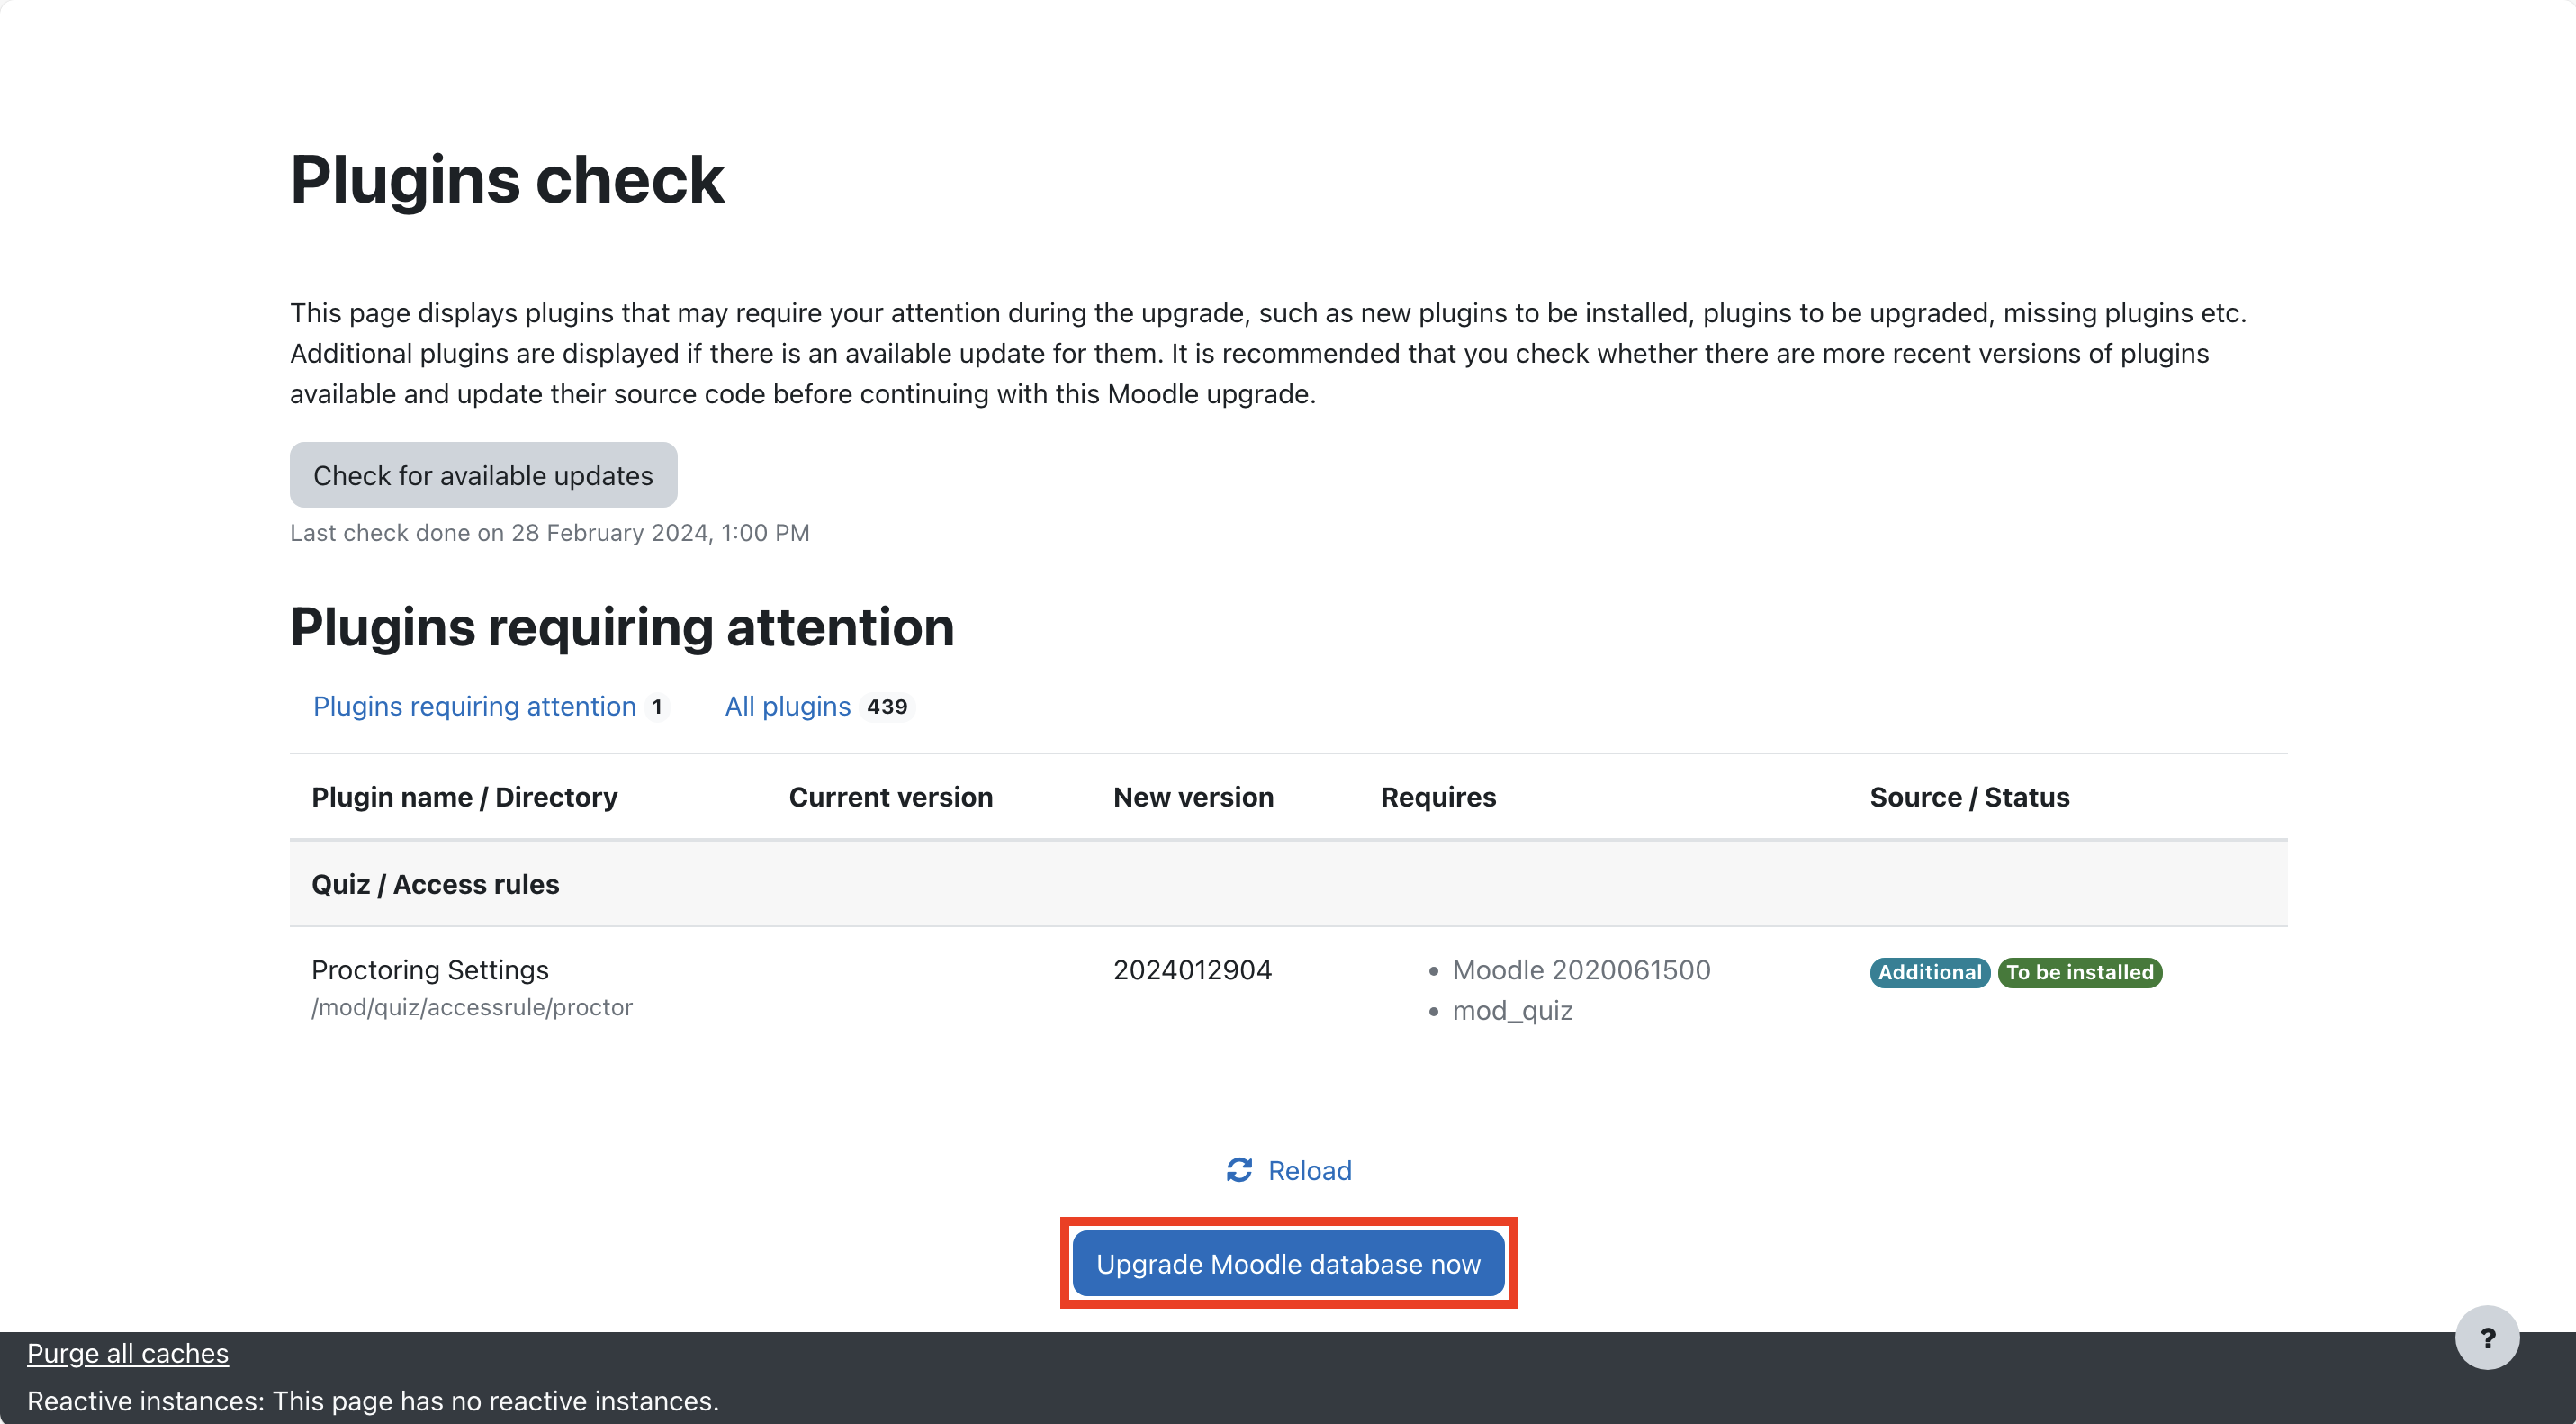
 * Next, click on **Upgrade Moodle database now** button.
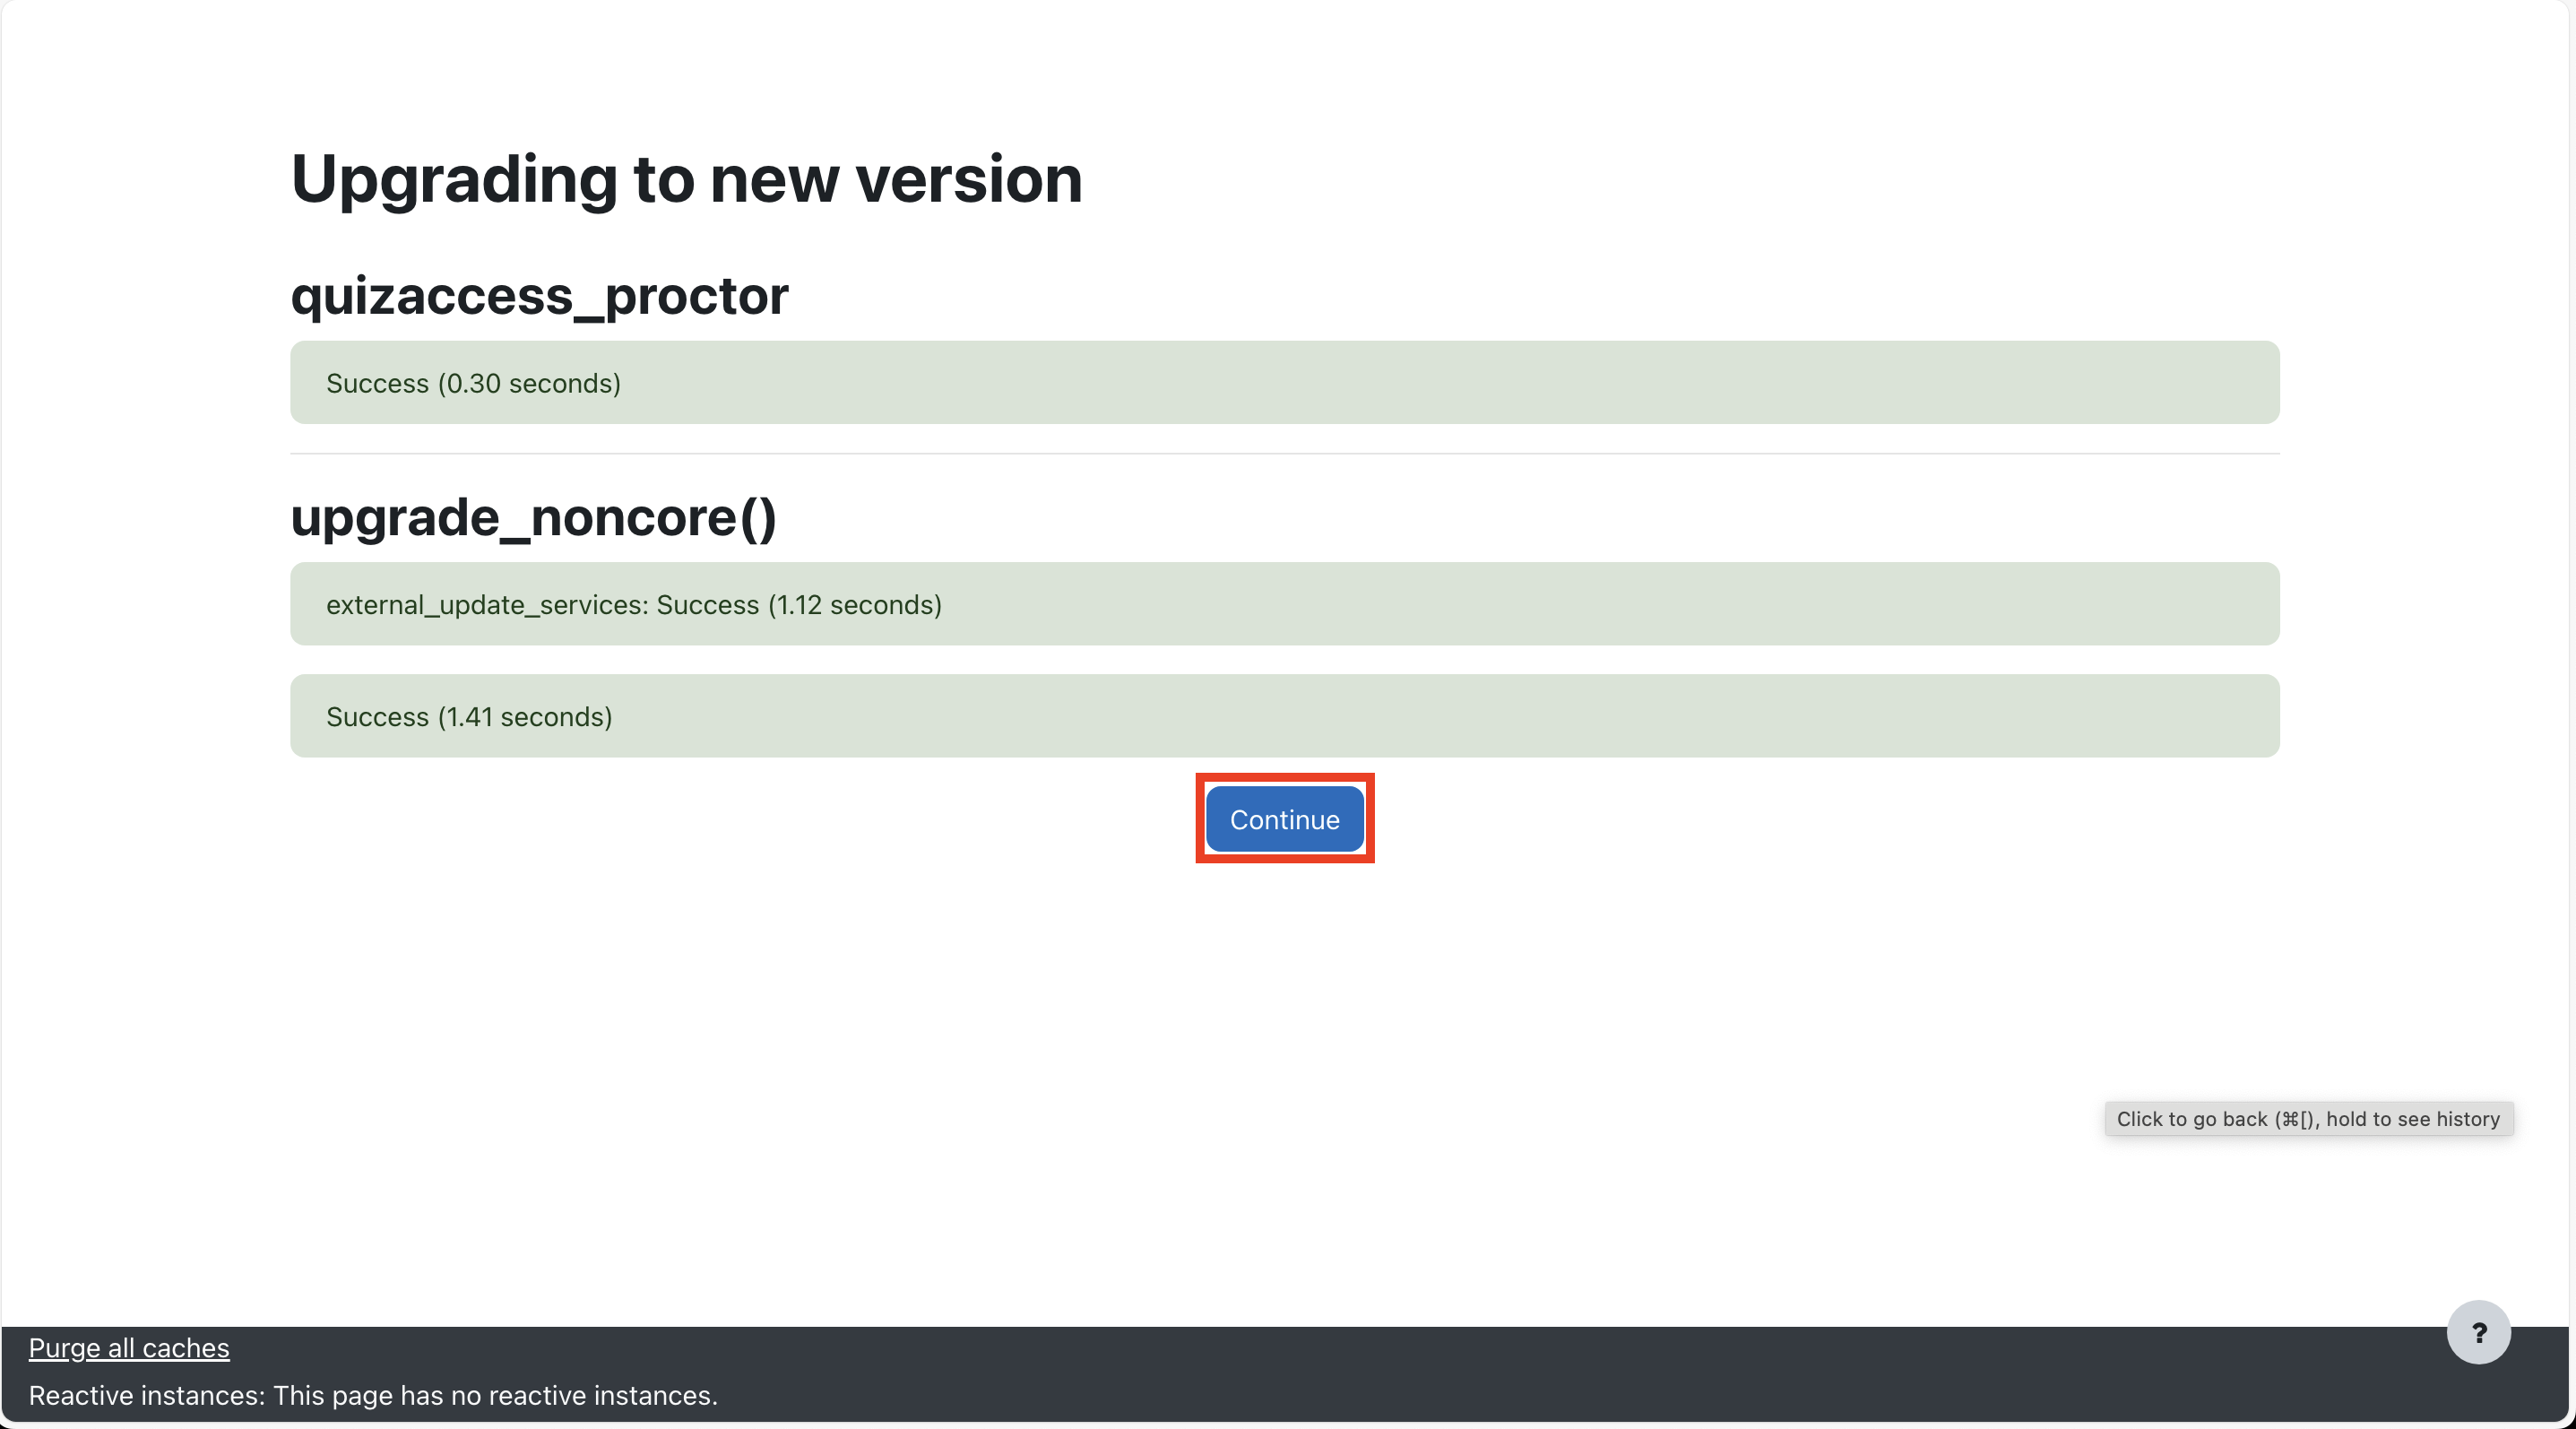
 * Next, click on **Continue** button.
 ### **5. Configuring the plugin settings**
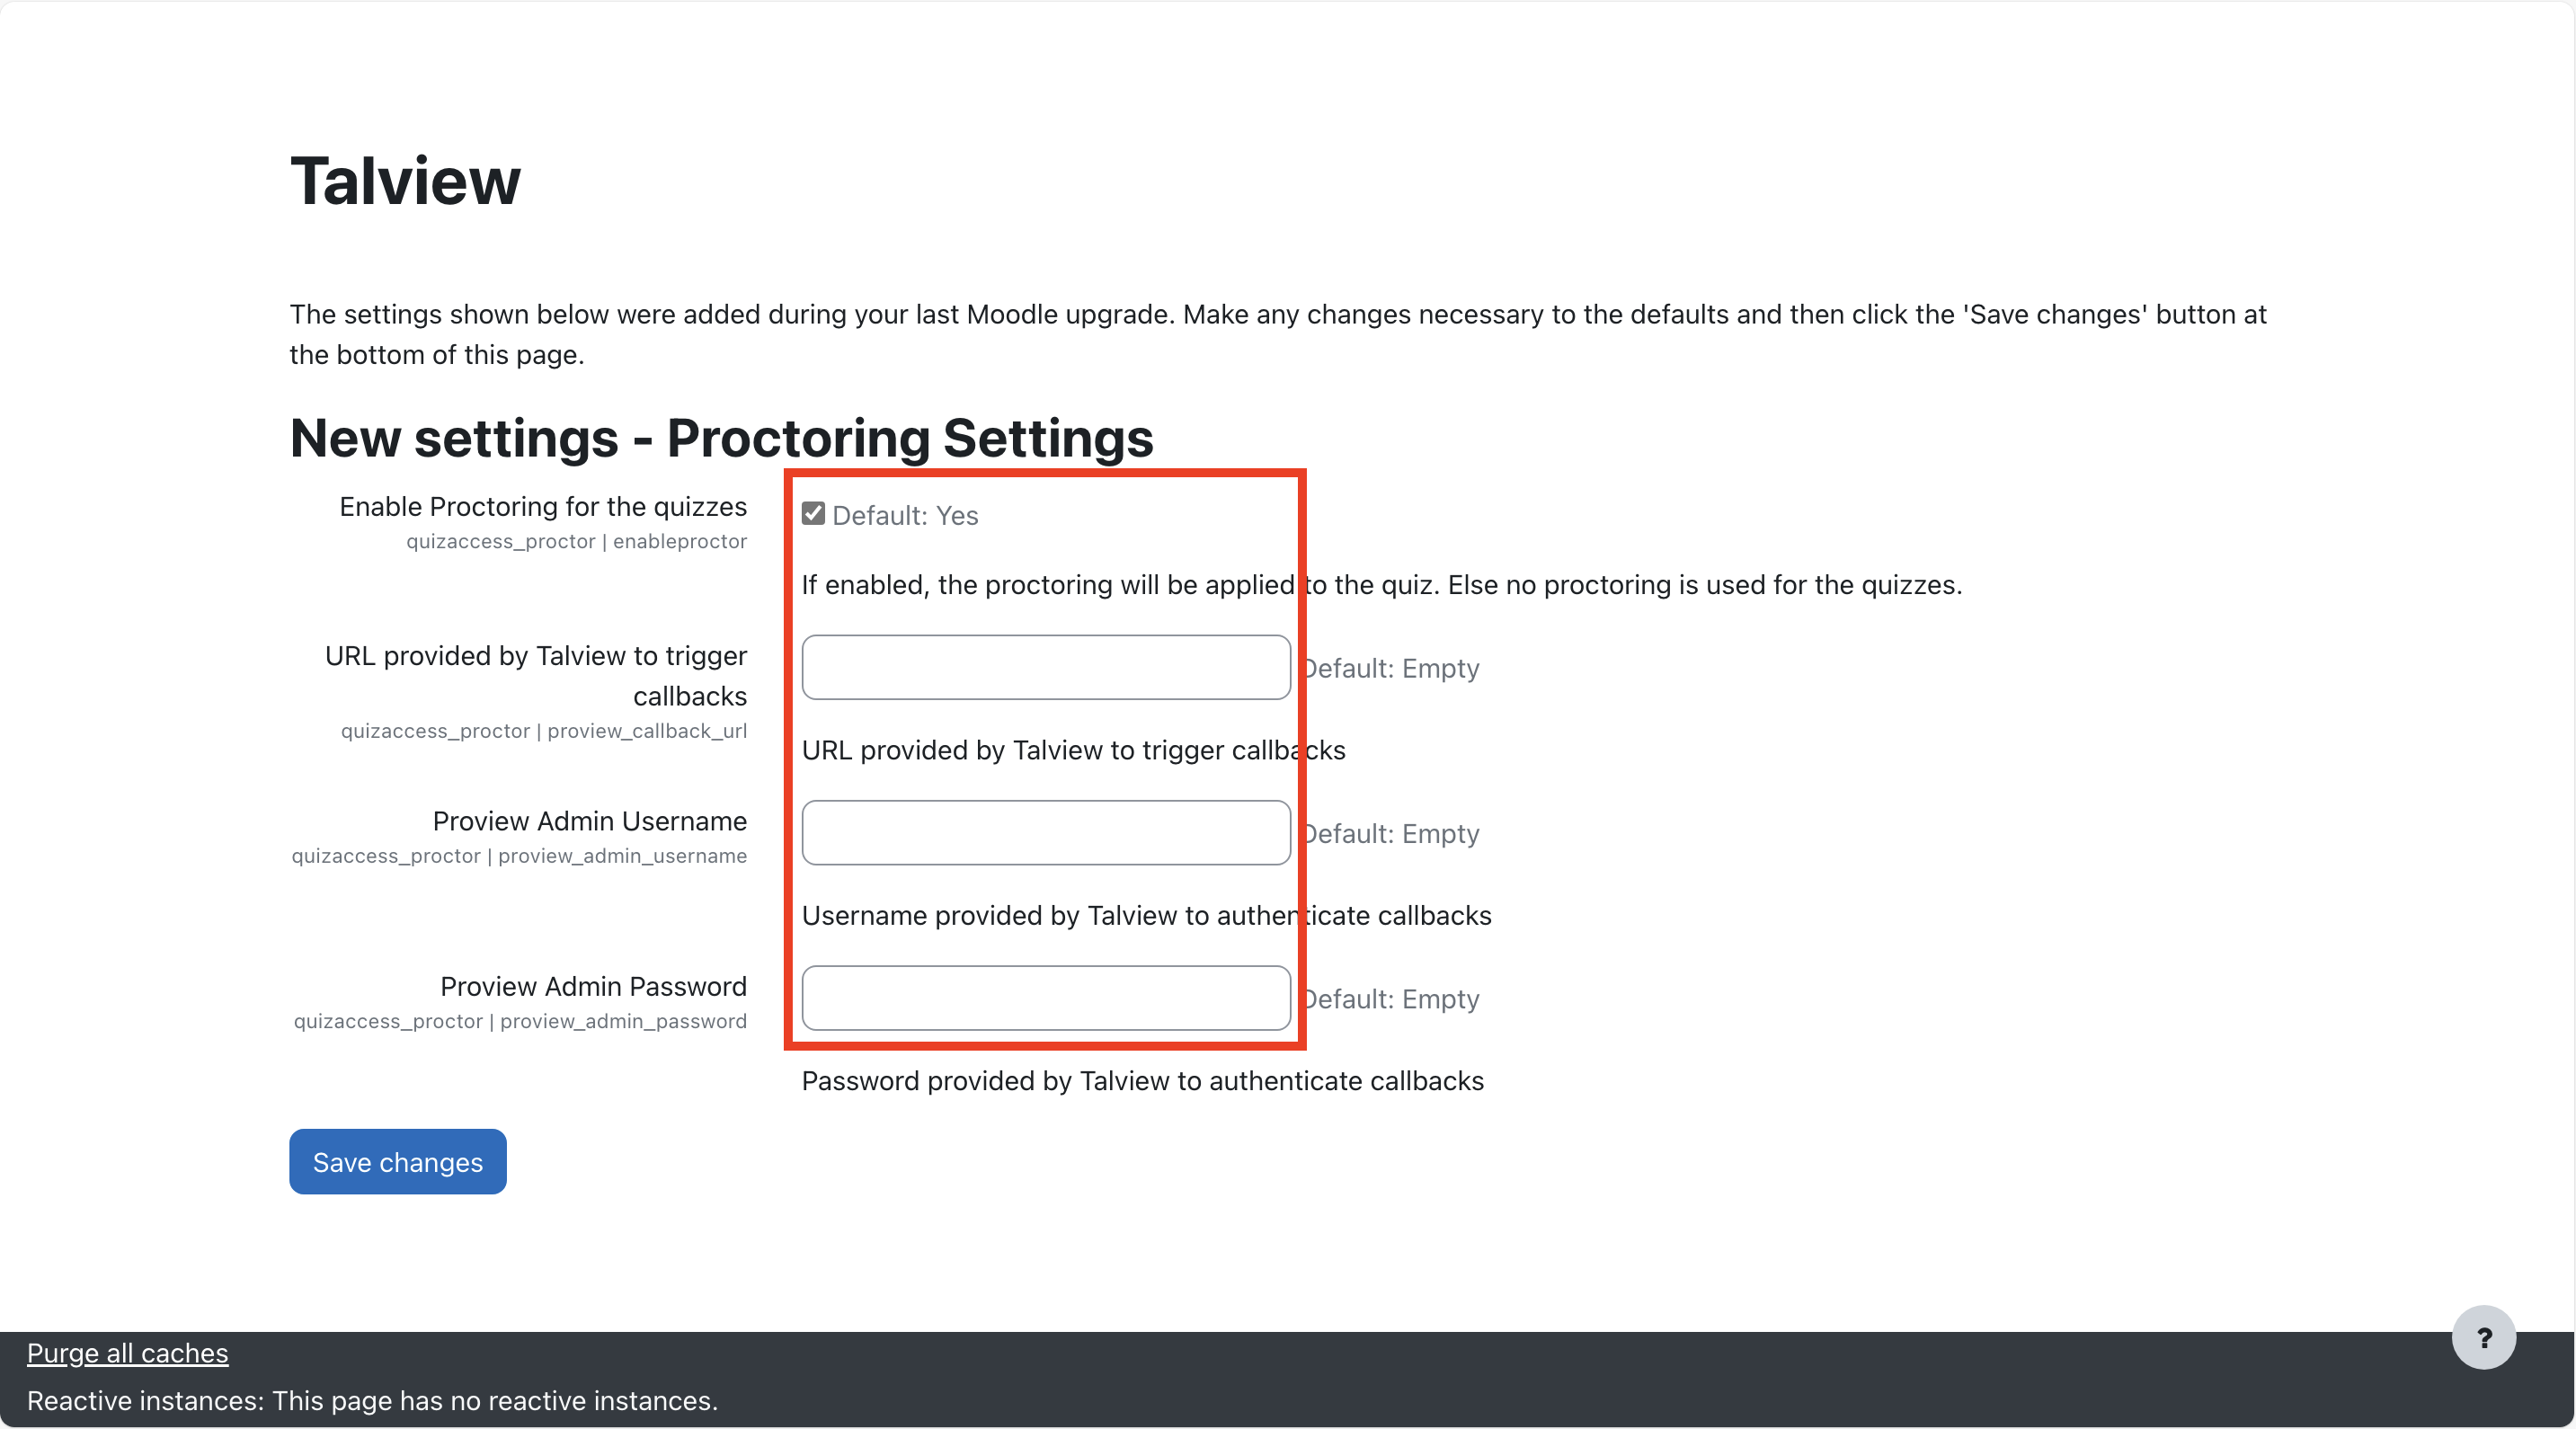
On the plugin settings page:
* **Enable configurations**: Enable configurations for the plugin by selecting the checkbox (Default Enabled).
* **Enter callback URL**:
* For Europe: `https://moodle-proview-api.talview.com`
* For Australia: `https://moodle-proview-api.talview.nz`
* **Input Authentication Details**:
* **Username**: Enter the username provided by Talview for authenticating the callbacks.
* **Password**: Provide the password provided by Talview for authenticating the callbacks.
* **Save Changes**: Once all configurations are finalized, click on the **Save Changes** button.
### **5. Configuring the plugin settings**
On the plugin settings page:
* **Enable configurations**: Enable configurations for the plugin by selecting the checkbox (Default Enabled).
* **Enter callback URL**:
* For Europe: `https://moodle-proview-api.talview.com`
* For Australia: `https://moodle-proview-api.talview.nz`
* **Input Authentication Details**:
* **Username**: Enter the username provided by Talview for authenticating the callbacks.
* **Password**: Provide the password provided by Talview for authenticating the callbacks.
* **Save Changes**: Once all configurations are finalized, click on the **Save Changes** button.
 ## Steps - **Local Proview Plugin**
Install the “local proview” plugin second
### **1. Accessing site administration**
* Log in to Moodle as an admin. In the admin view, go to **Site Administration**.
## Steps - **Local Proview Plugin**
Install the “local proview” plugin second
### **1. Accessing site administration**
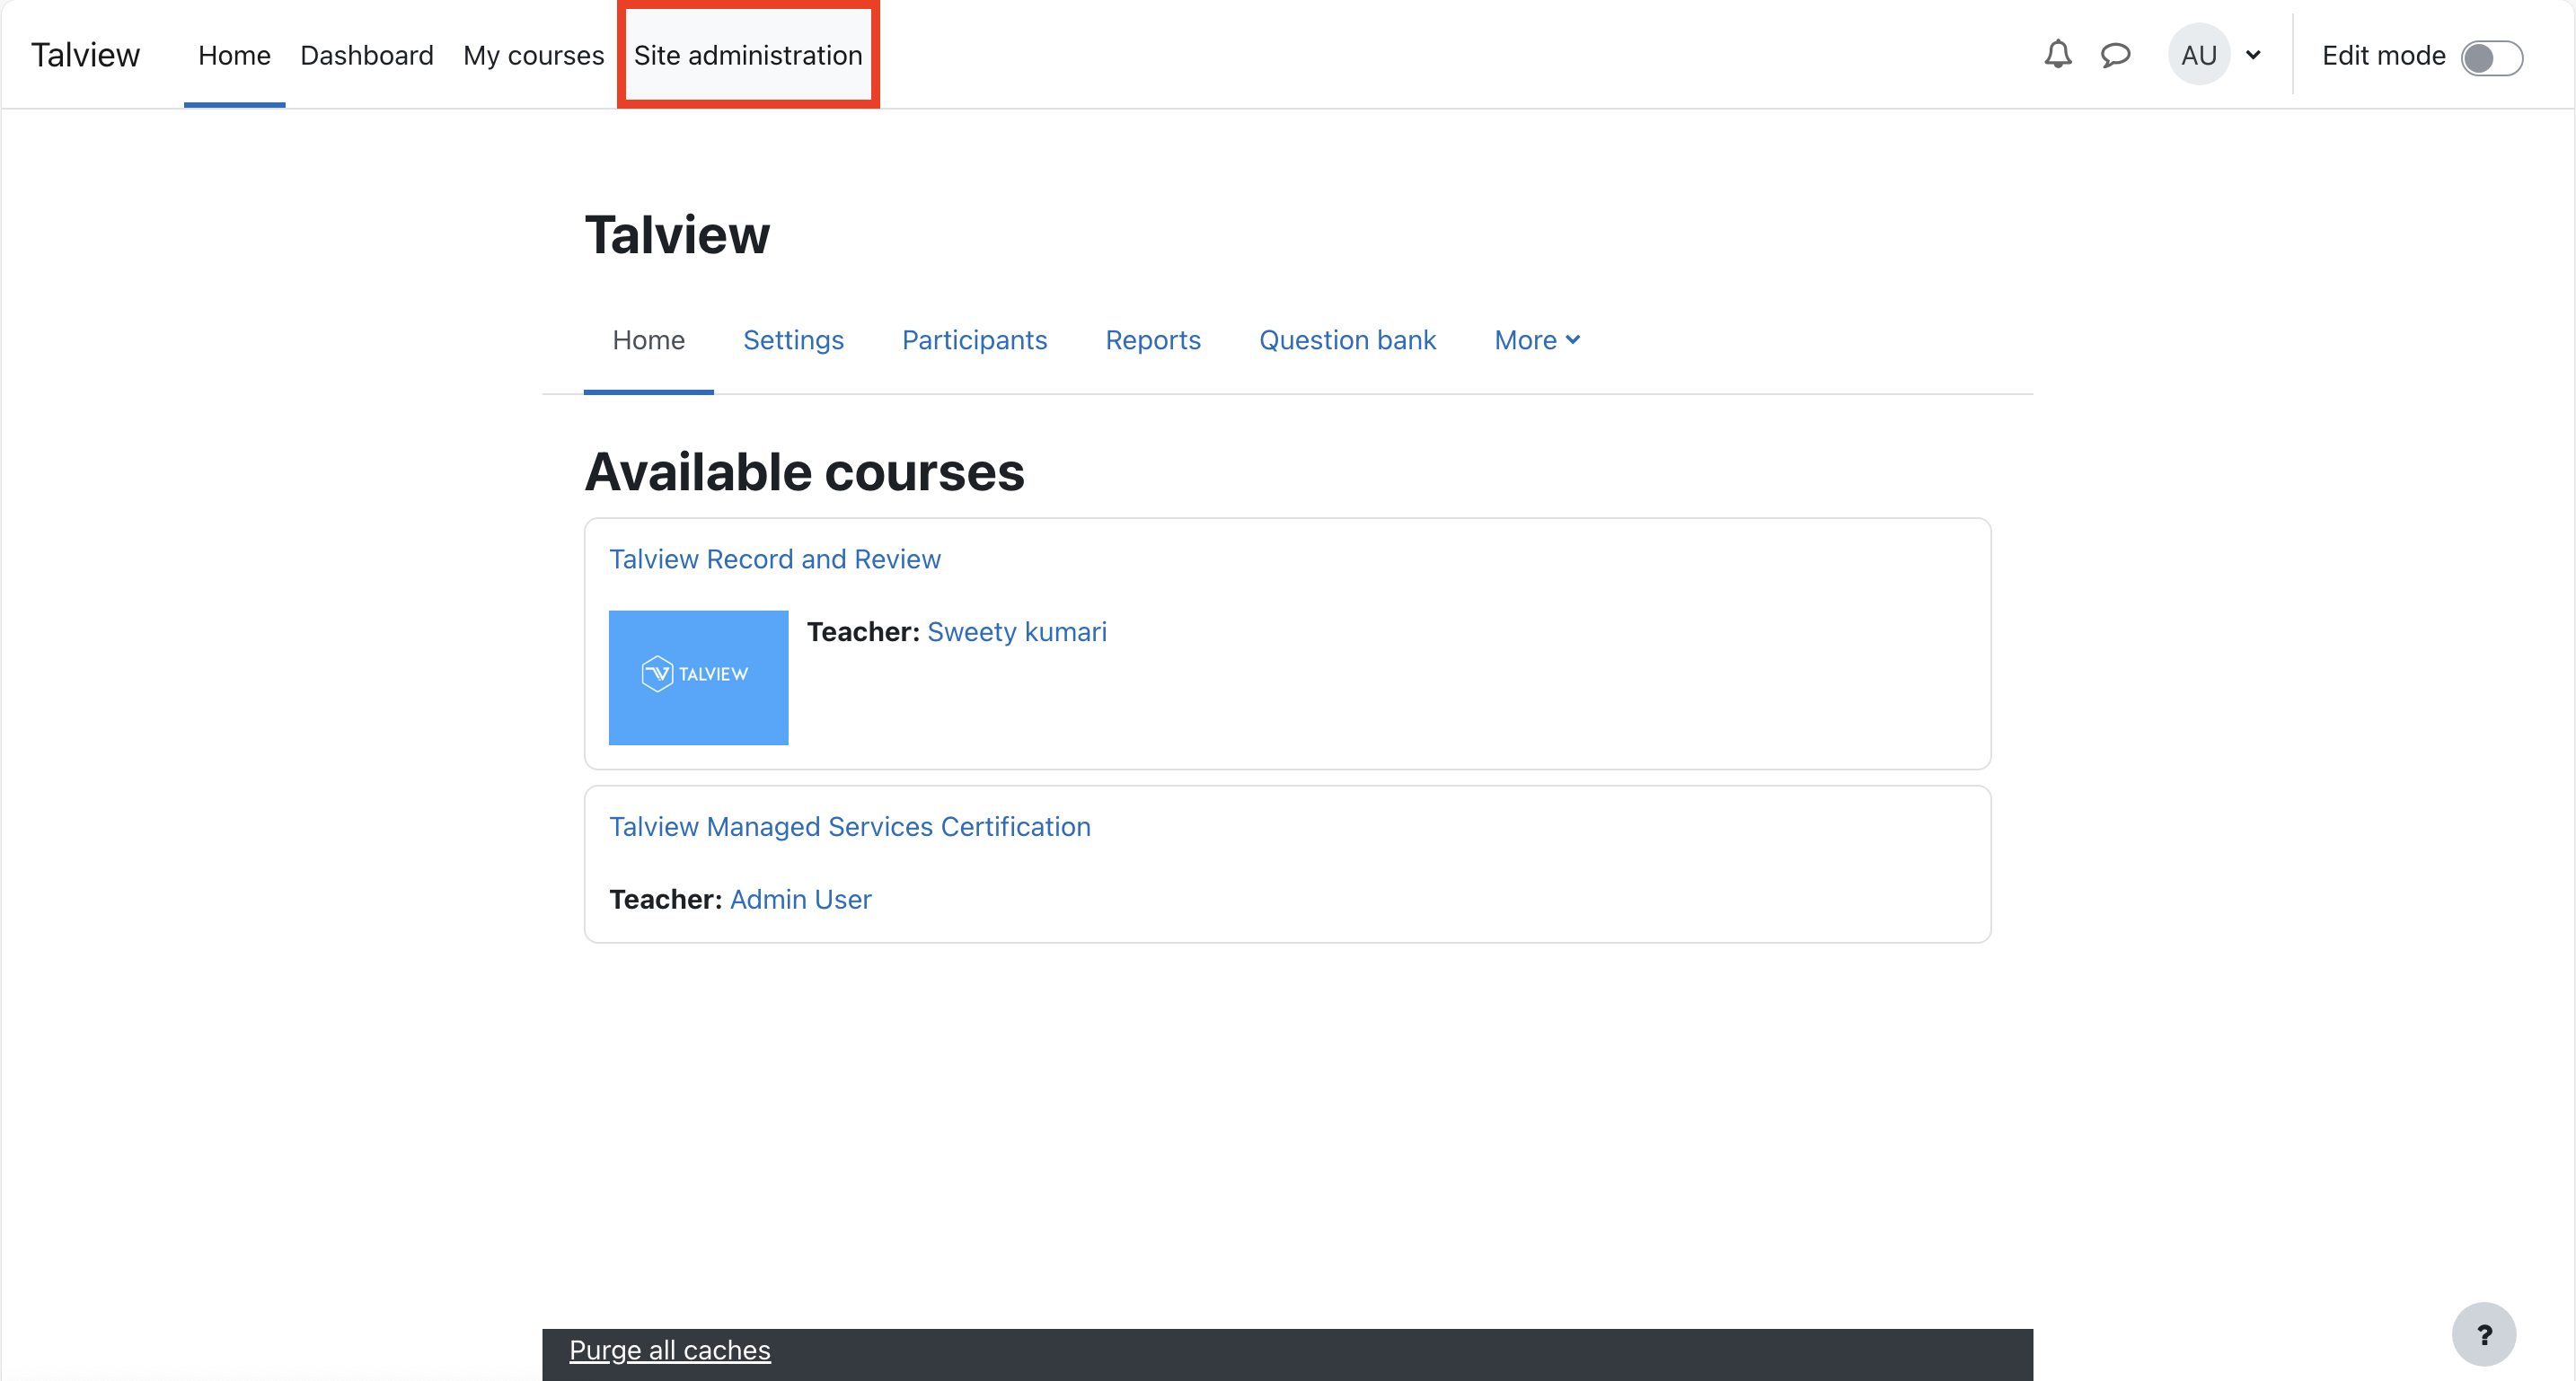
* Log in to Moodle as an admin. In the admin view, go to **Site Administration**.
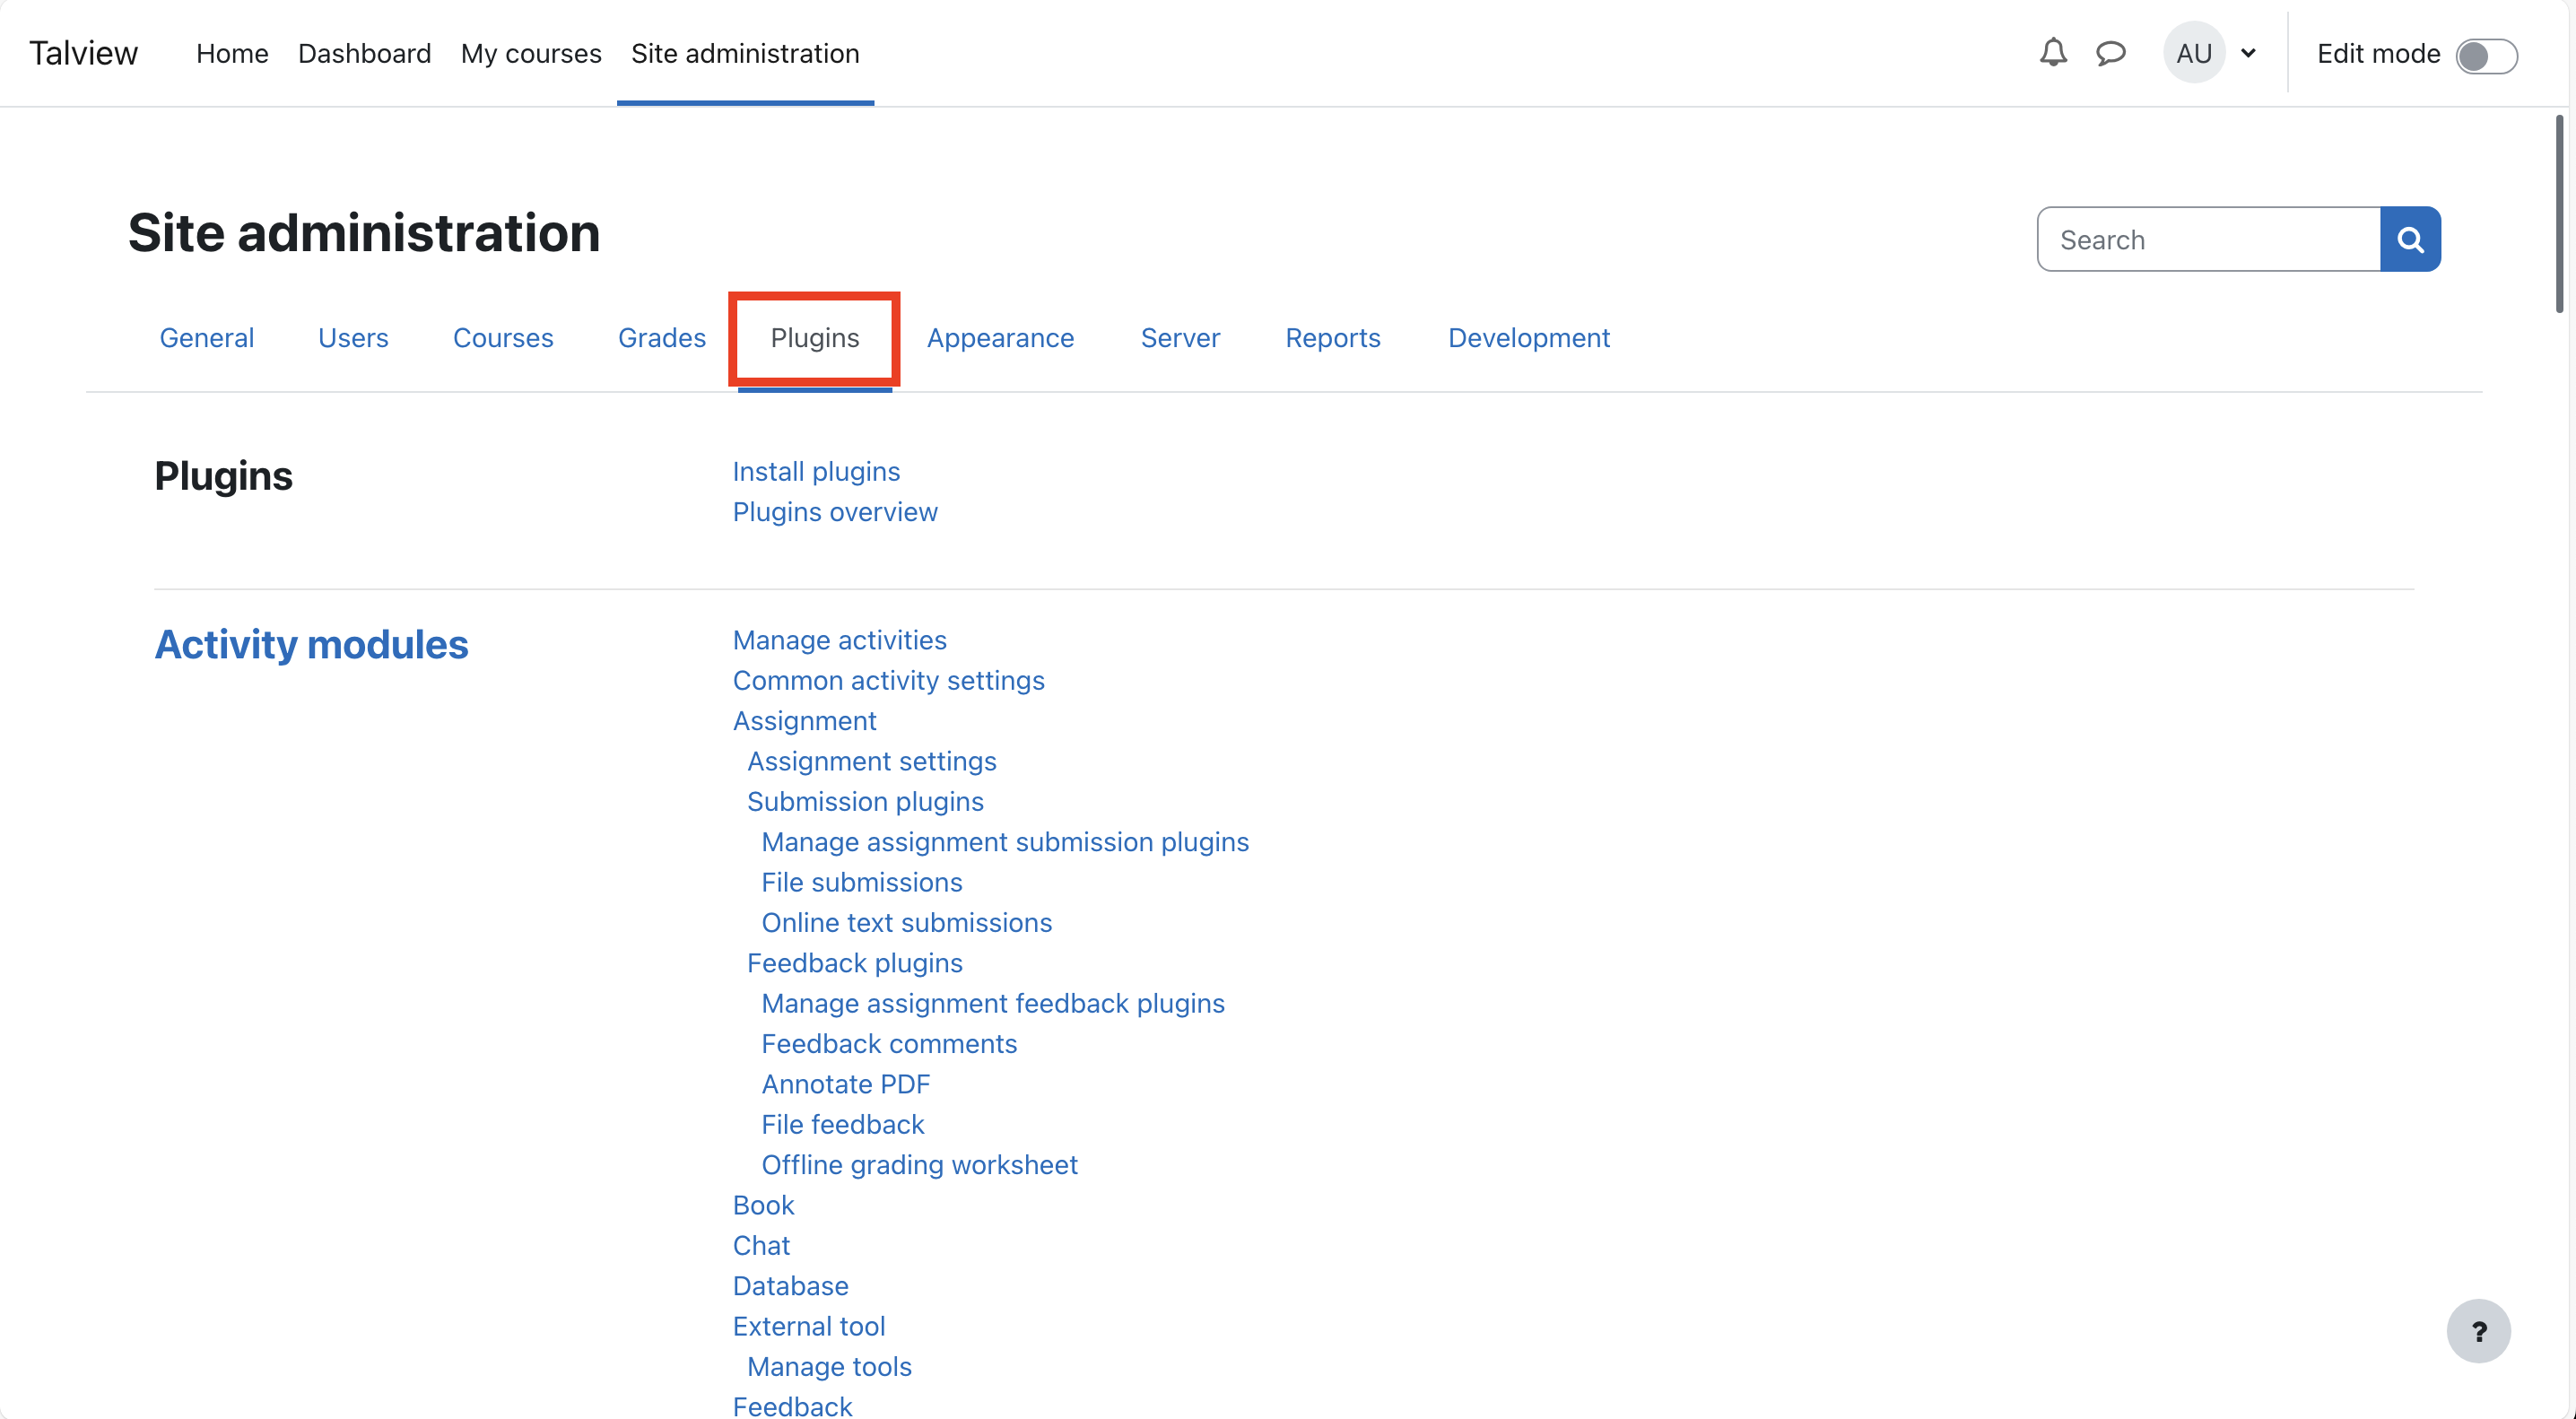
 ### **2. Installing the plugin**
* Click on **Plugins** in the Site Administration menu.
* Choose **Install Plugin** from the plugin options.
### **2. Installing the plugin**
* Click on **Plugins** in the Site Administration menu.
* Choose **Install Plugin** from the plugin options.
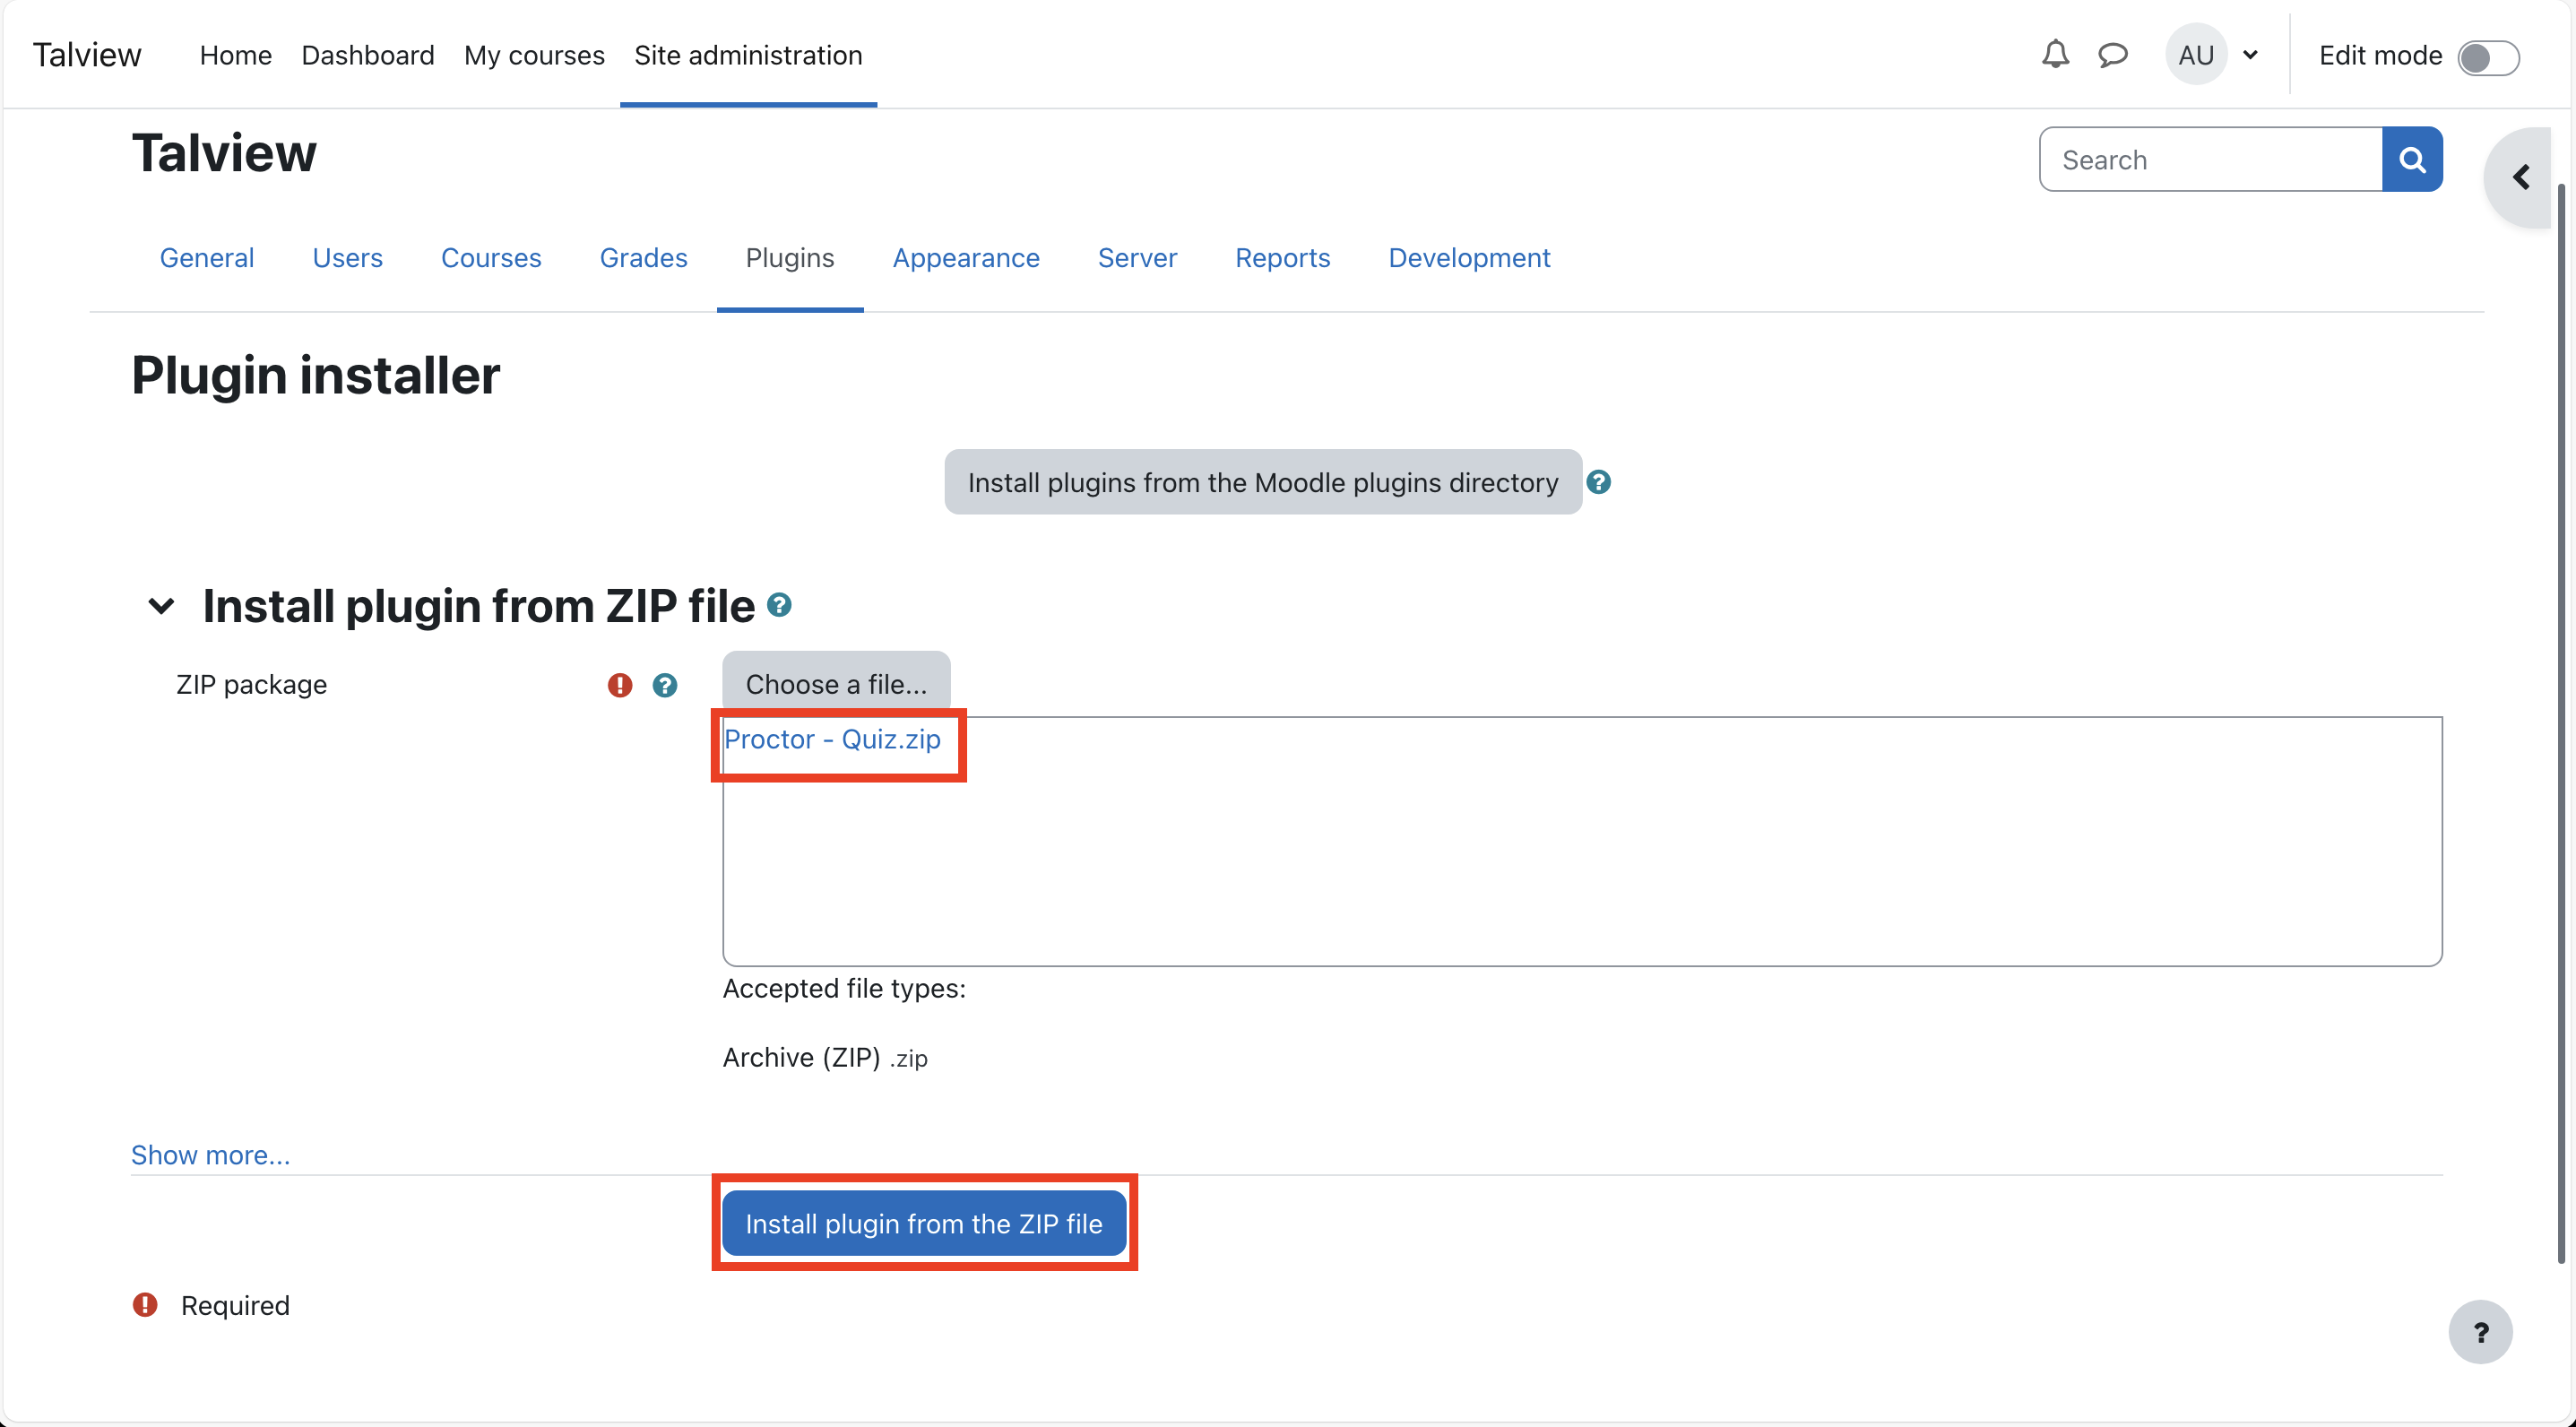
 ### **3. Downloading and uploading the plugin**
* Download the latest plugin from [https://github.com/talview/moodle-local\_proview/releases/tag/v3.3.11-local-proview](https://github.com/talview/moodle-local_proview/releases/tag/v3.3.11-local-proview)
* Use the **File Picker** option to upload the downloaded plugin zip file. Once uploaded, click on **Install Plugin from ZIP file**.
### **3. Downloading and uploading the plugin**
* Download the latest plugin from [https://github.com/talview/moodle-local\_proview/releases/tag/v3.3.11-local-proview](https://github.com/talview/moodle-local_proview/releases/tag/v3.3.11-local-proview)
* Use the **File Picker** option to upload the downloaded plugin zip file. Once uploaded, click on **Install Plugin from ZIP file**.
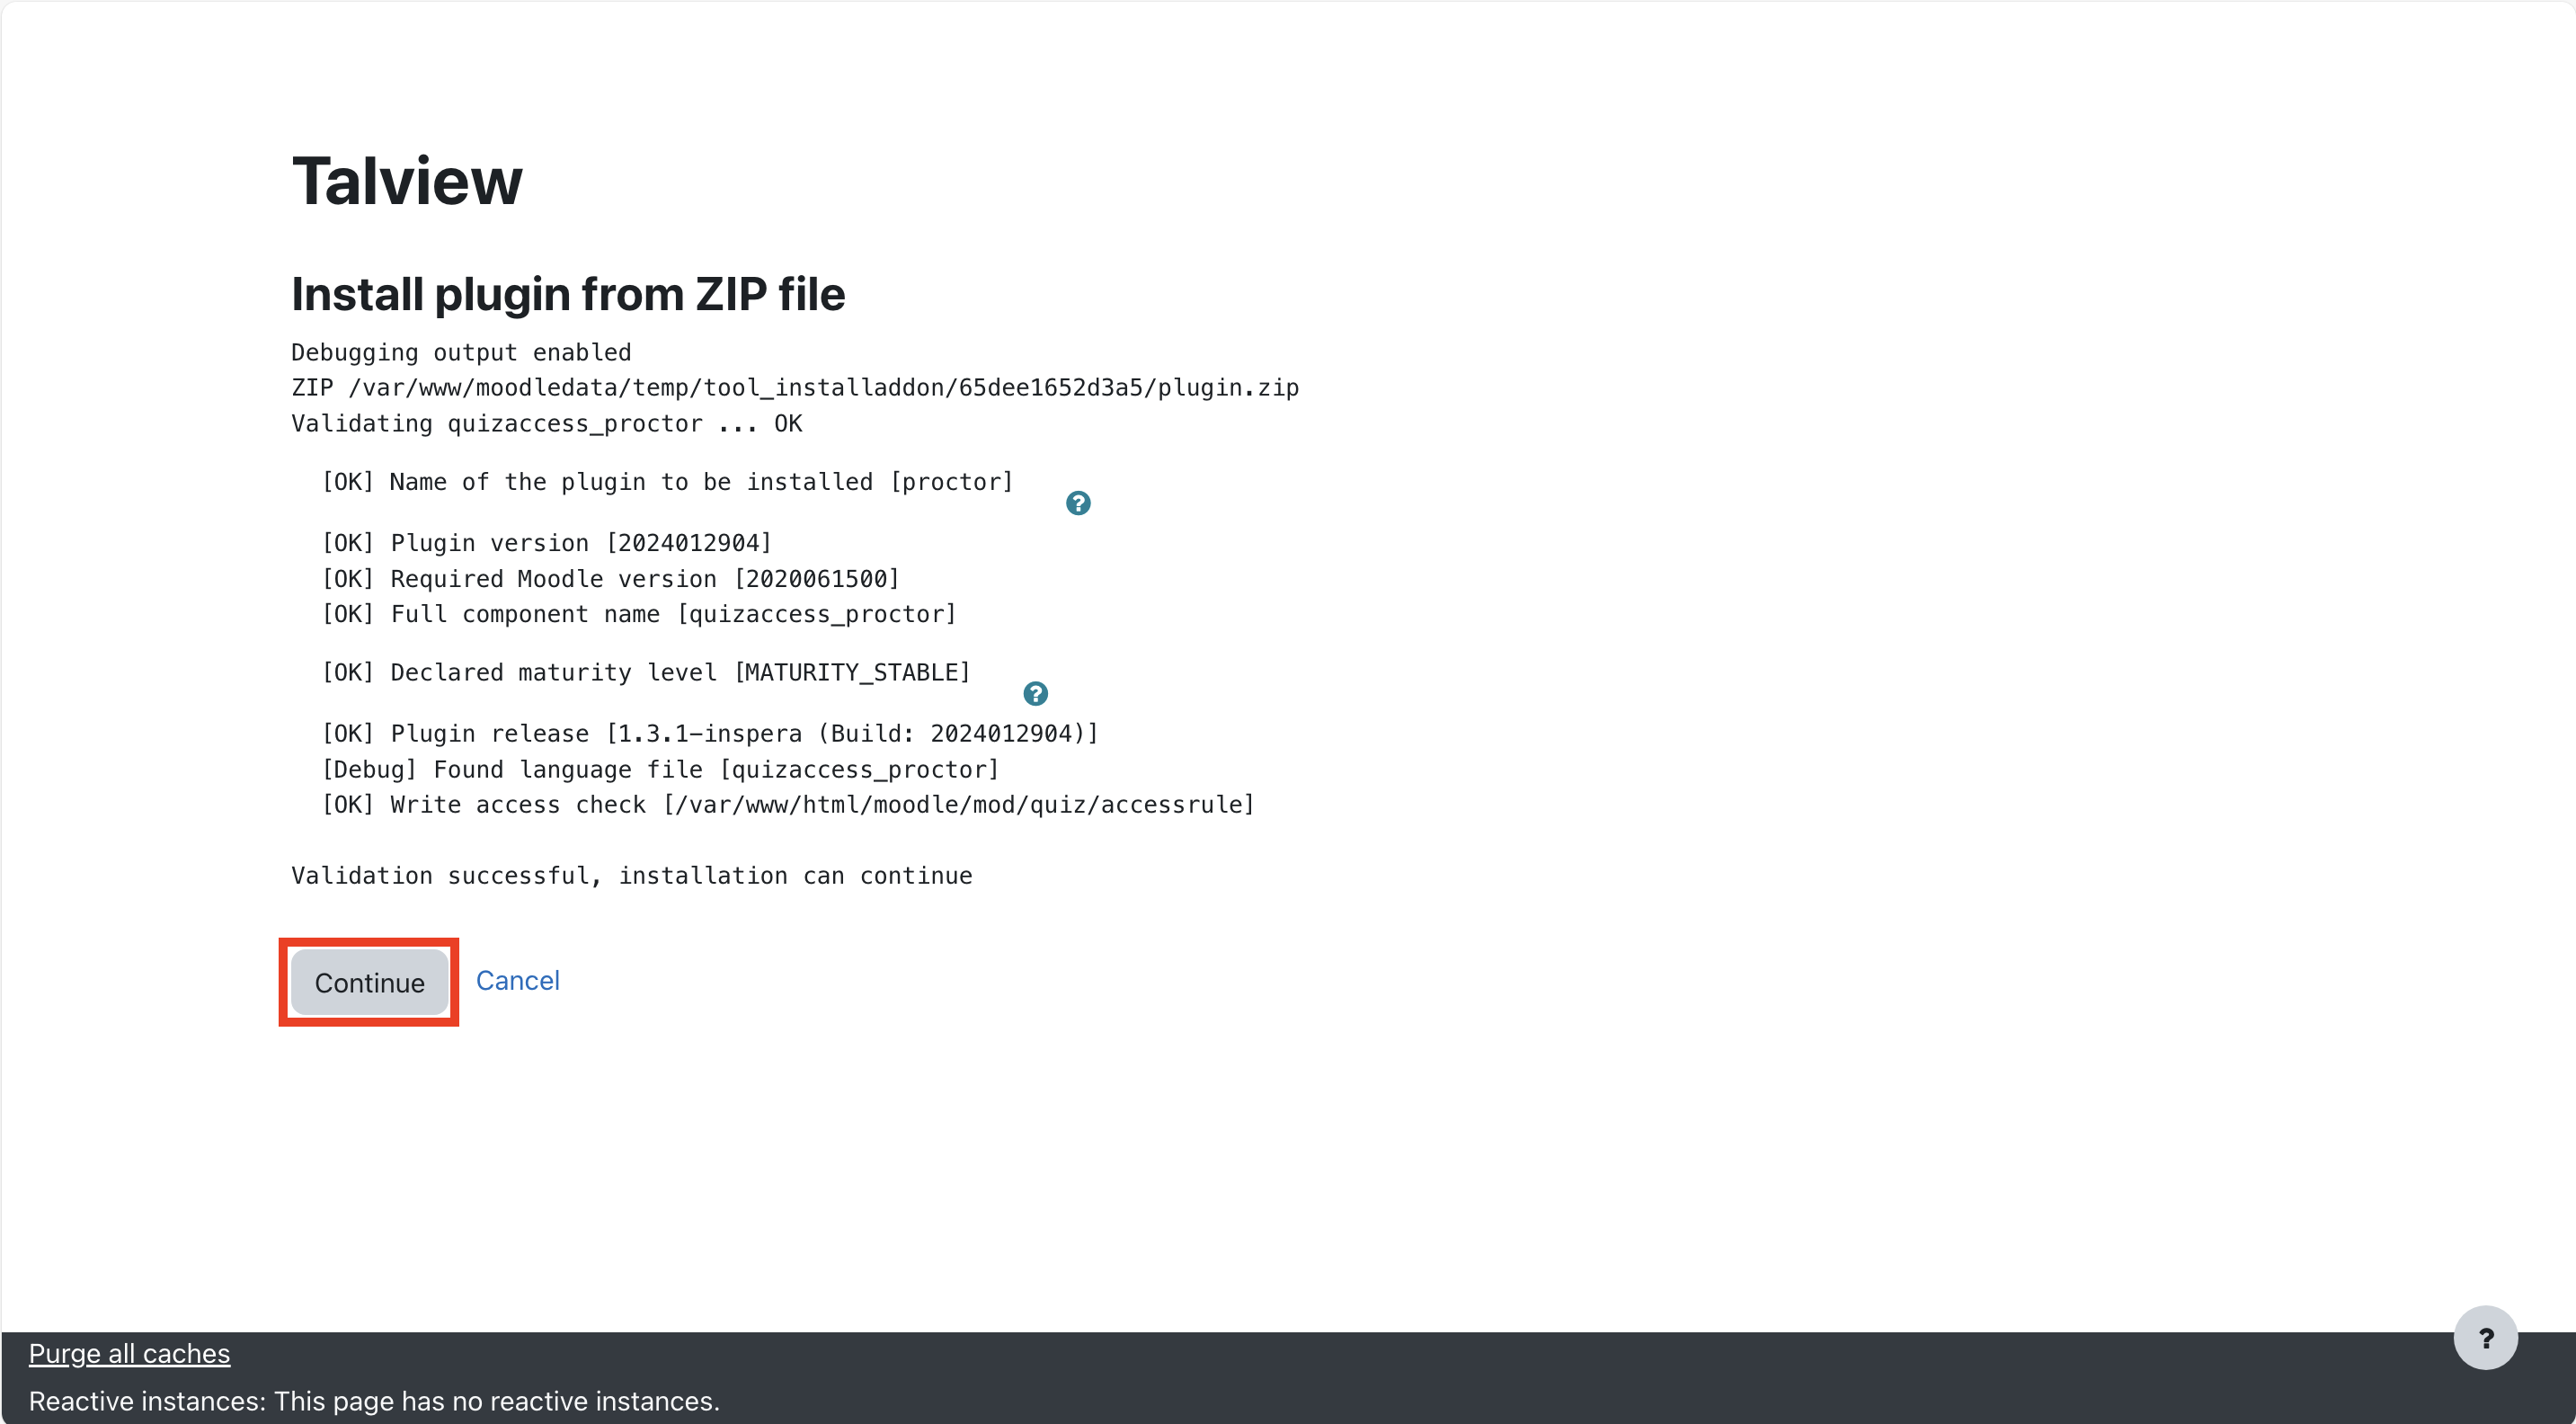
 ### **4. Validating and continuing installation**
* You will see a message stating "Validation successful, installation can continue". Click on the **Continue** button.
### **4. Validating and continuing installation**
* You will see a message stating "Validation successful, installation can continue". Click on the **Continue** button.
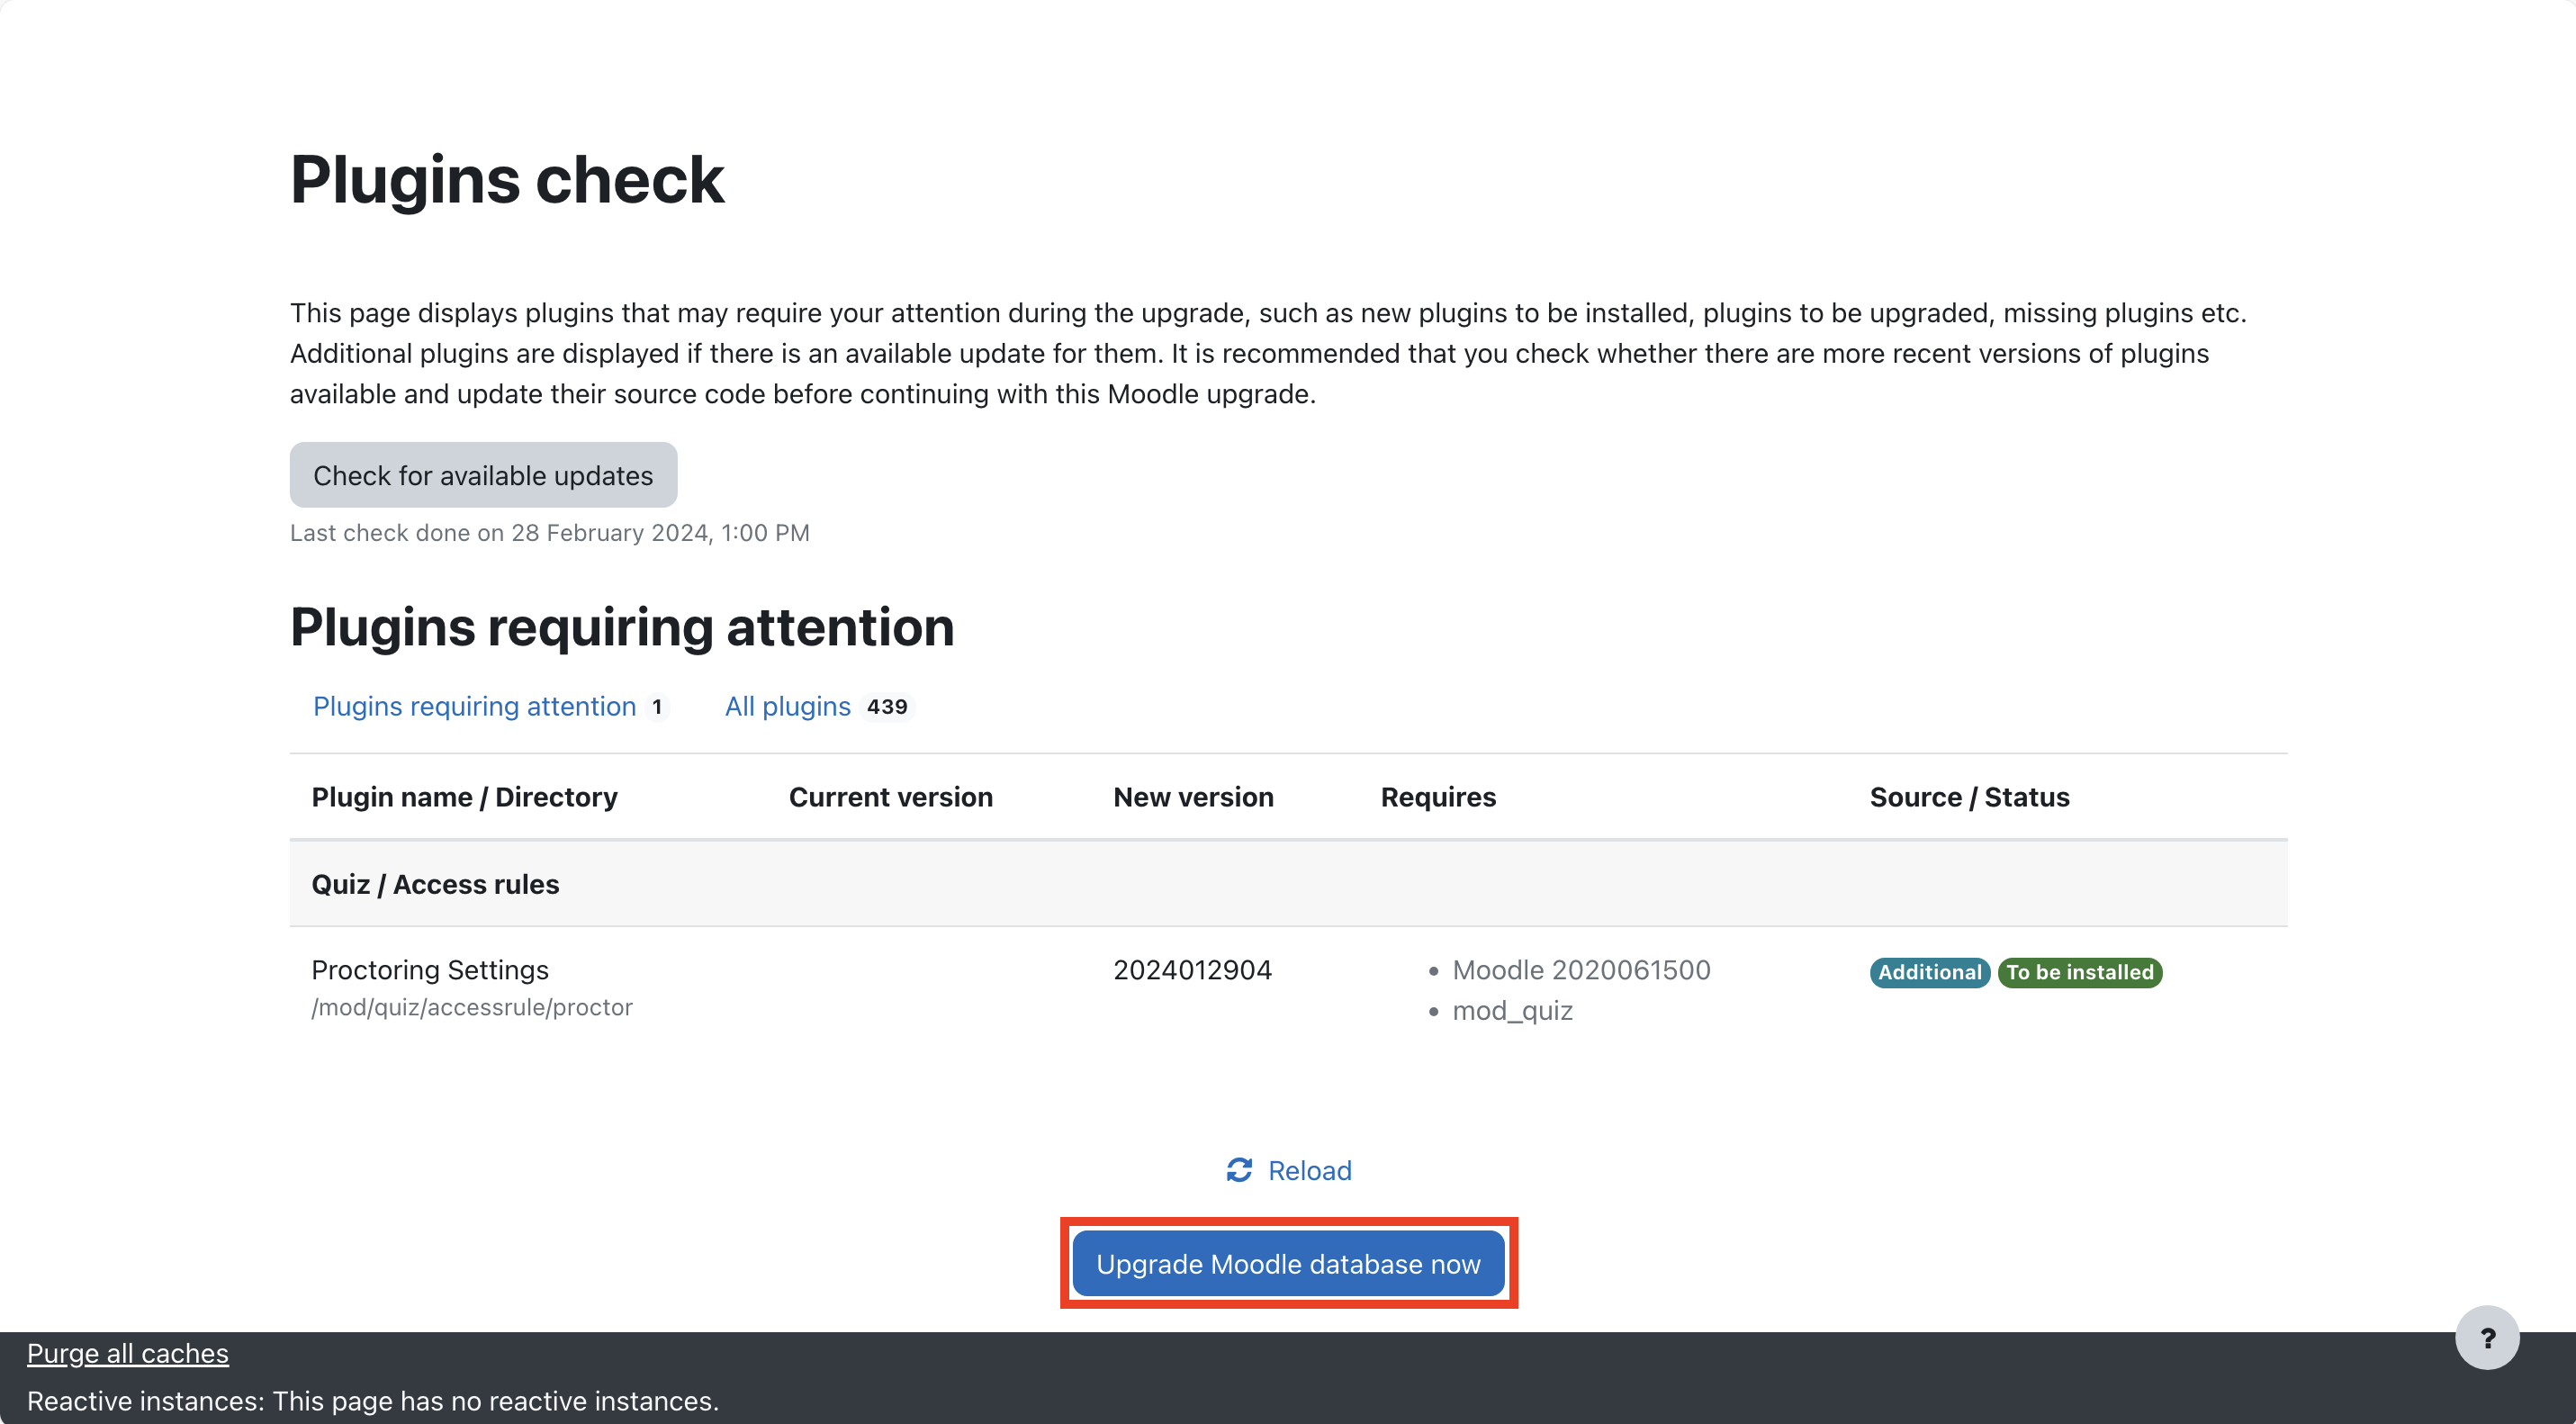
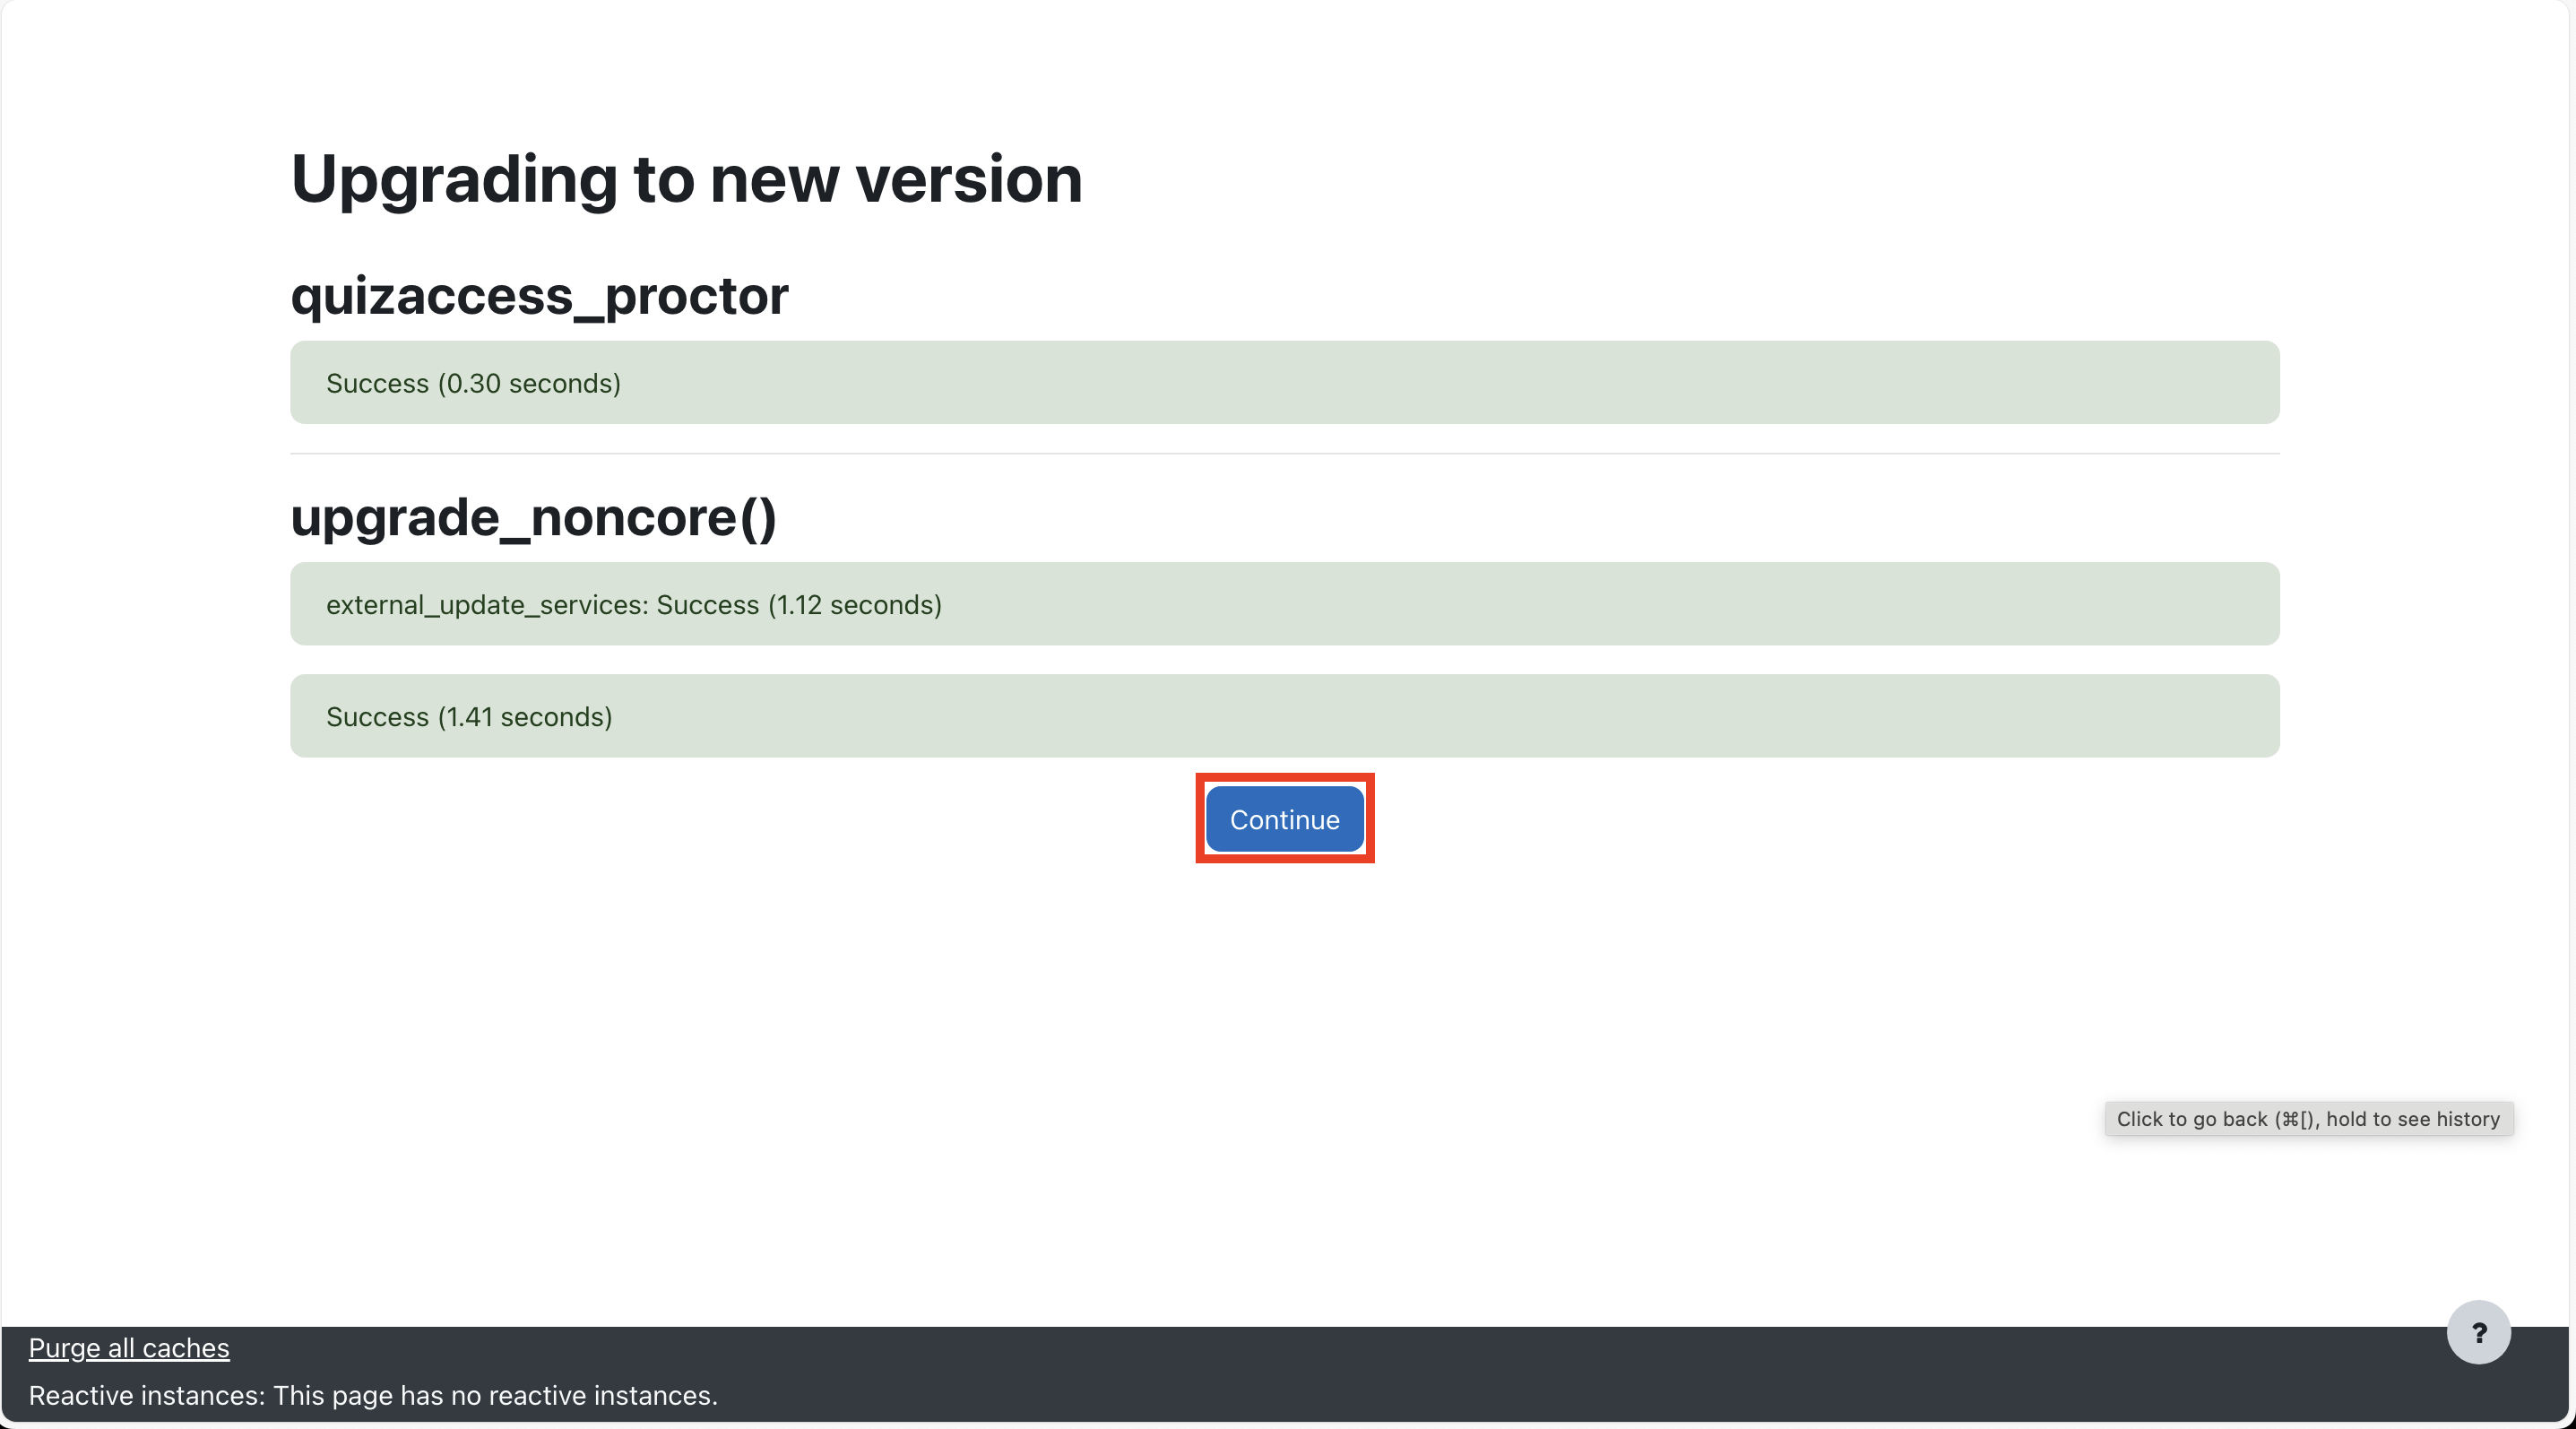
 * Next, click on **Upgrade Moodle database now** button.
 * Next, click on **Continue** button.
 ### **5. Configuring the Plugin Settings**
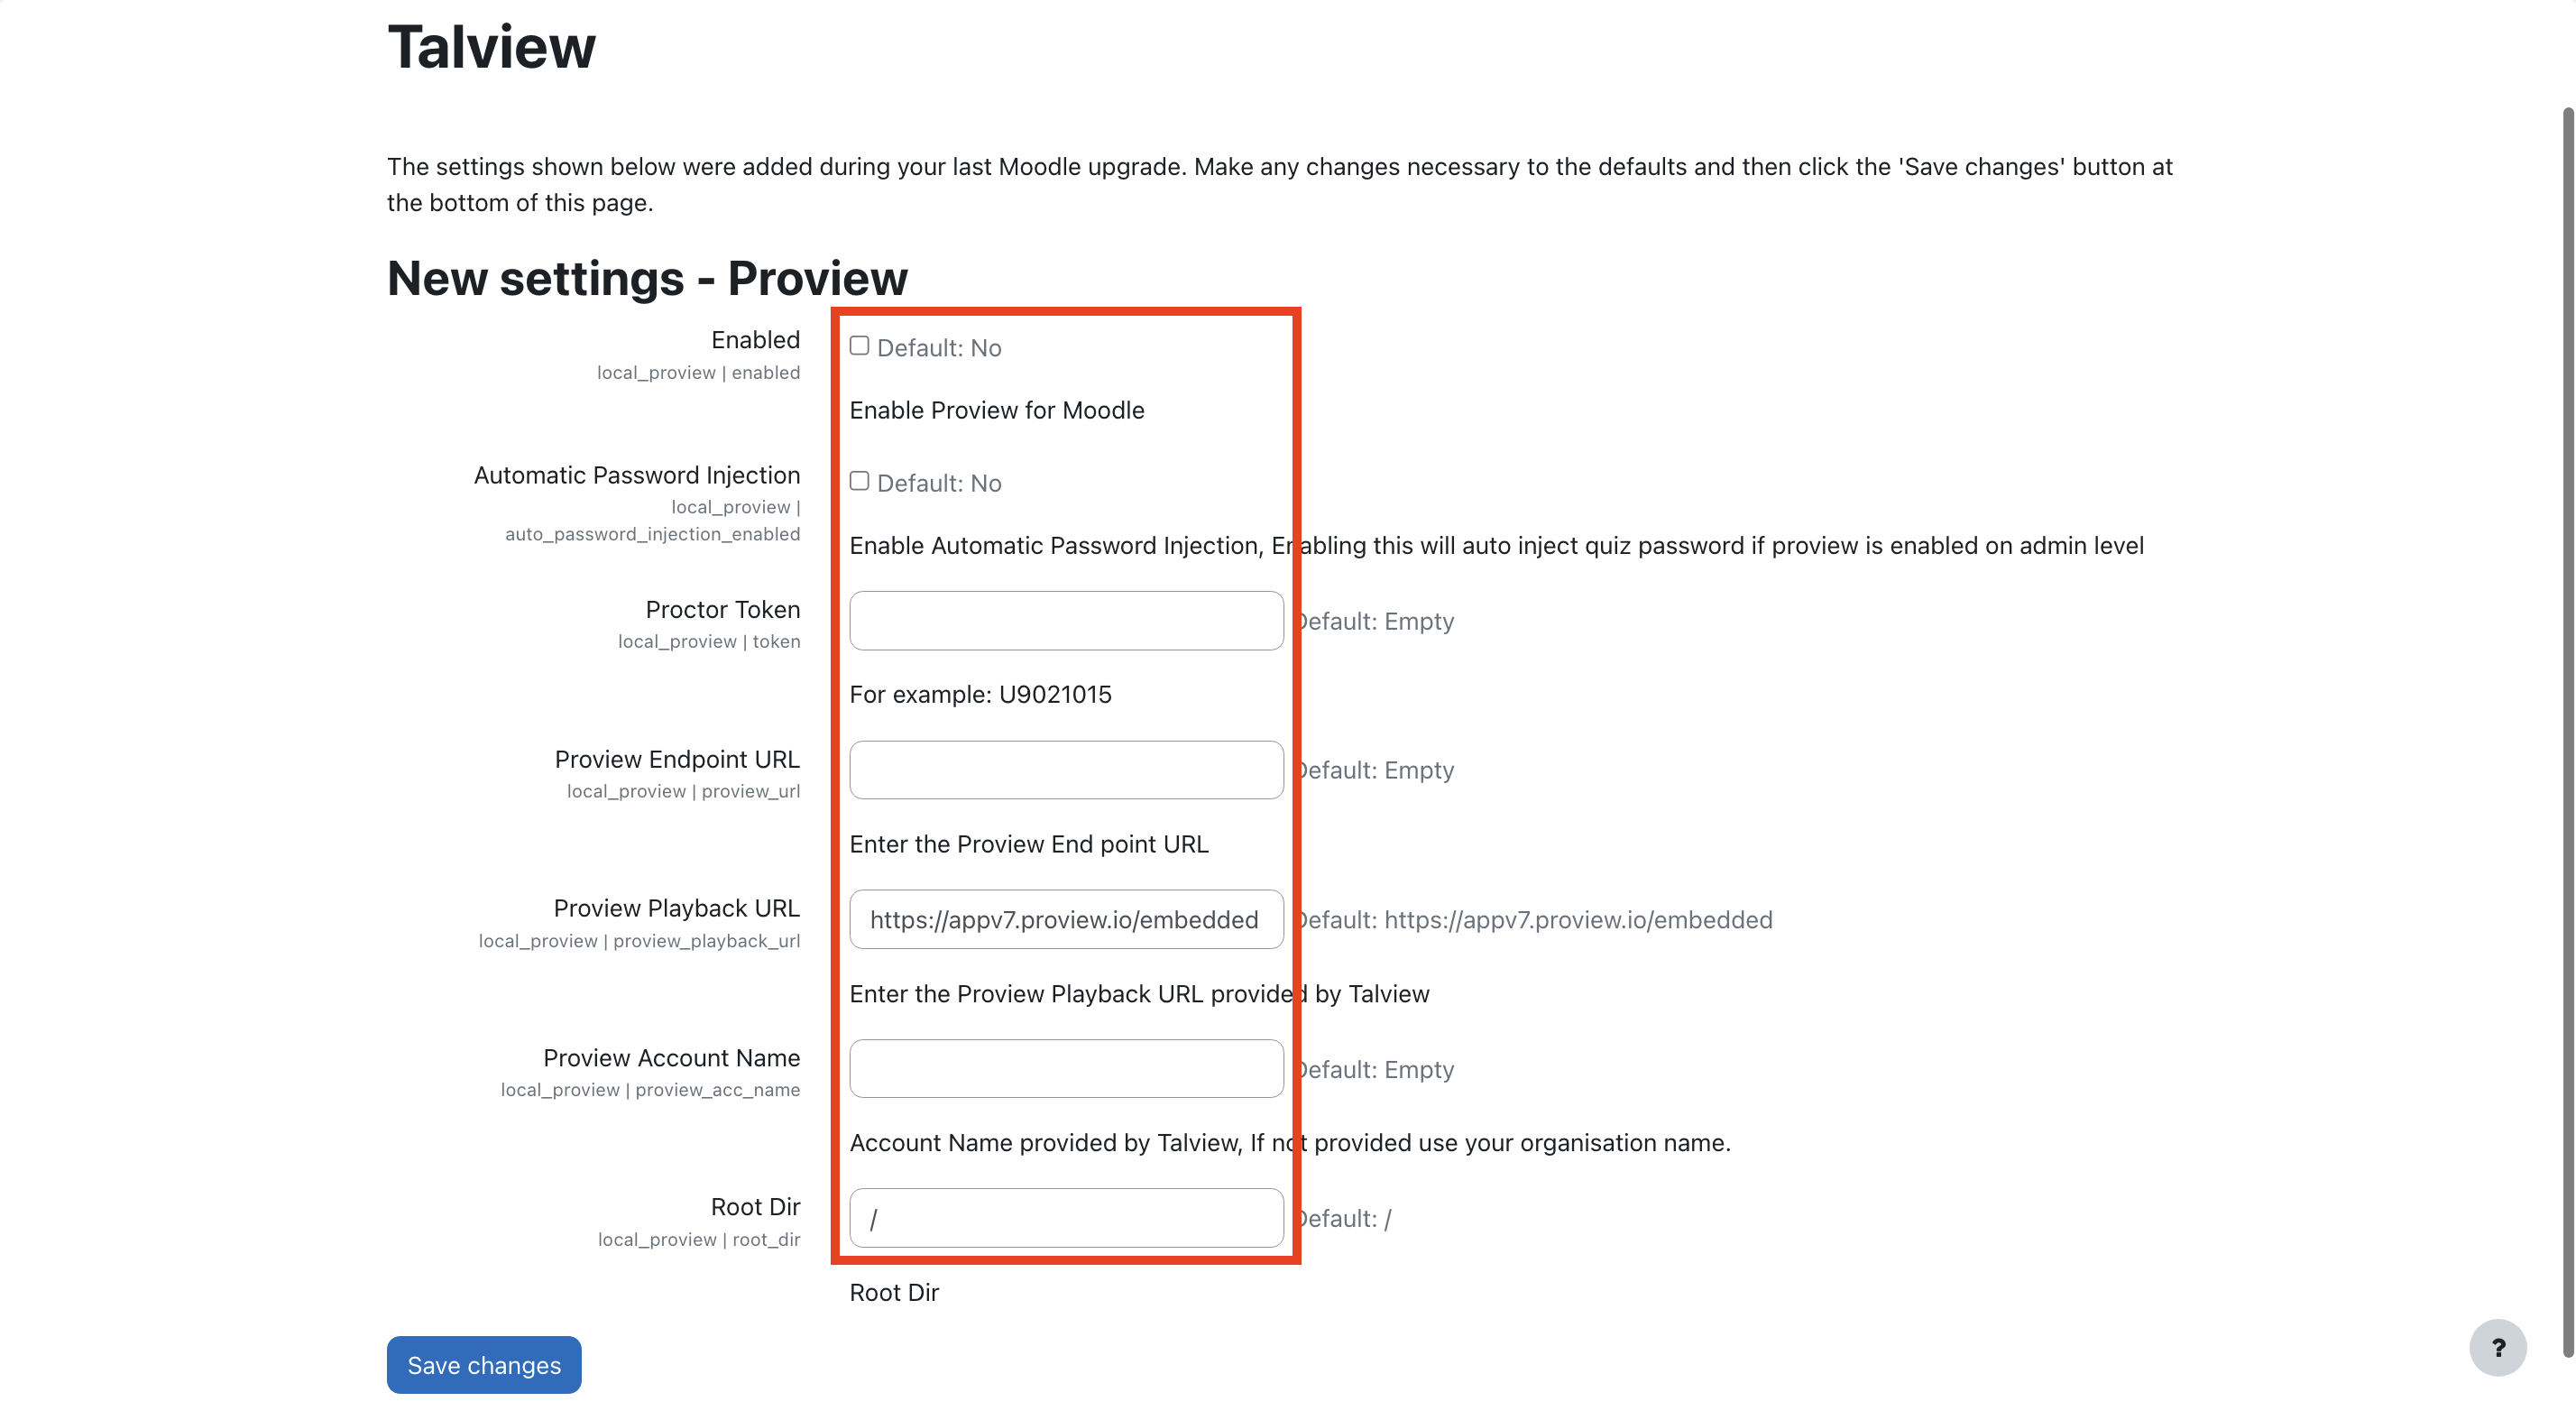
On the plugin settings page:
* **Enable Proview**: Check the checkbox to enable Proview (Default Disabled).
* **Enter Proctor Token**: Input the Proctor Token provided by Talview (subscription-based).
* **Enter CDN URL**: Input the CDN URL provided by Talview (subscription-based).
* **Enter Account Name**: Input the Account Name provided by Talview.
* **Update Root Directory**:
* **Root Directory Configuration**: Update the `root_dir` to match the root directory of your Moodle installation.
* **Examples**:
* If you access Moodle using a URL like `https://example.domain.com/`, the root directory is `/` and no additional configuration is required.
* If you access Moodle using a URL like `https://example.domain.com/moodle/`, the root directory is `/moodle/` and must be configured accordingly in the `root_dir` field during the Proview installation process.
### **5. Configuring the Plugin Settings**
On the plugin settings page:
* **Enable Proview**: Check the checkbox to enable Proview (Default Disabled).
* **Enter Proctor Token**: Input the Proctor Token provided by Talview (subscription-based).
* **Enter CDN URL**: Input the CDN URL provided by Talview (subscription-based).
* **Enter Account Name**: Input the Account Name provided by Talview.
* **Update Root Directory**:
* **Root Directory Configuration**: Update the `root_dir` to match the root directory of your Moodle installation.
* **Examples**:
* If you access Moodle using a URL like `https://example.domain.com/`, the root directory is `/` and no additional configuration is required.
* If you access Moodle using a URL like `https://example.domain.com/moodle/`, the root directory is `/moodle/` and must be configured accordingly in the `root_dir` field during the Proview installation process.
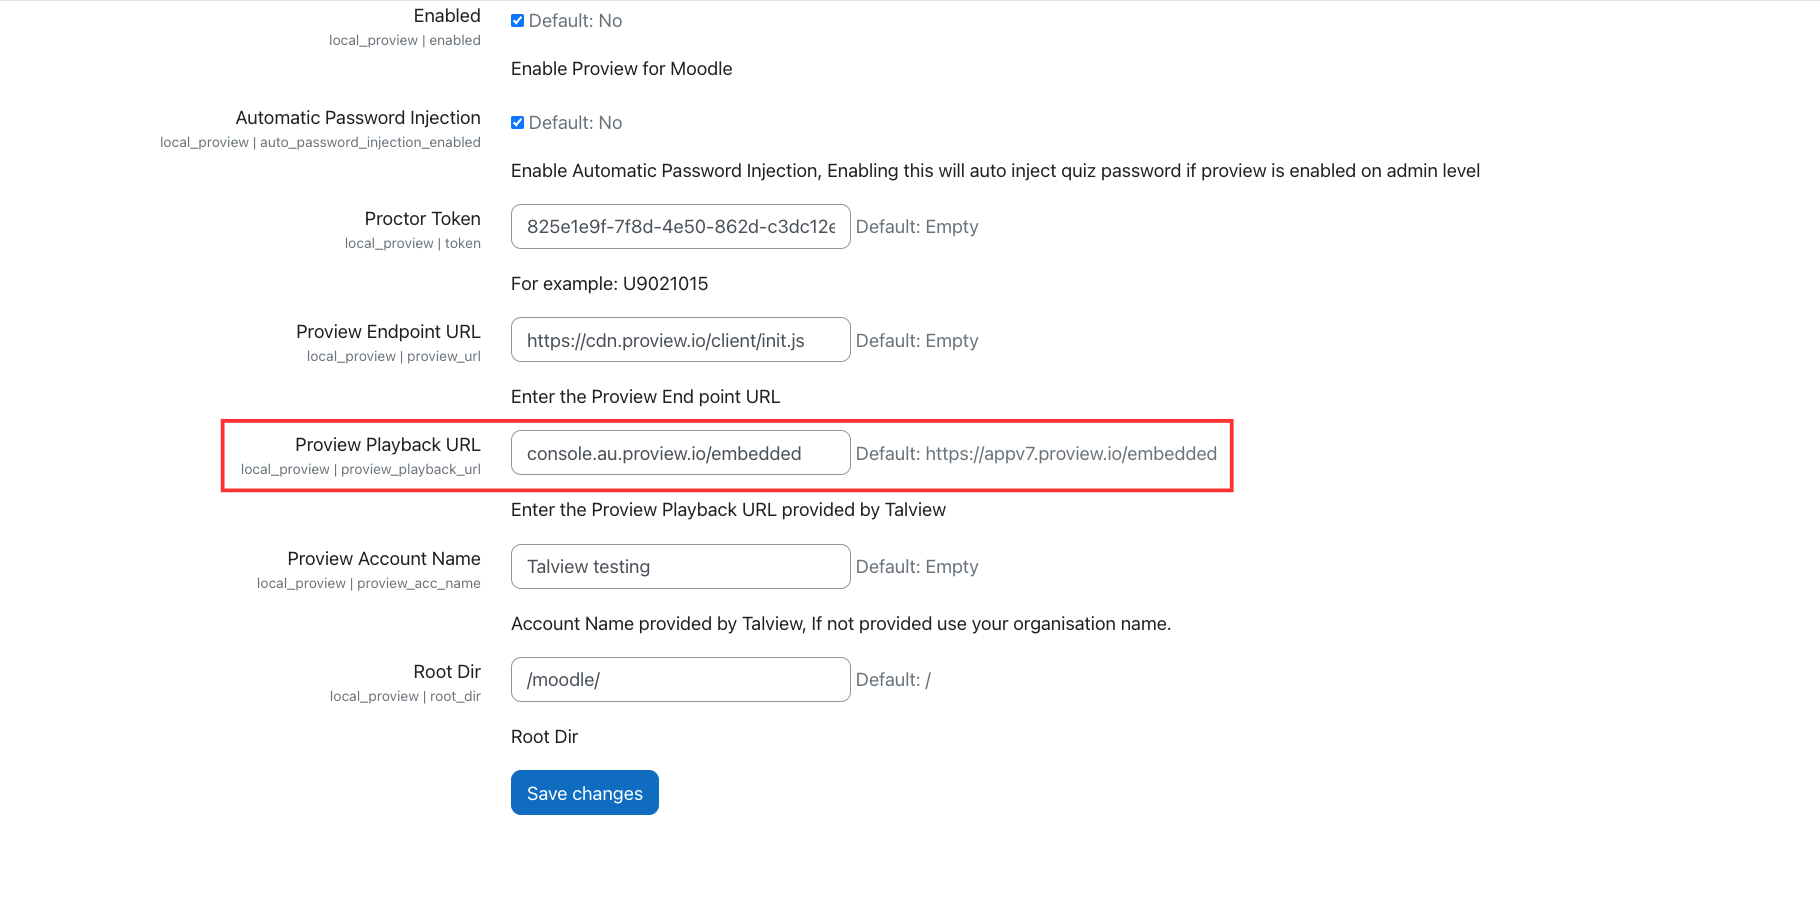
 * **Enter Proview Playback URL**: Input the Proview Playback URL provided by Talview, : [console.au.proview.io/embedded](http://console.au.proview.io/embedded)
 ### **6. Completing the Installation**
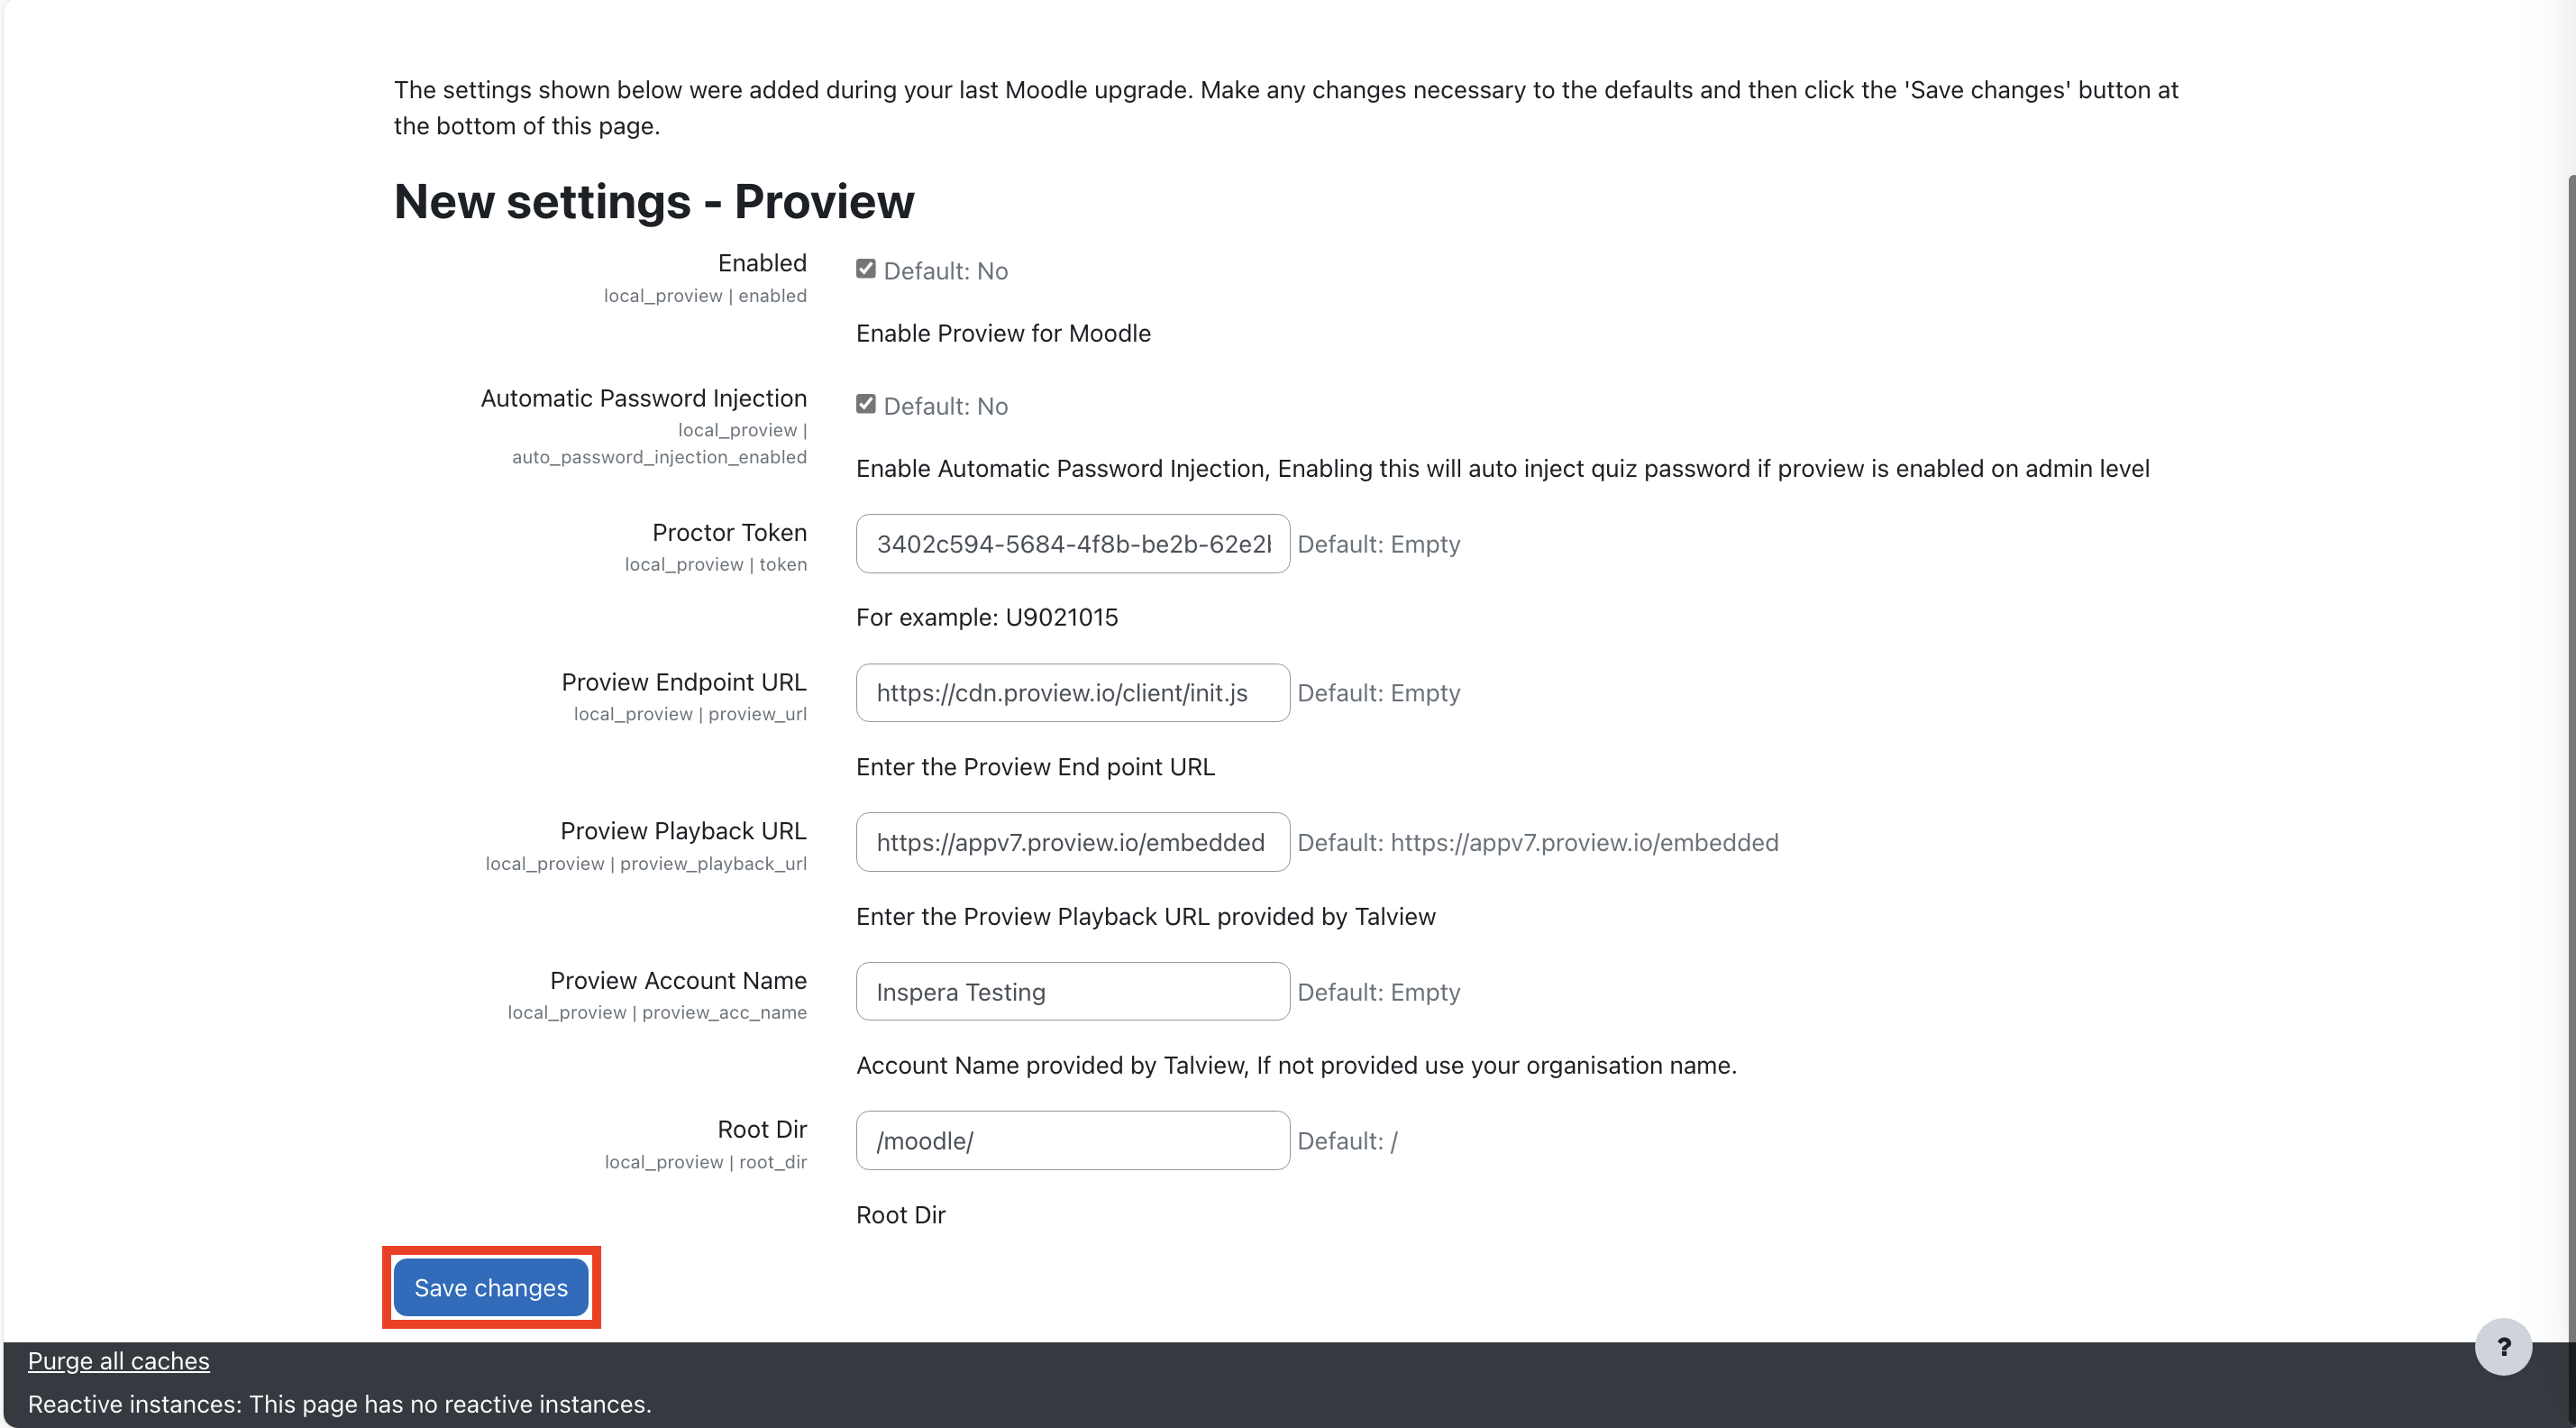
* **Save Changes**: Once all configurations are finalized, click on the **Save Changes** button.
### **6. Completing the Installation**
* **Save Changes**: Once all configurations are finalized, click on the **Save Changes** button.
 ## Steps - Create Moodle Web Service Token
Creating Web Service Token for Talview to synchronize quiz attendee data for Live Proctoring use case we need access to Moodle API.
### **1. Accessing site administration**
* Log in to Moodle as an admin. In the admin view, go to **Site Administration**.
## Steps - Create Moodle Web Service Token
Creating Web Service Token for Talview to synchronize quiz attendee data for Live Proctoring use case we need access to Moodle API.
### **1. Accessing site administration**
* Log in to Moodle as an admin. In the admin view, go to **Site Administration**.
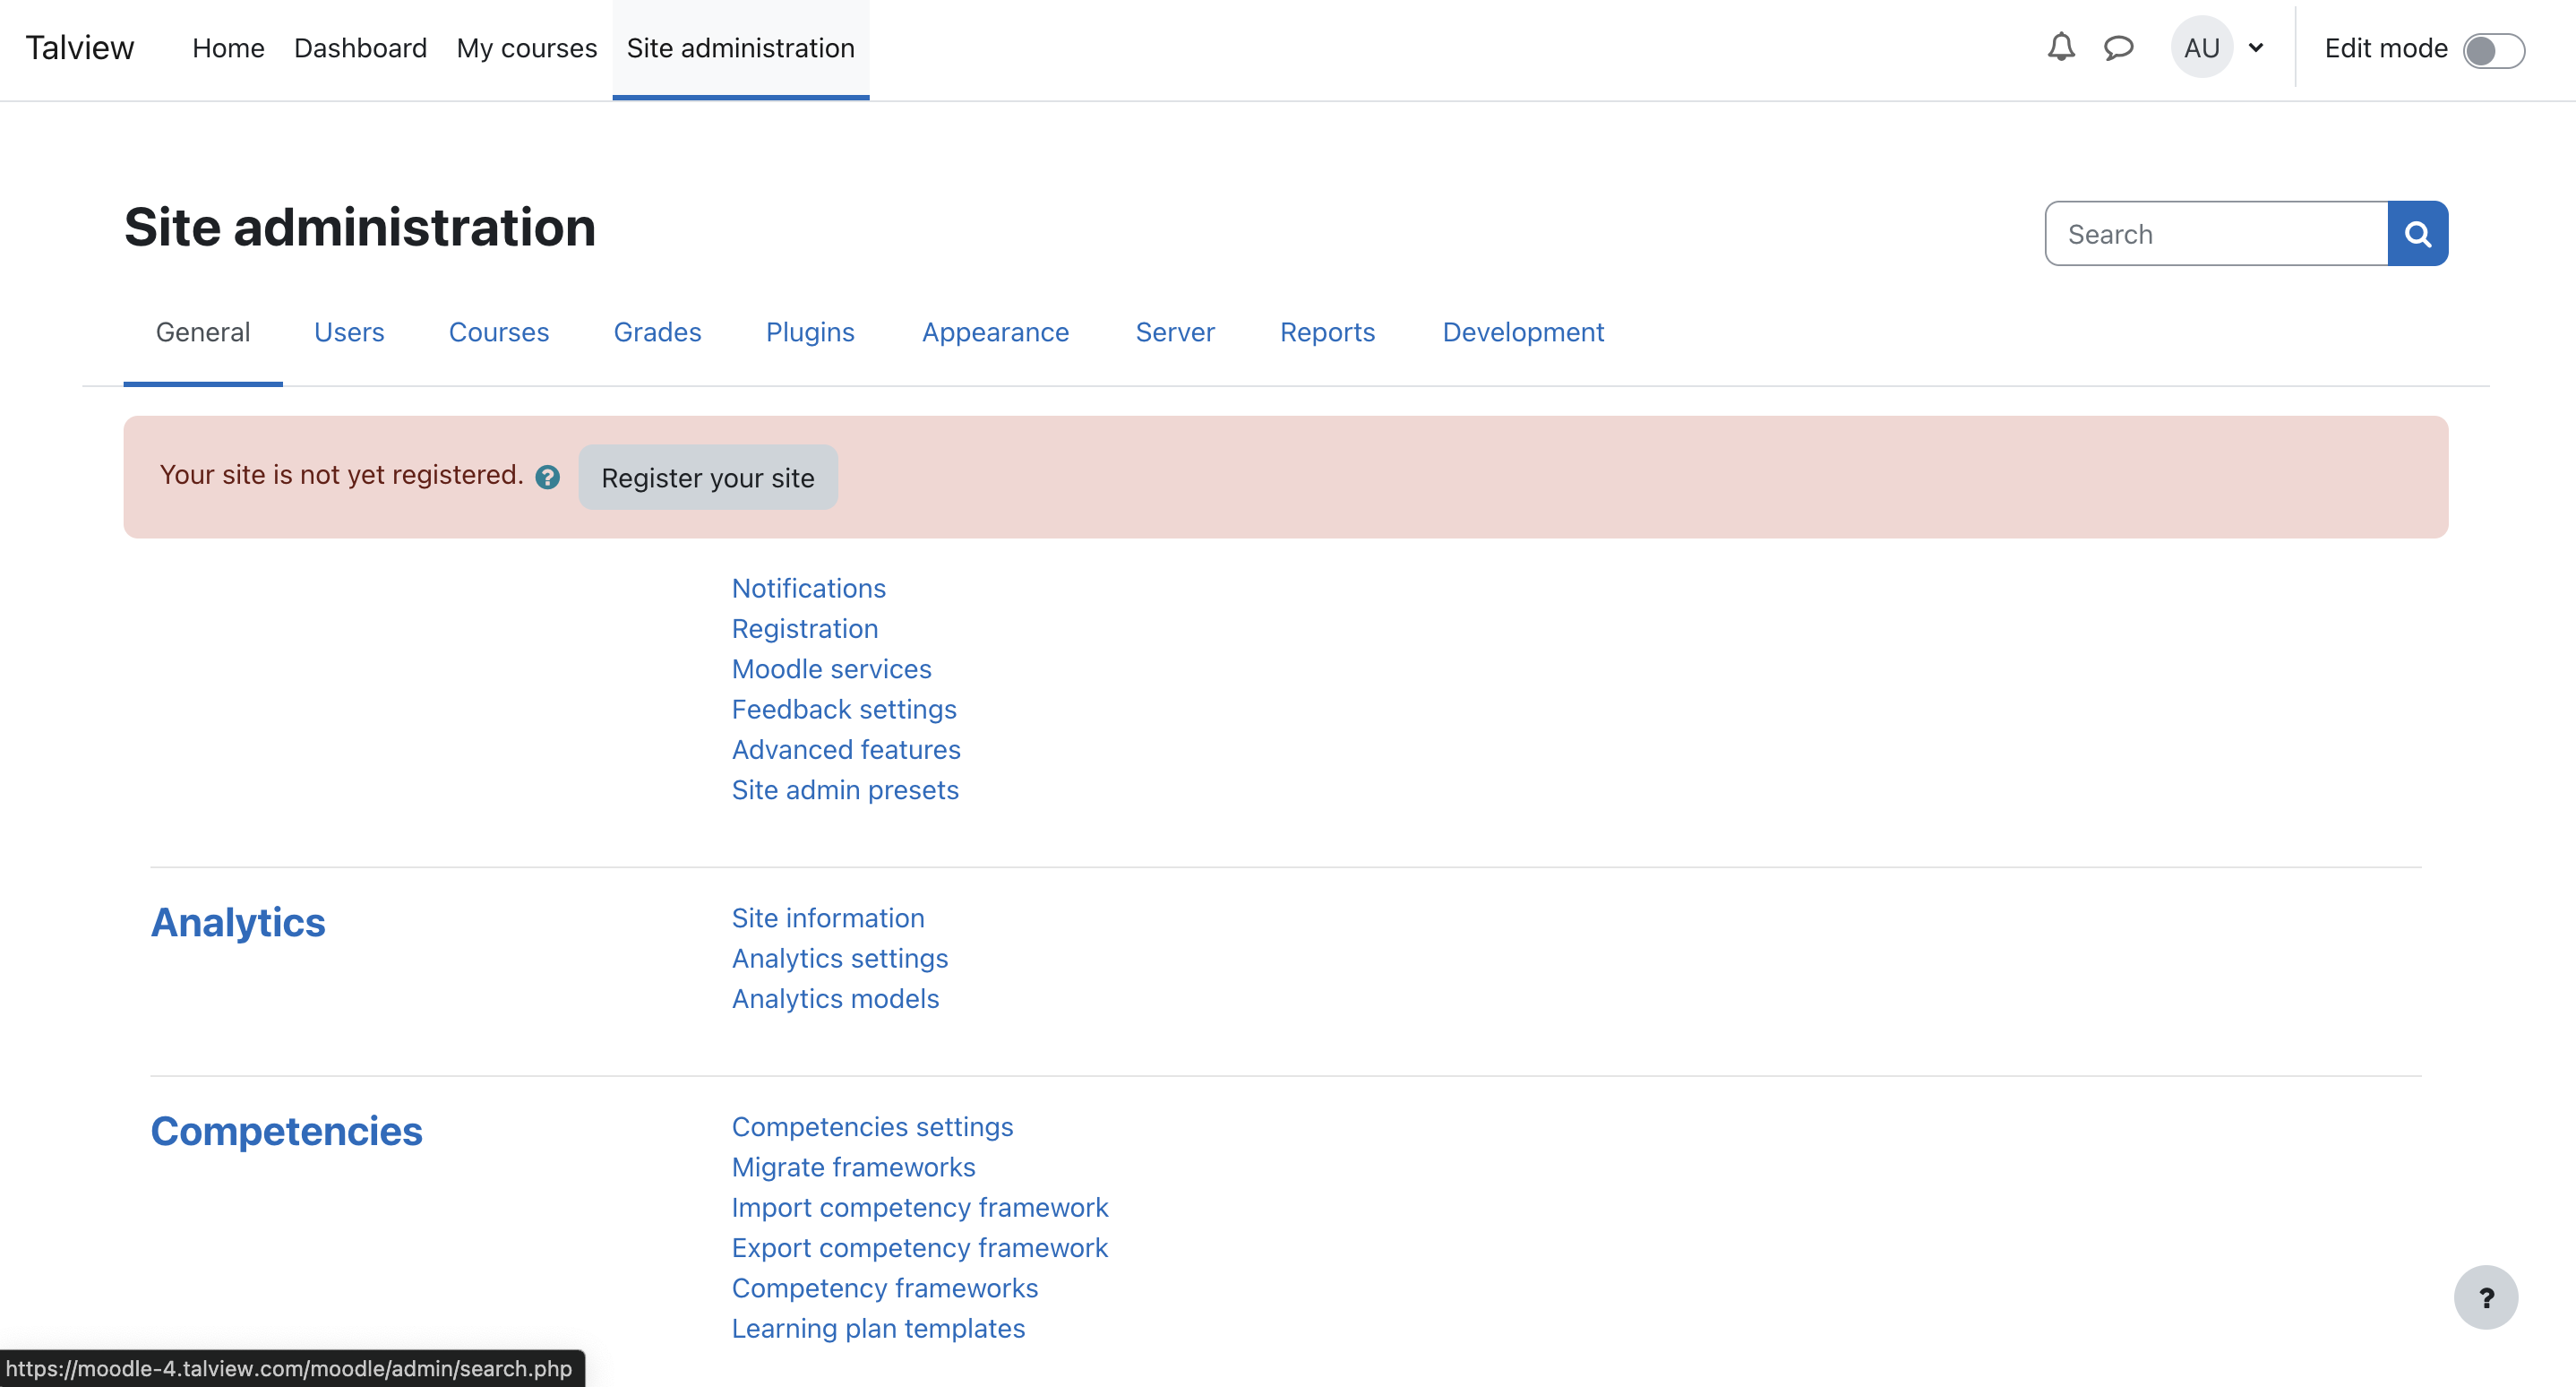 ### **2. Create External Service**
* Access “Server” tab
### **2. Create External Service**
* Access “Server” tab
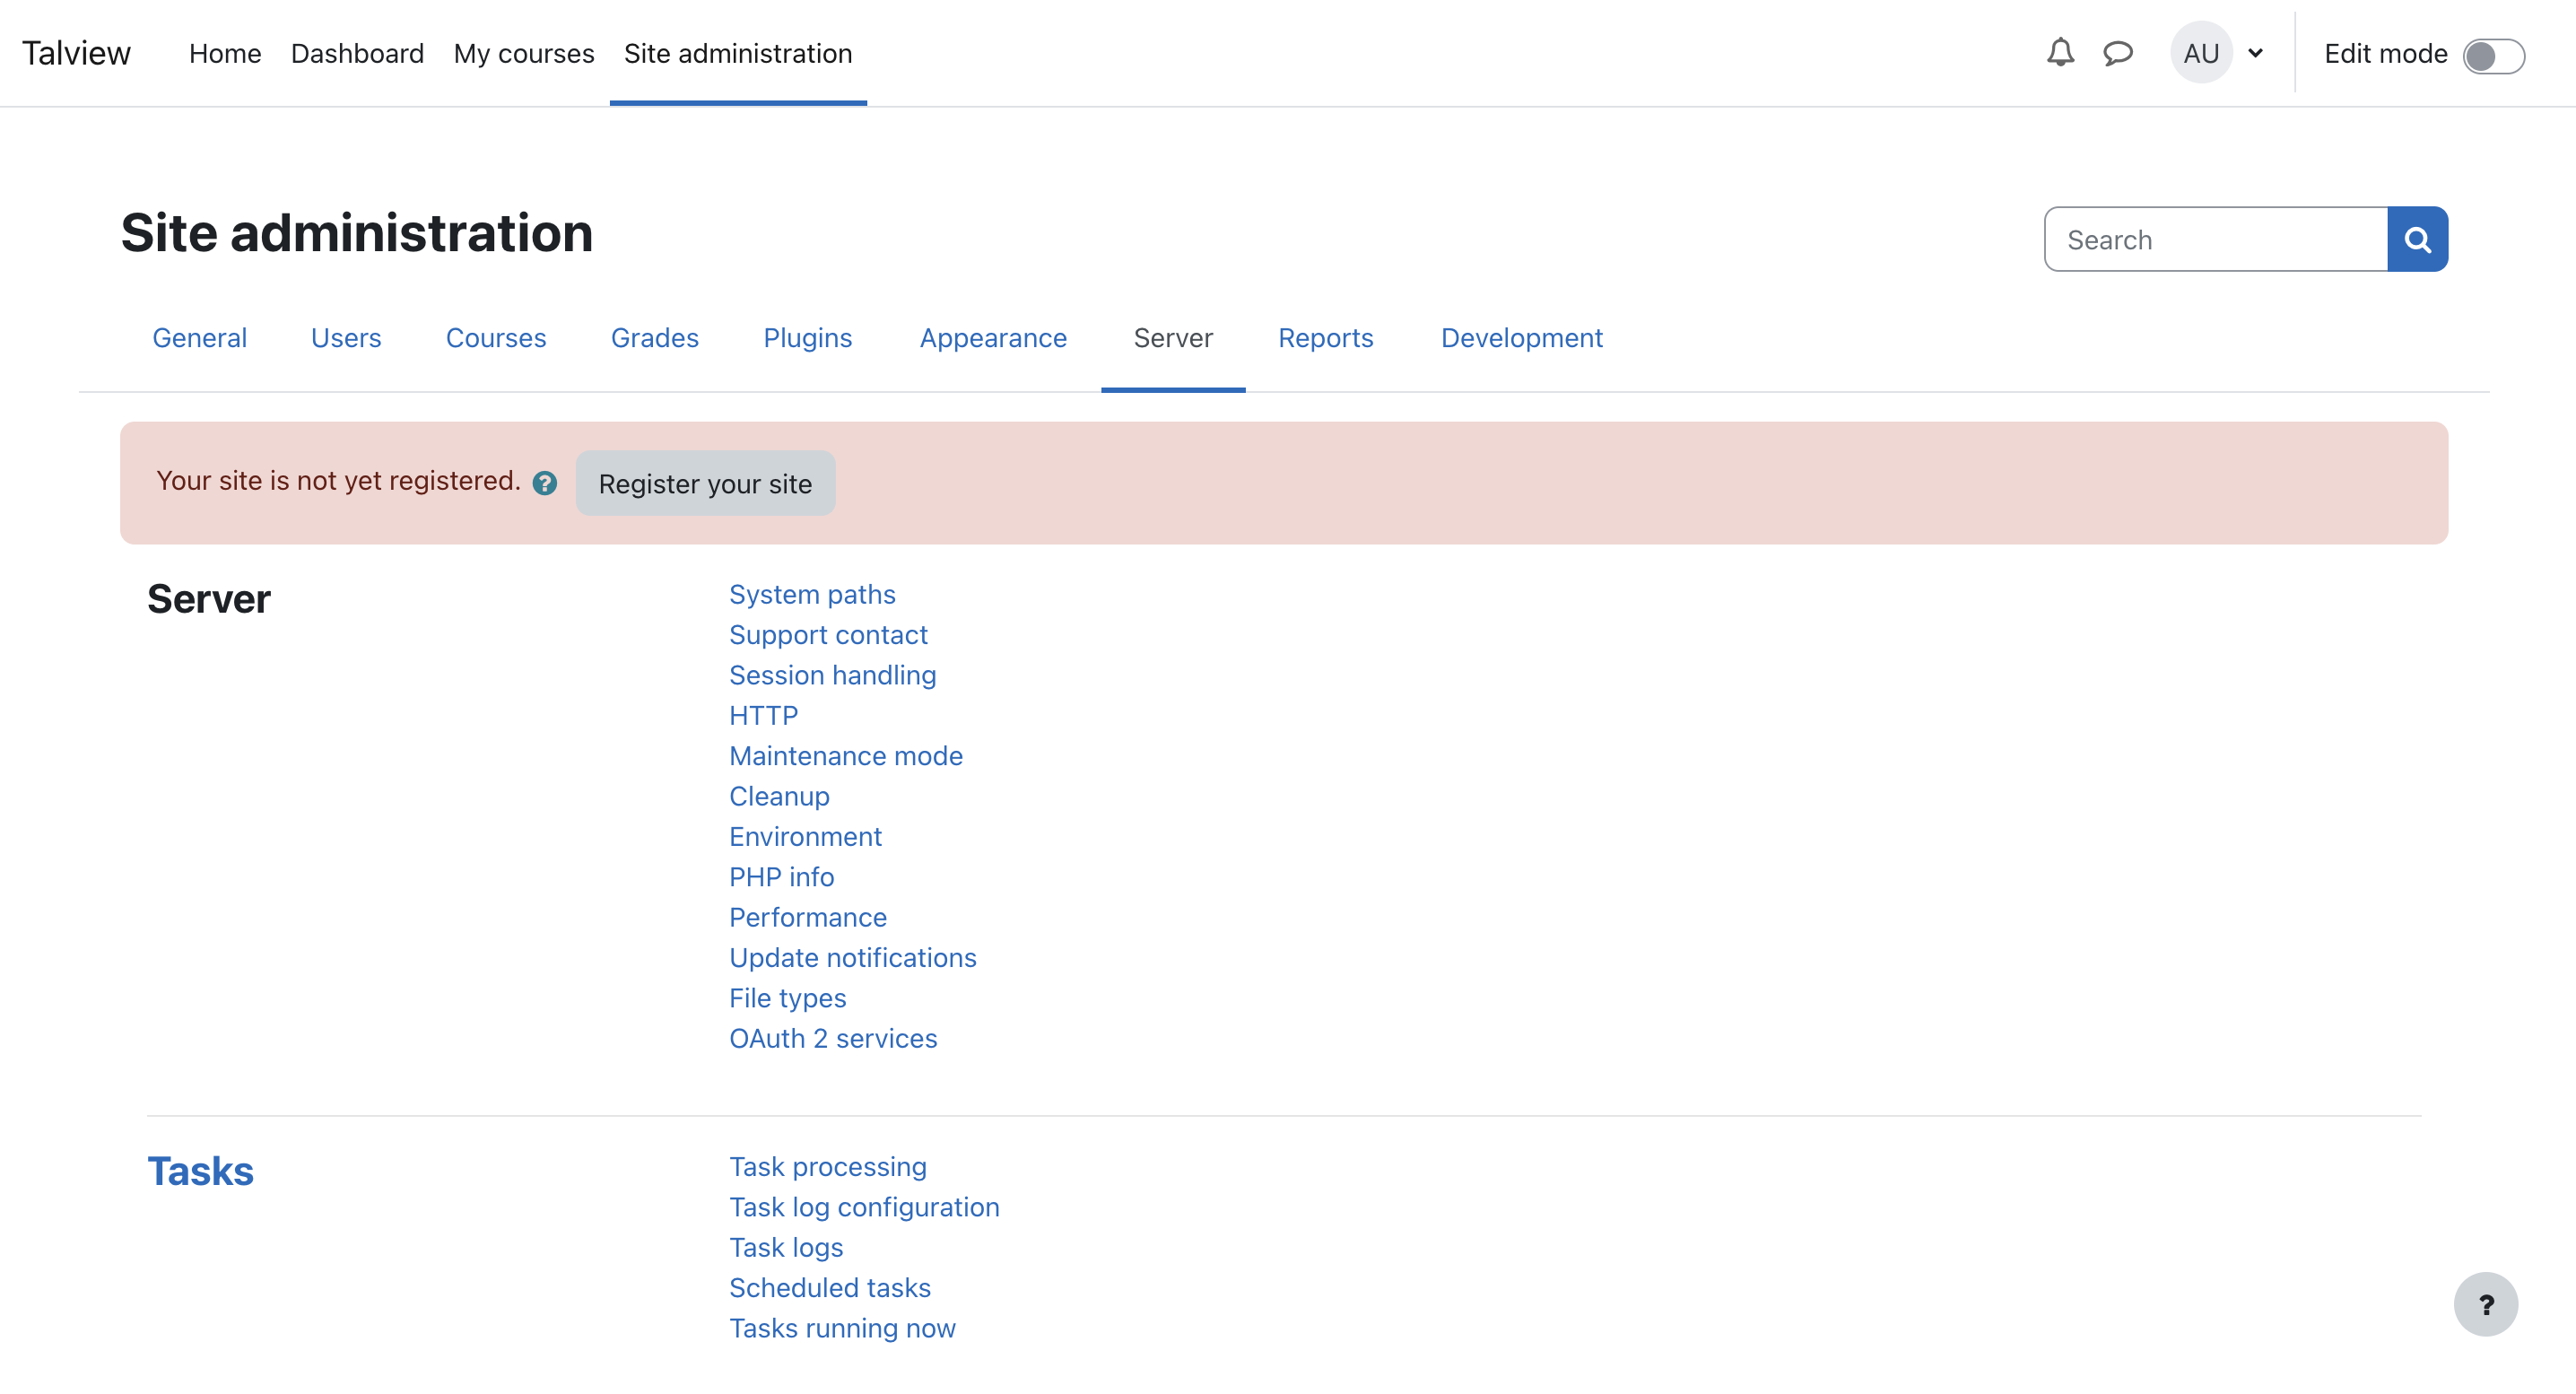 * Navigate to “Web Services” and select “External Services”
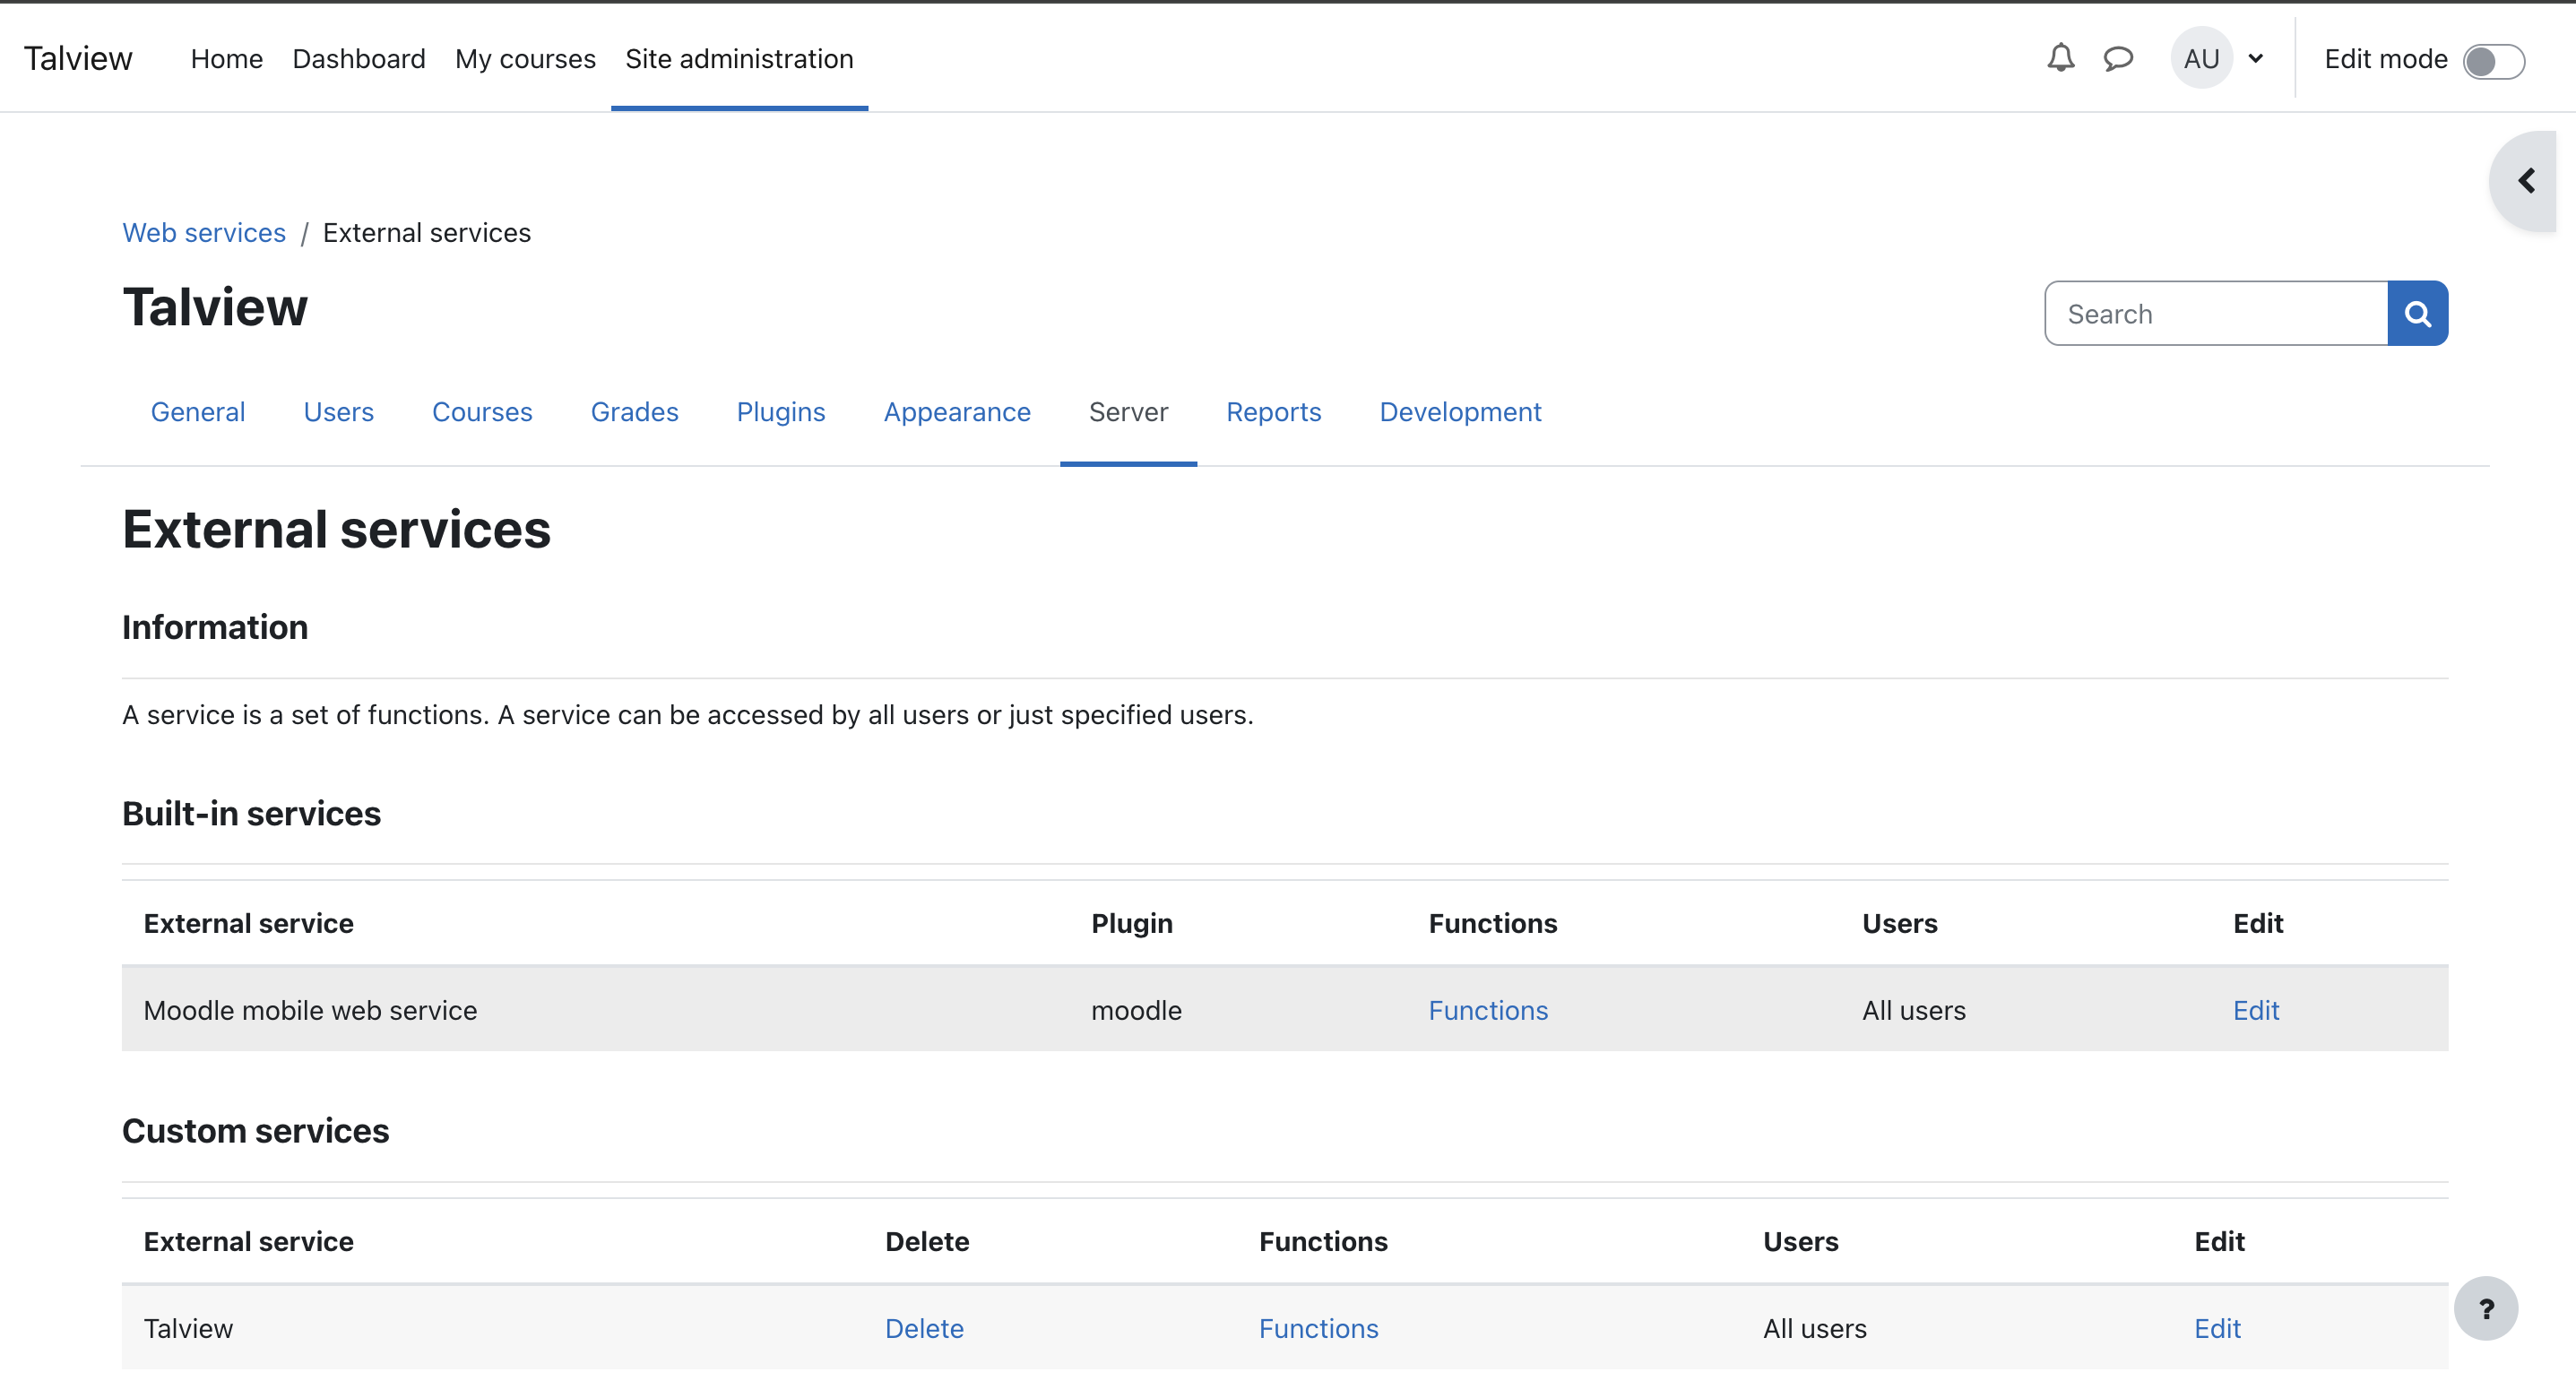 * Click on “Add” service to provide name and short name.
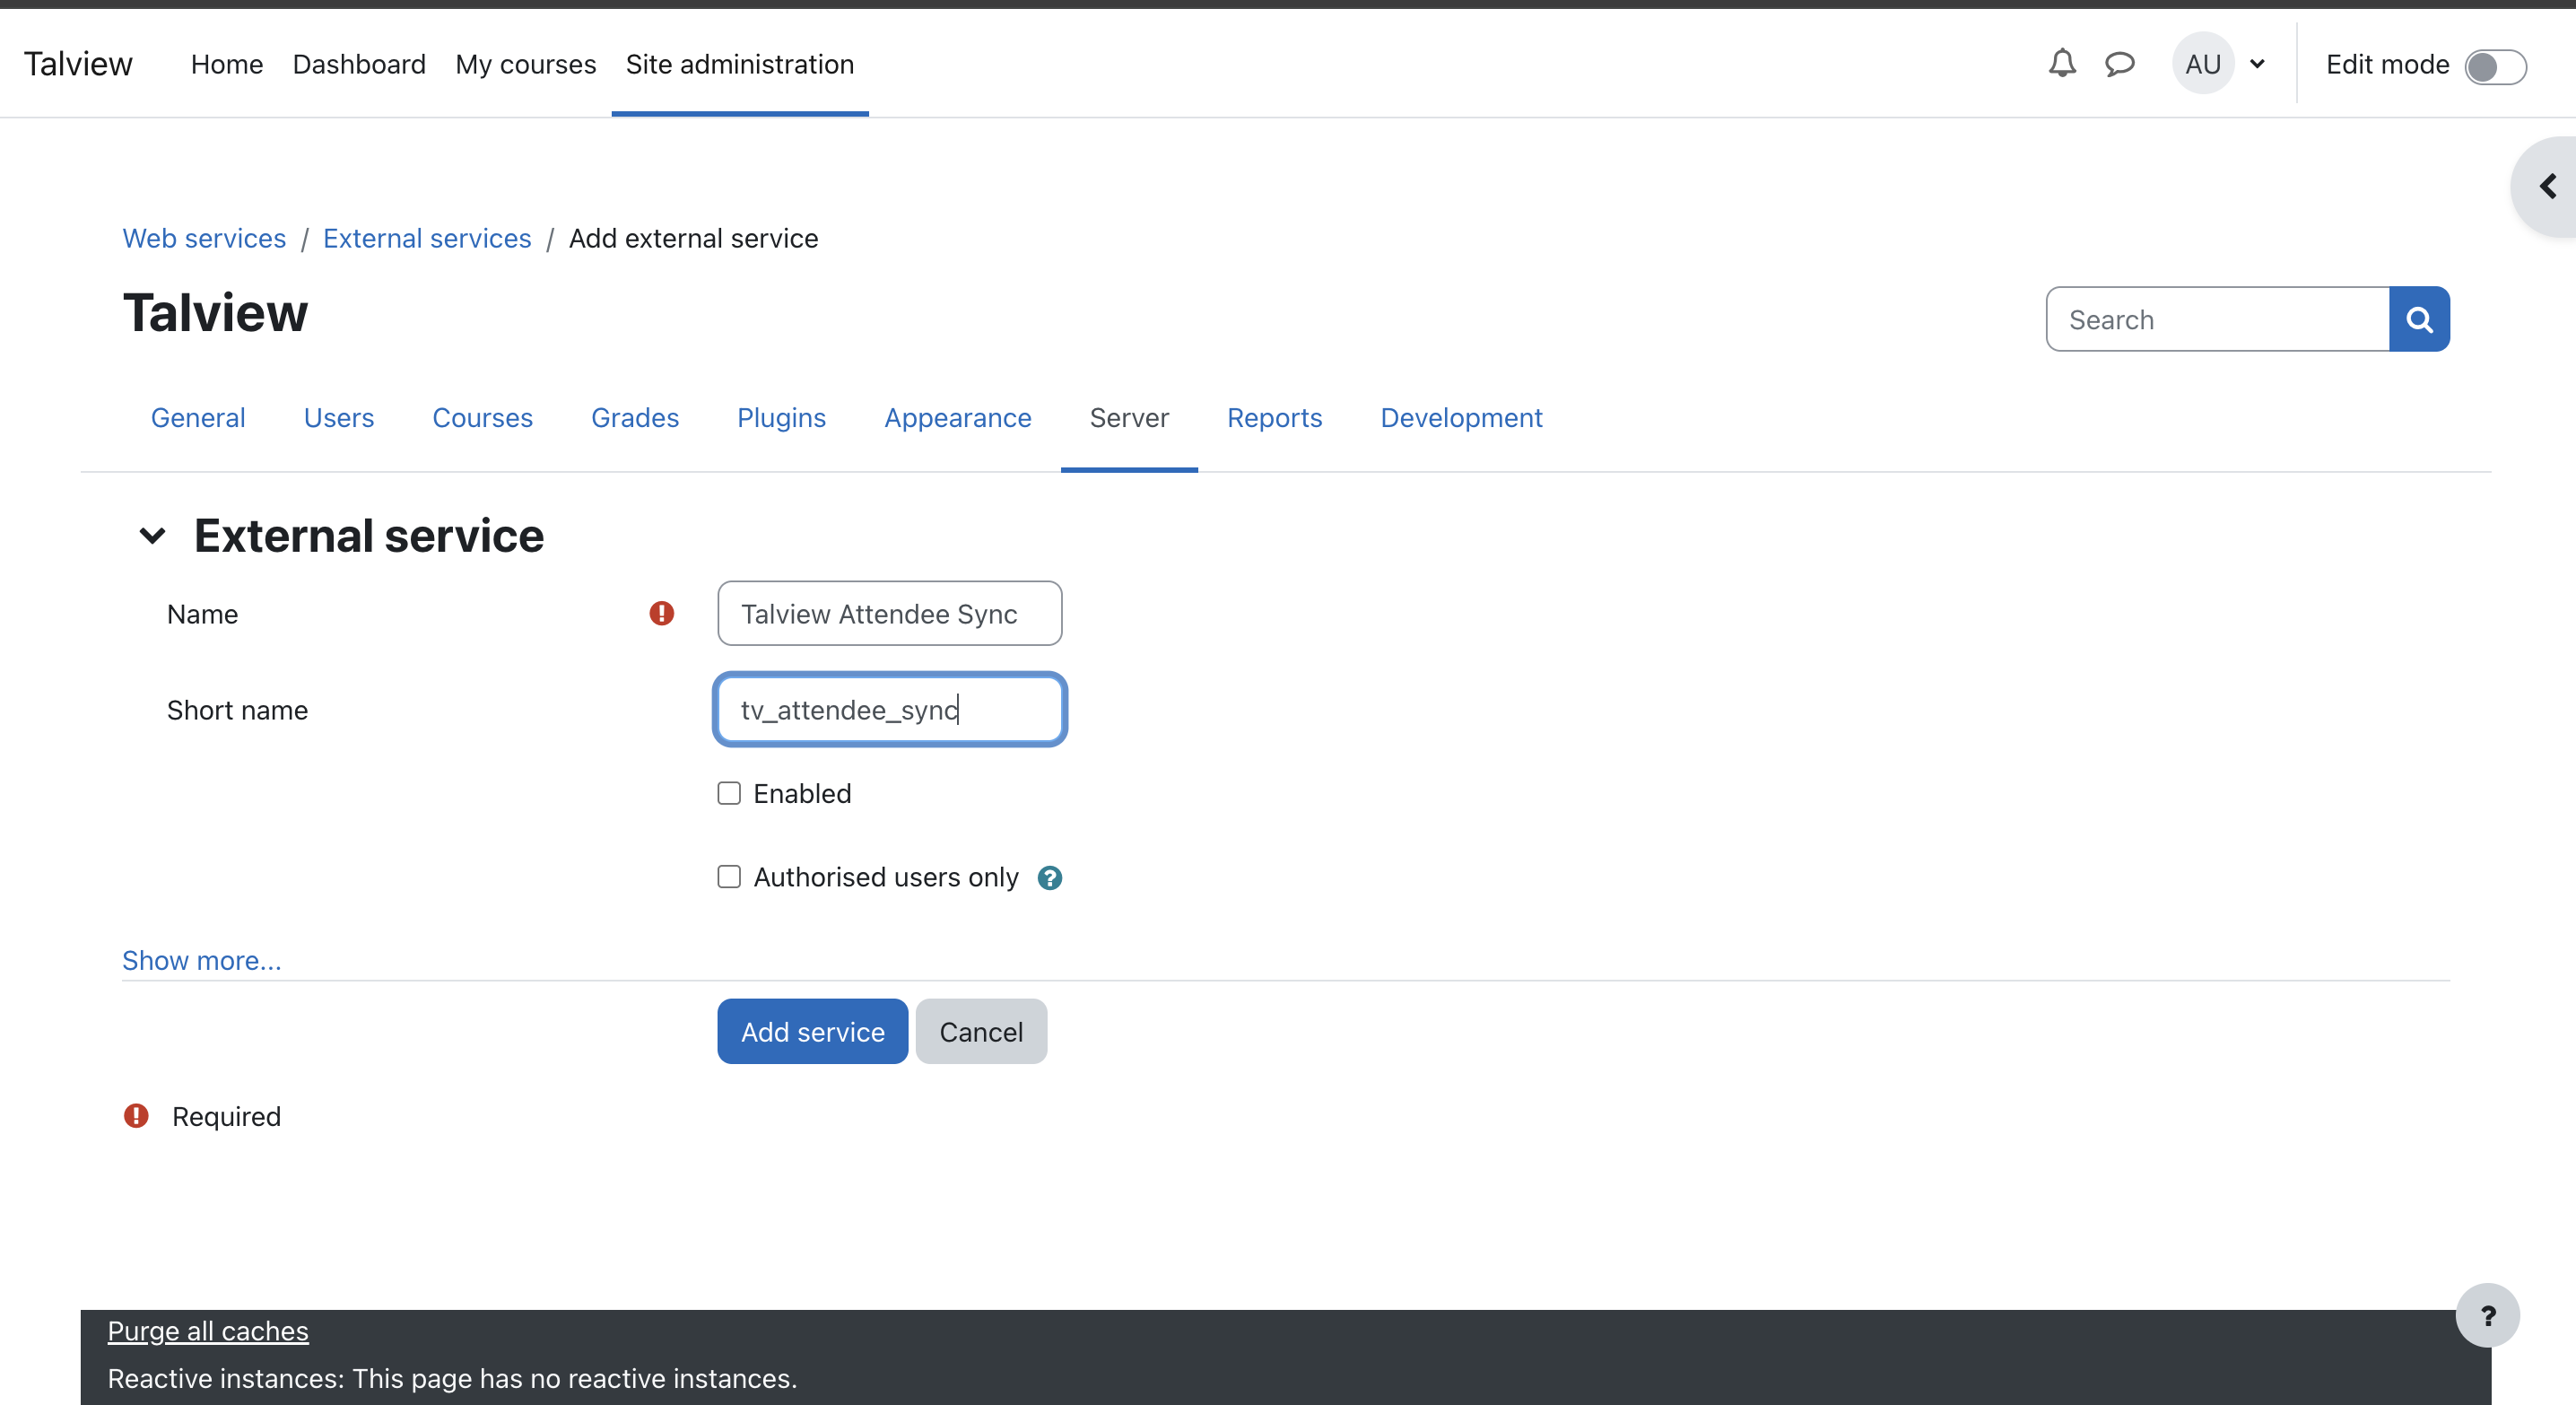 * Upon clicking the “Add Service”, it will prompt to add function. click on “Add Function”
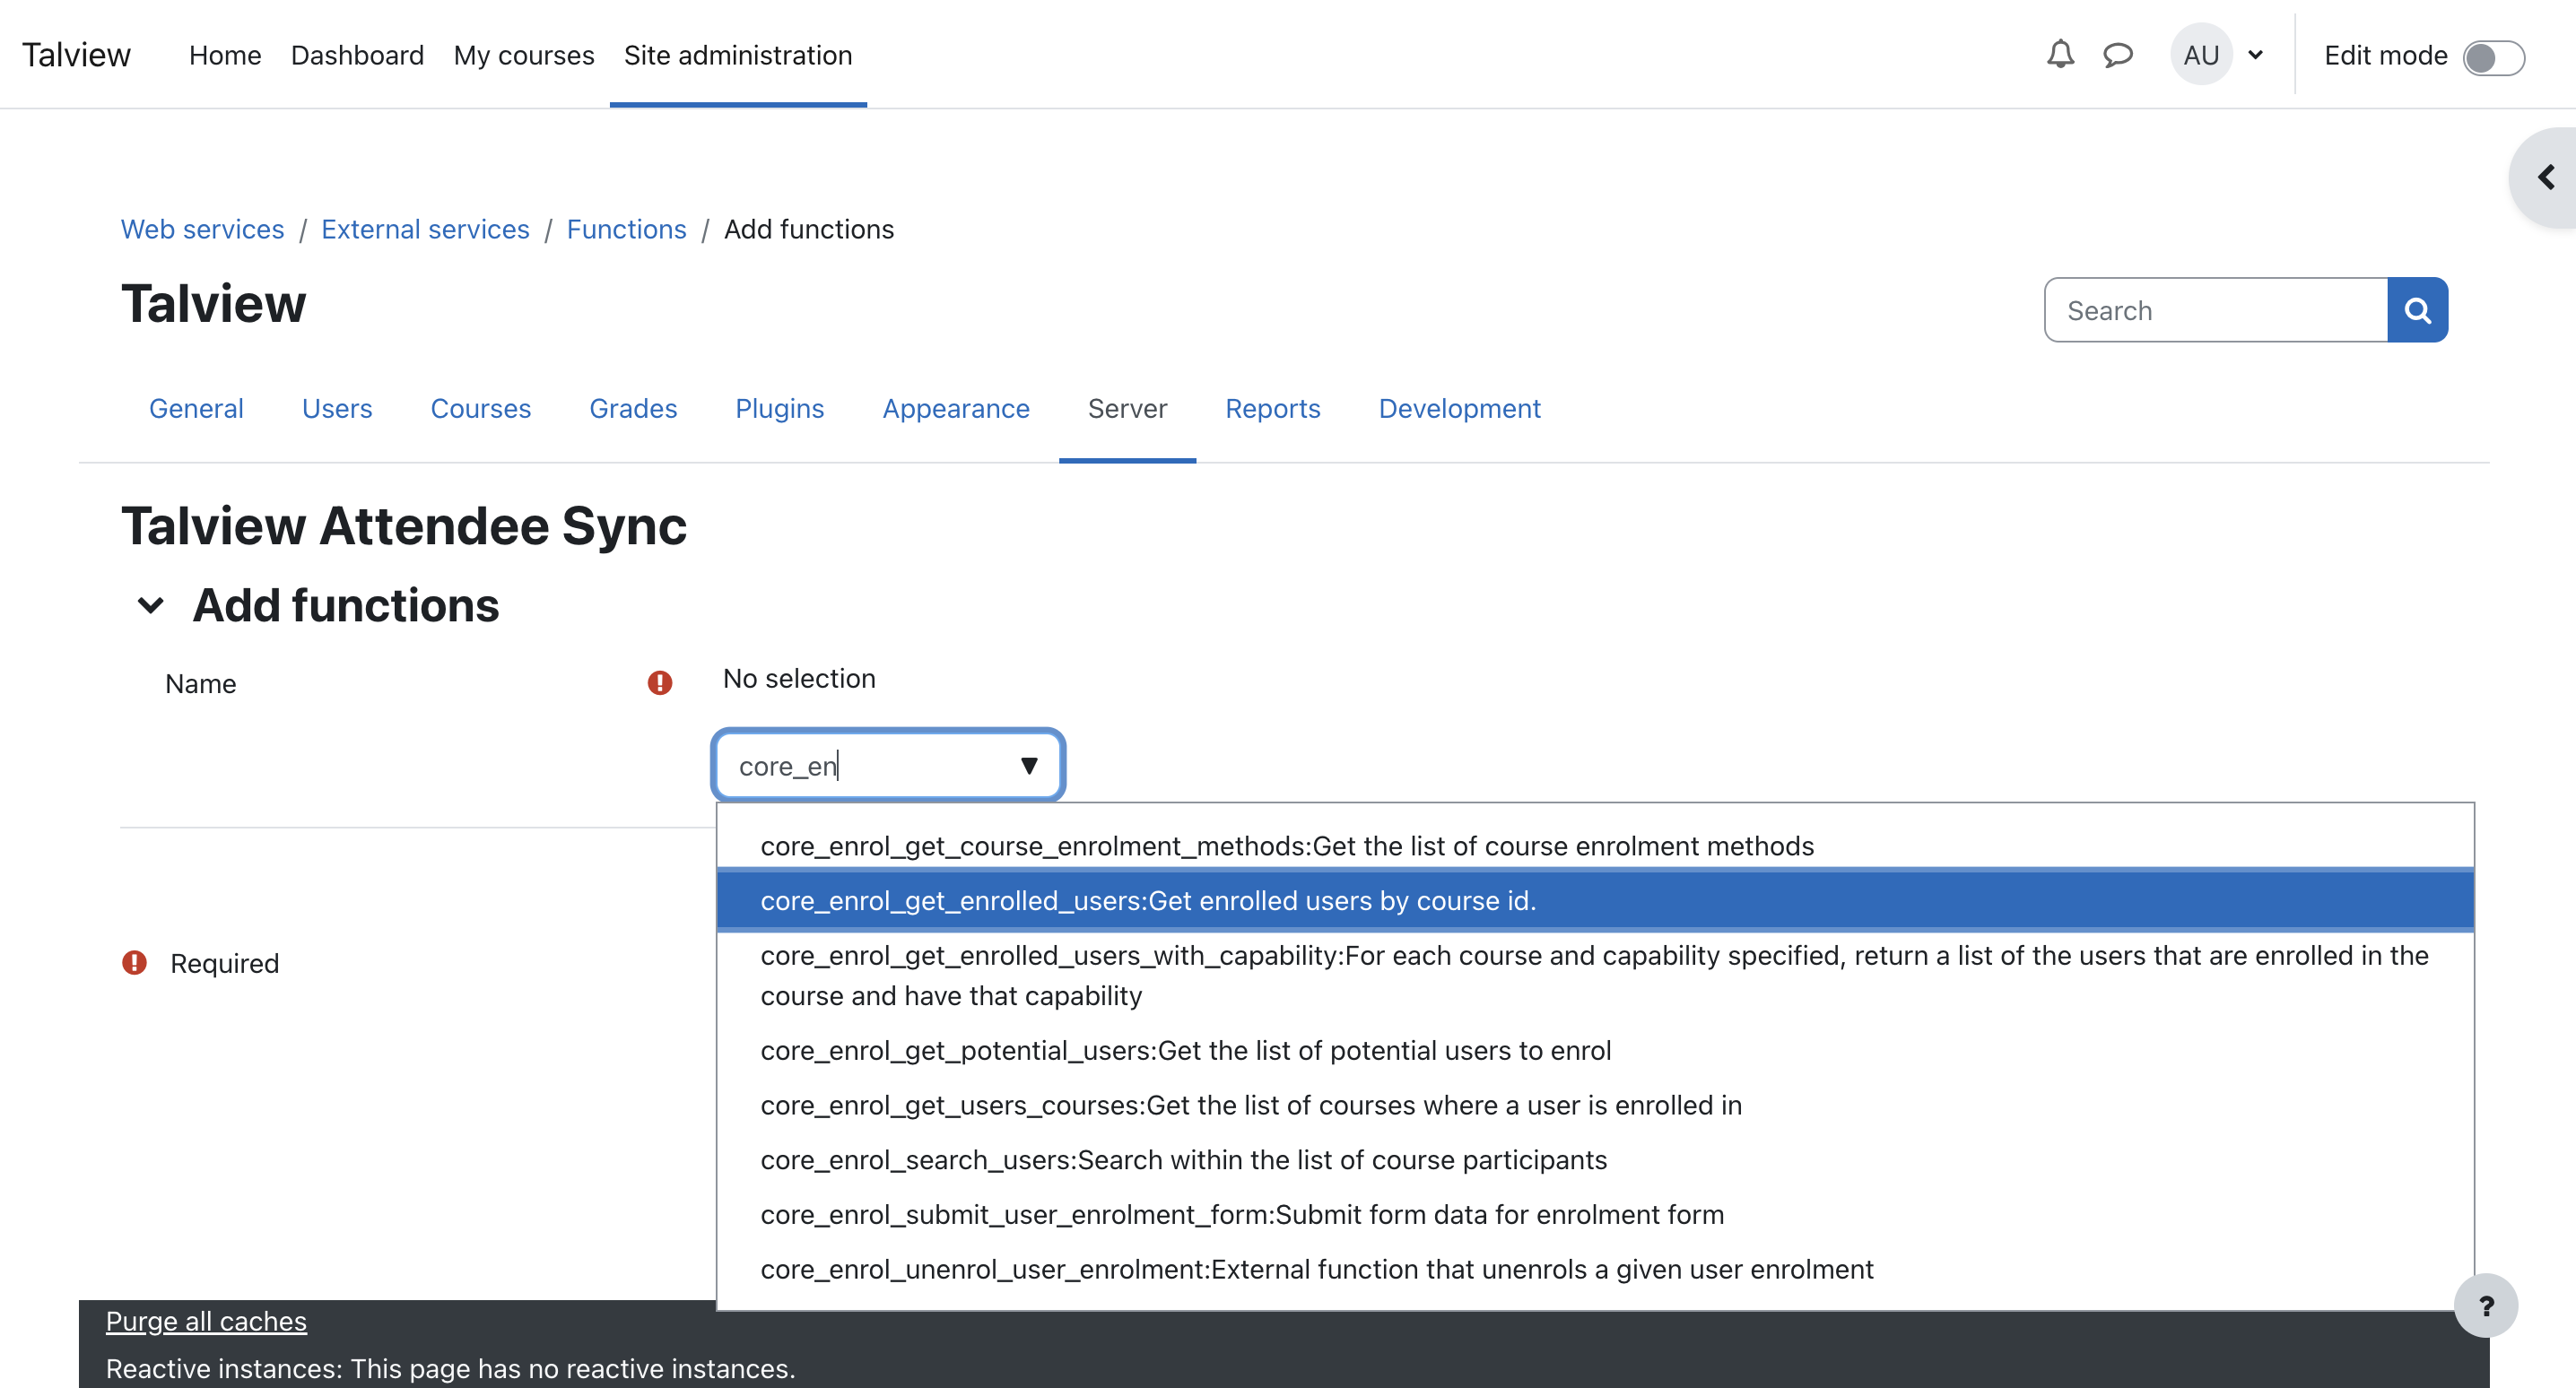
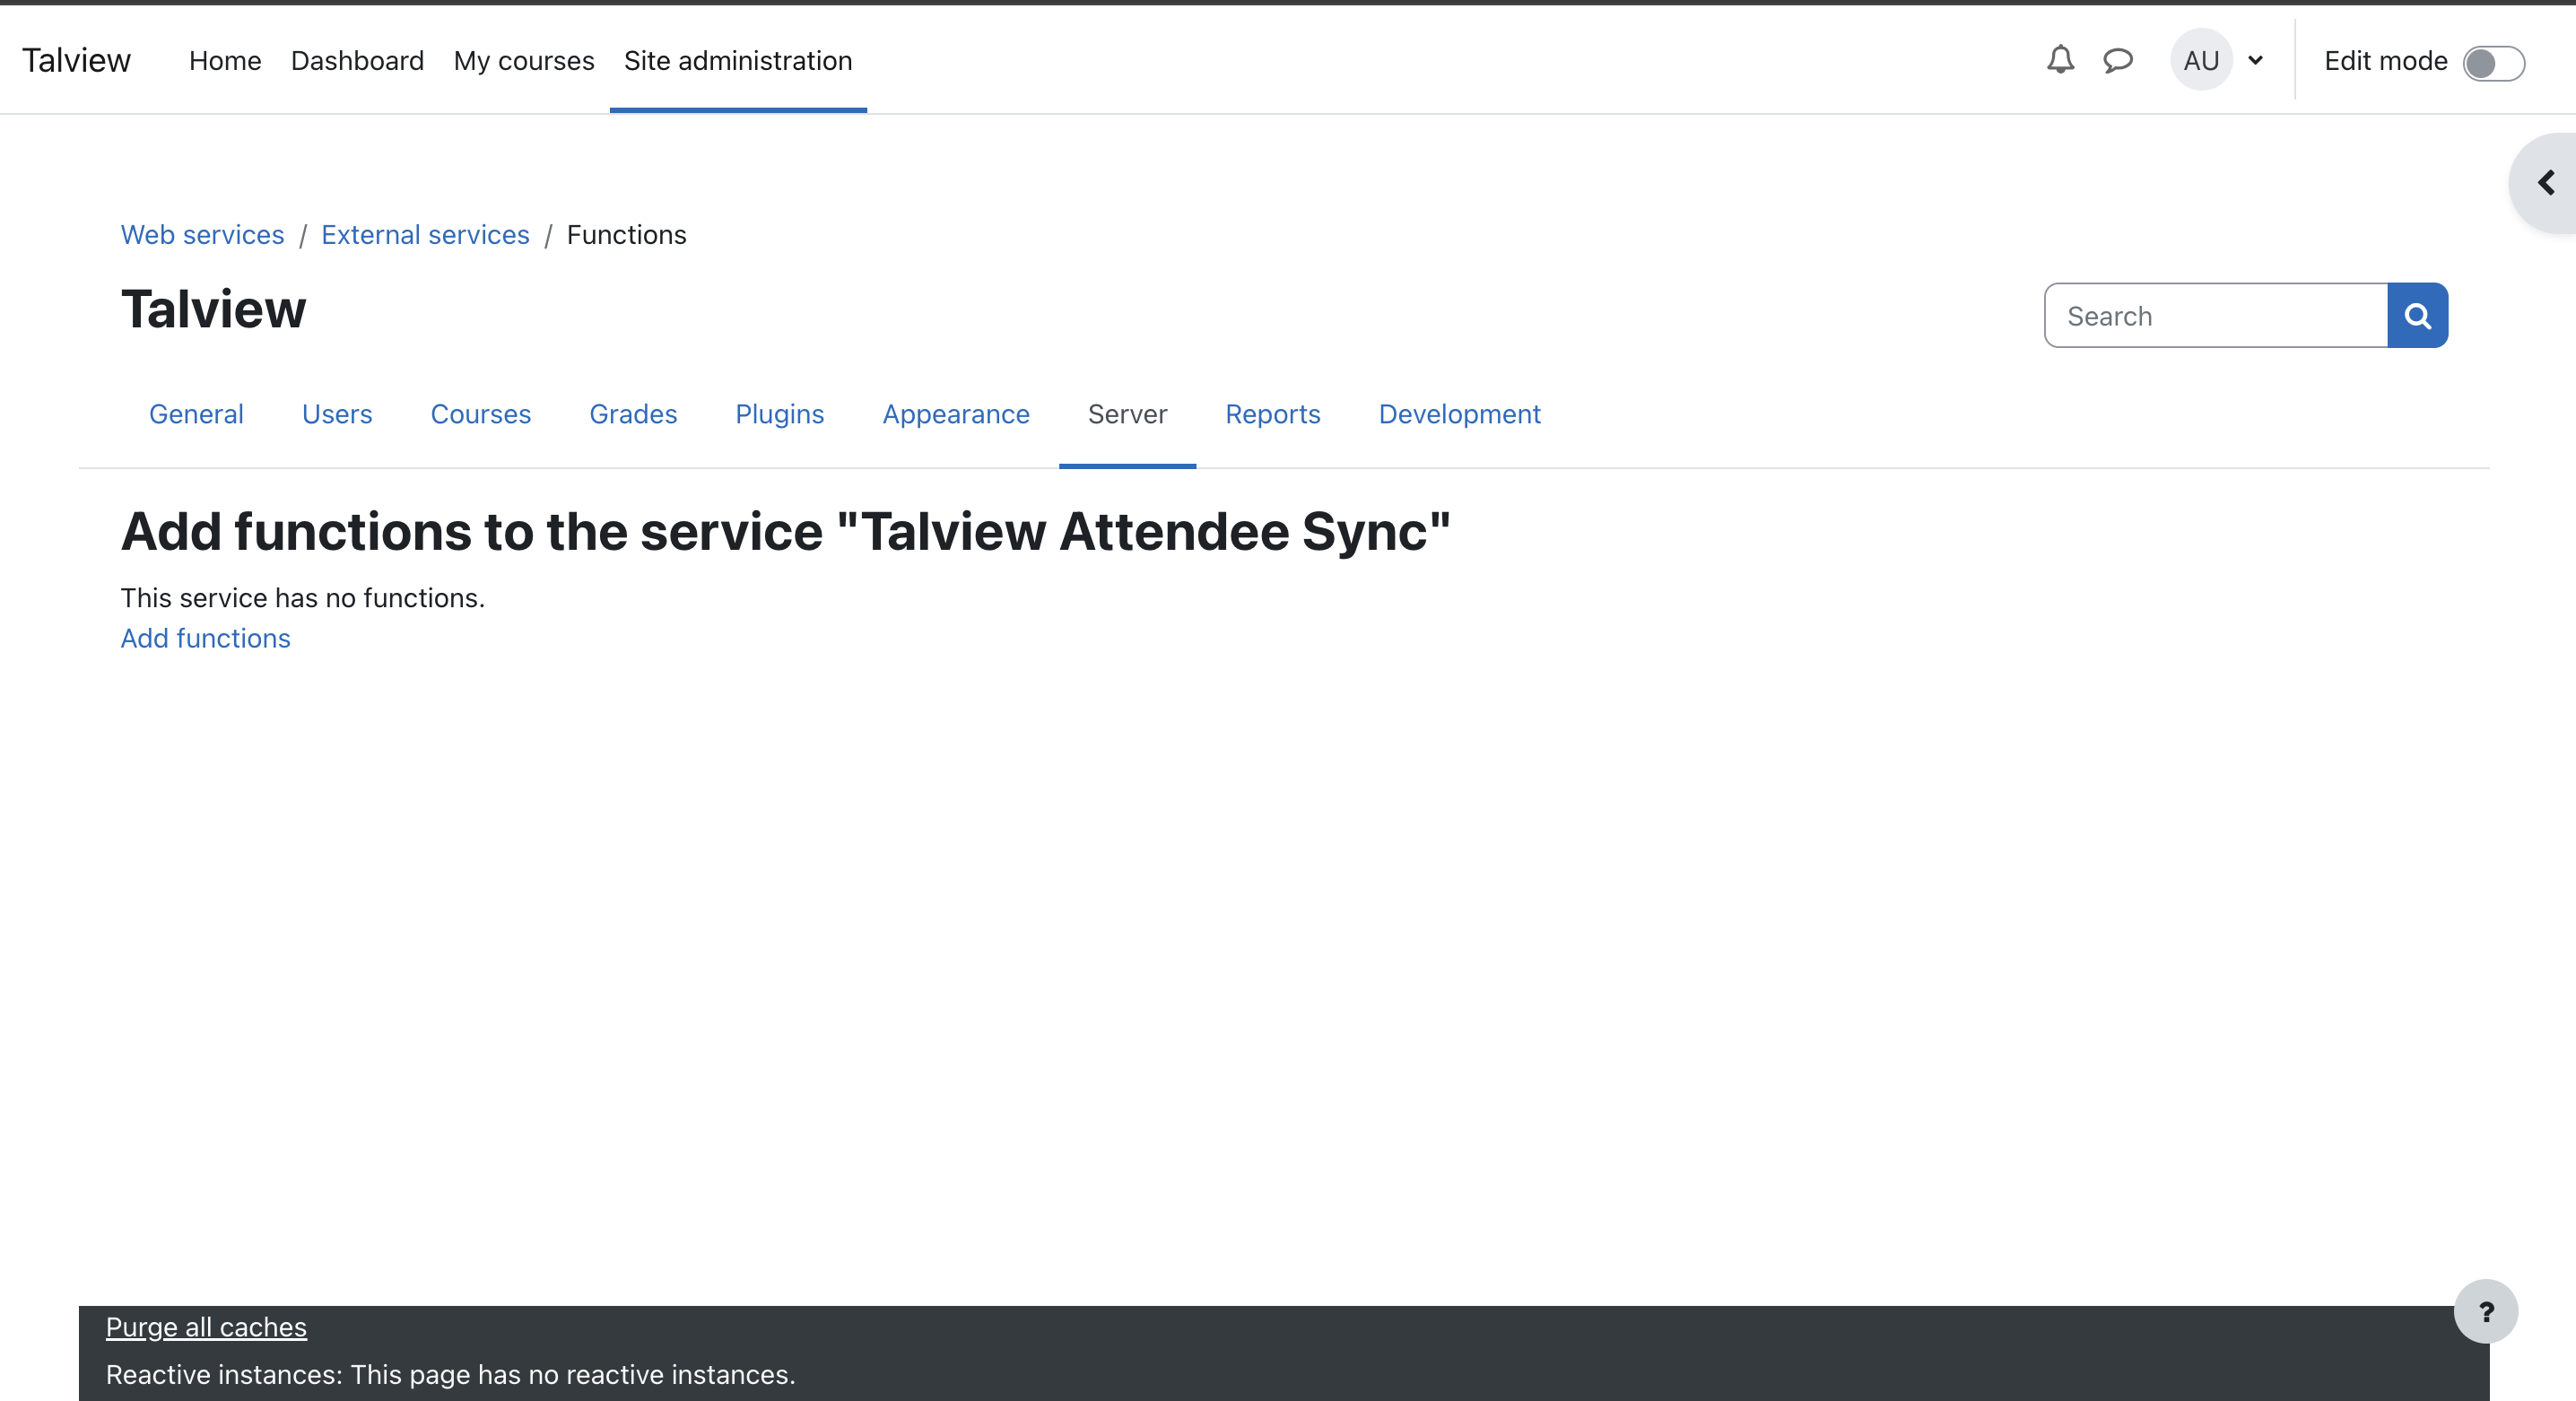 * Search the function name `core_enrol_get_enrolled_users `and select it
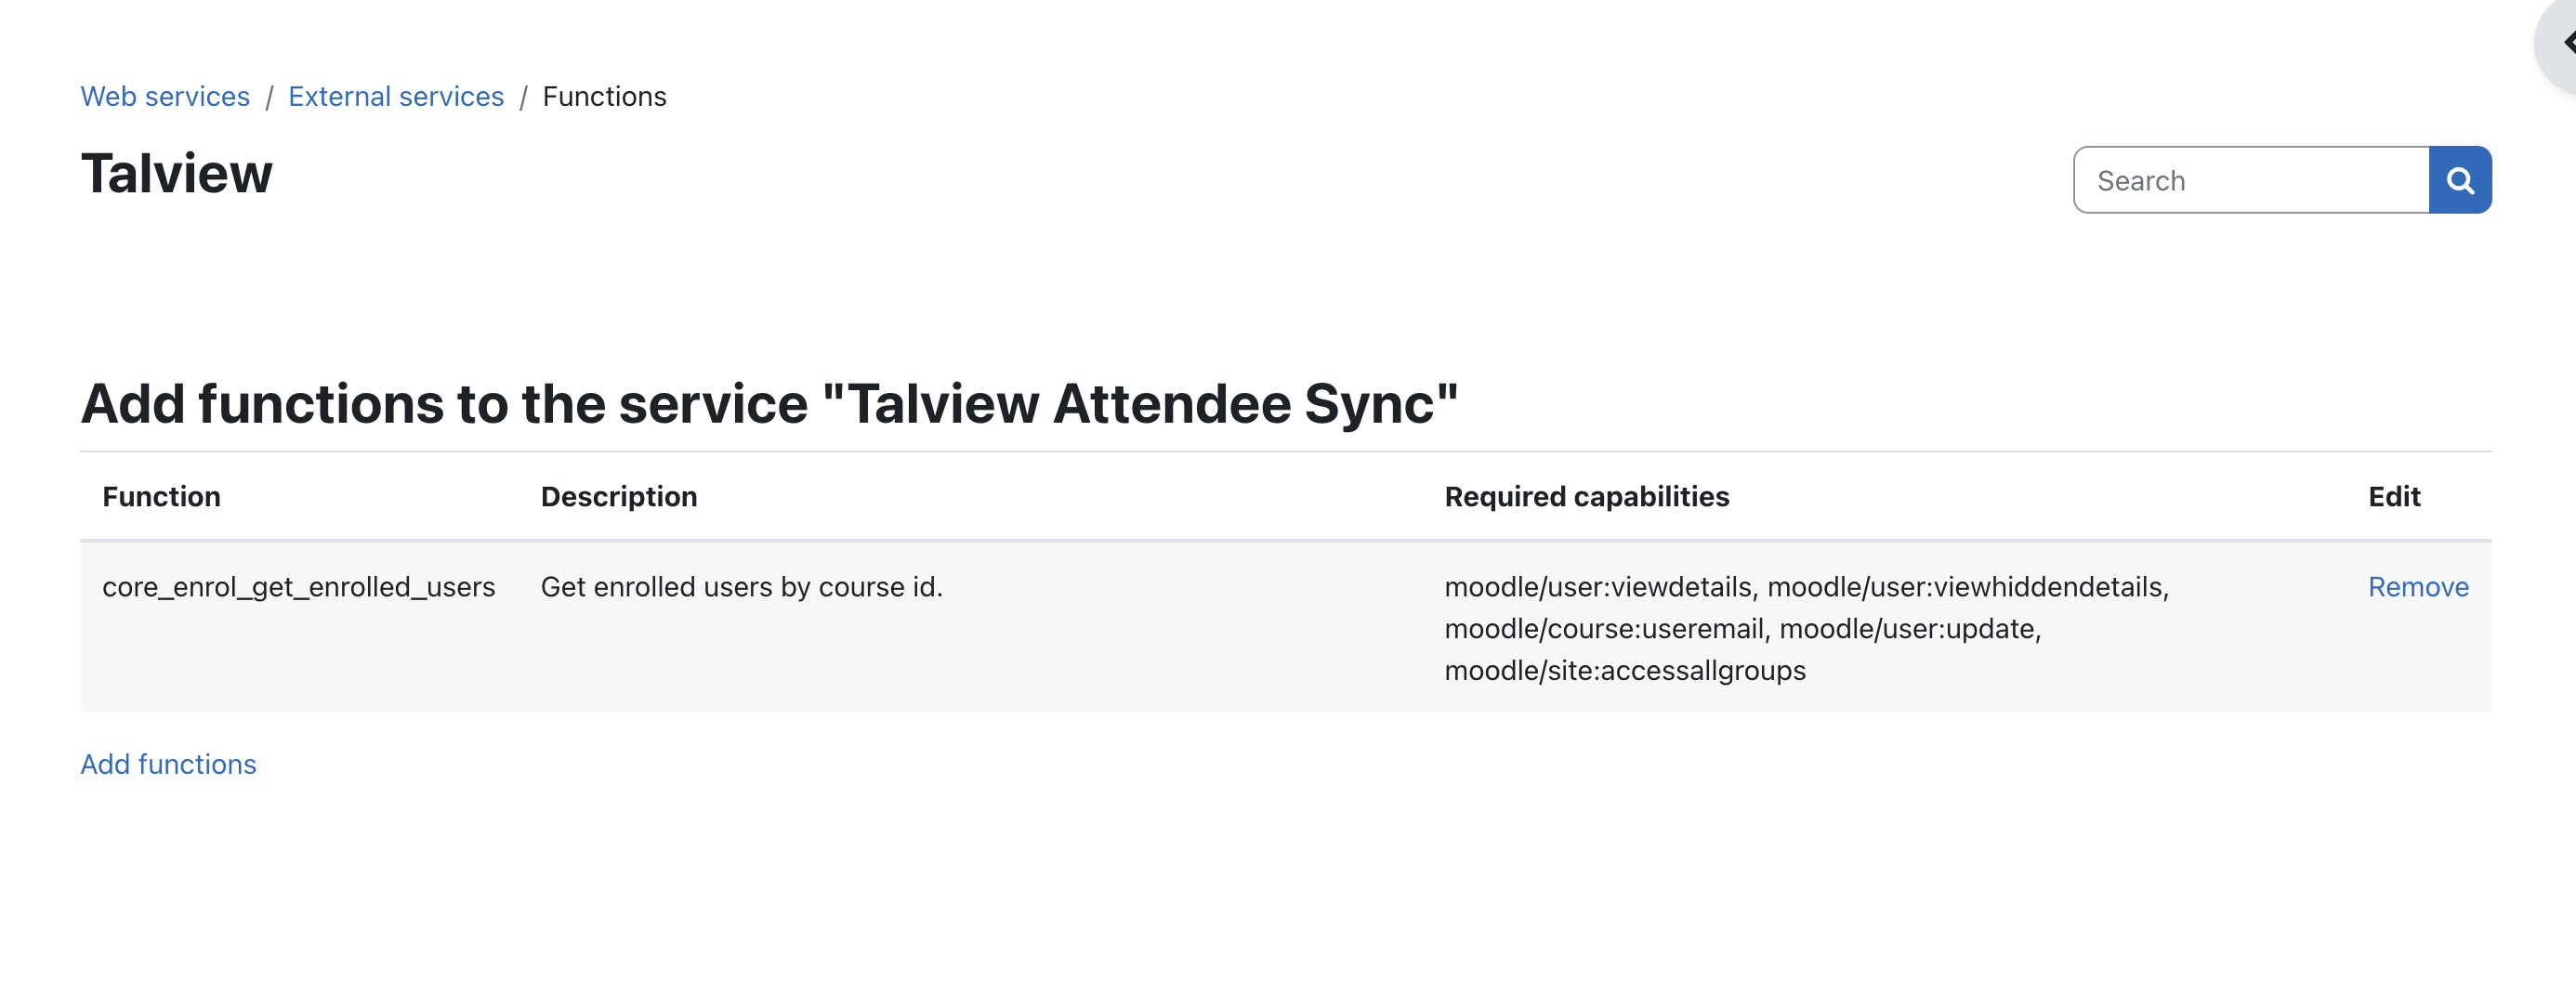
 * Upon adding the screen will look something like
 ### **3. Create WSToken**
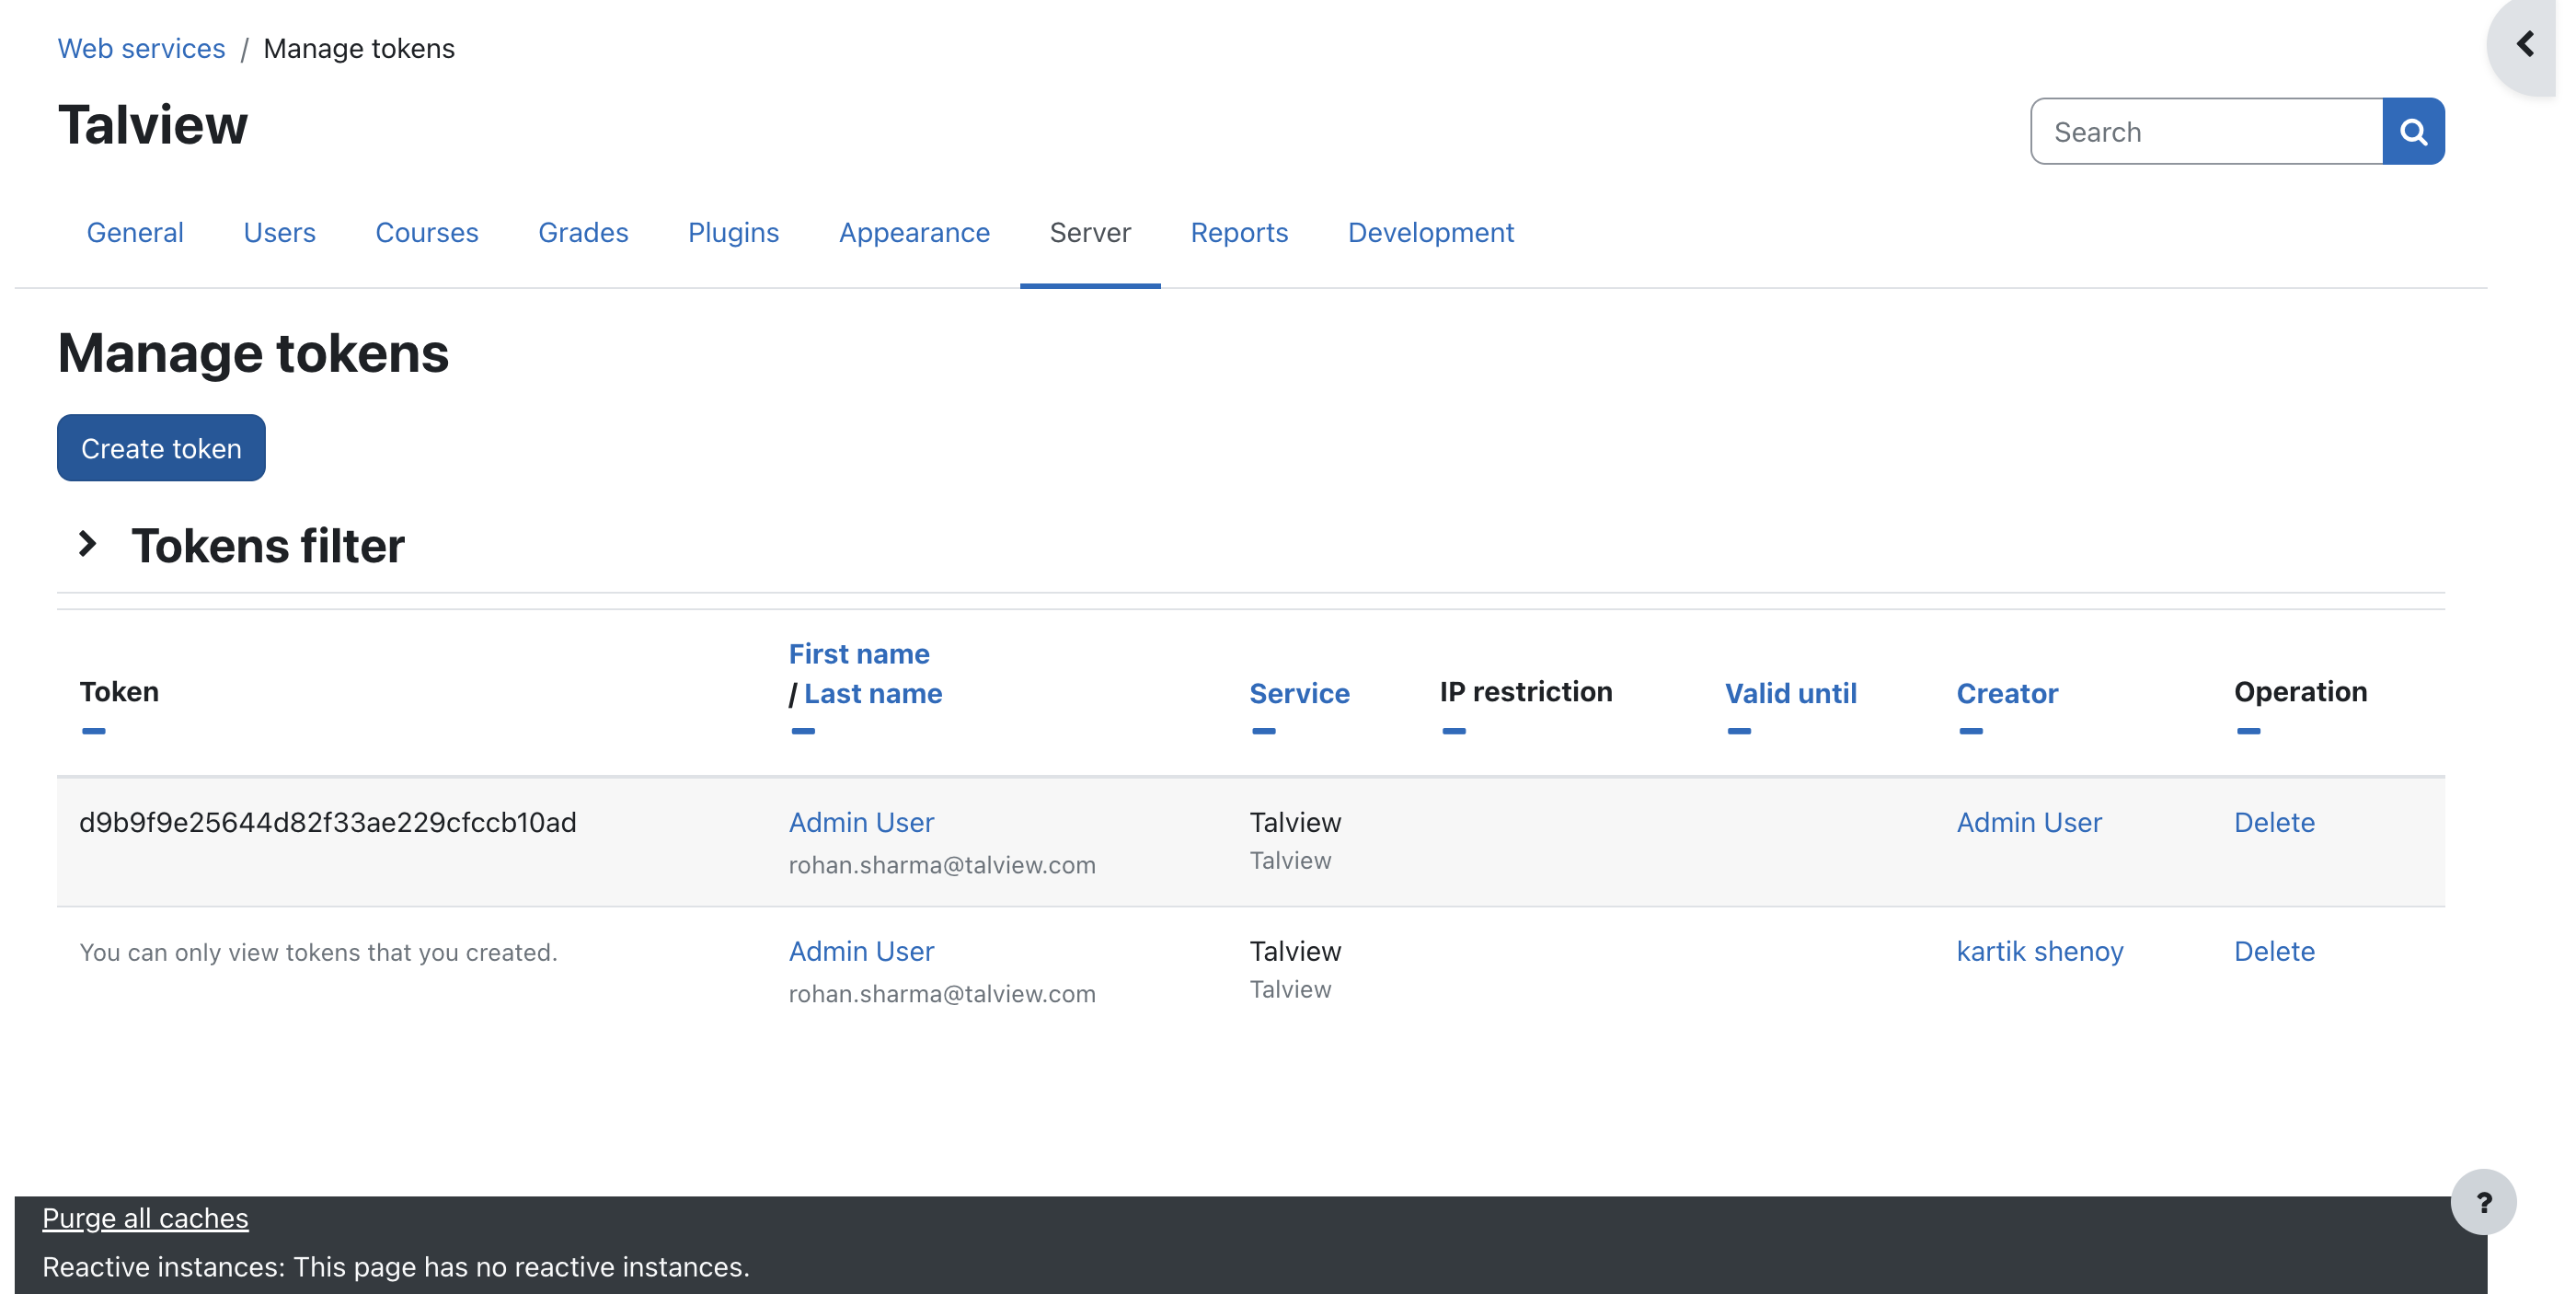
* Navigate to Server (Tab) > Web Services > Manage tokens
### **3. Create WSToken**
* Navigate to Server (Tab) > Web Services > Manage tokens
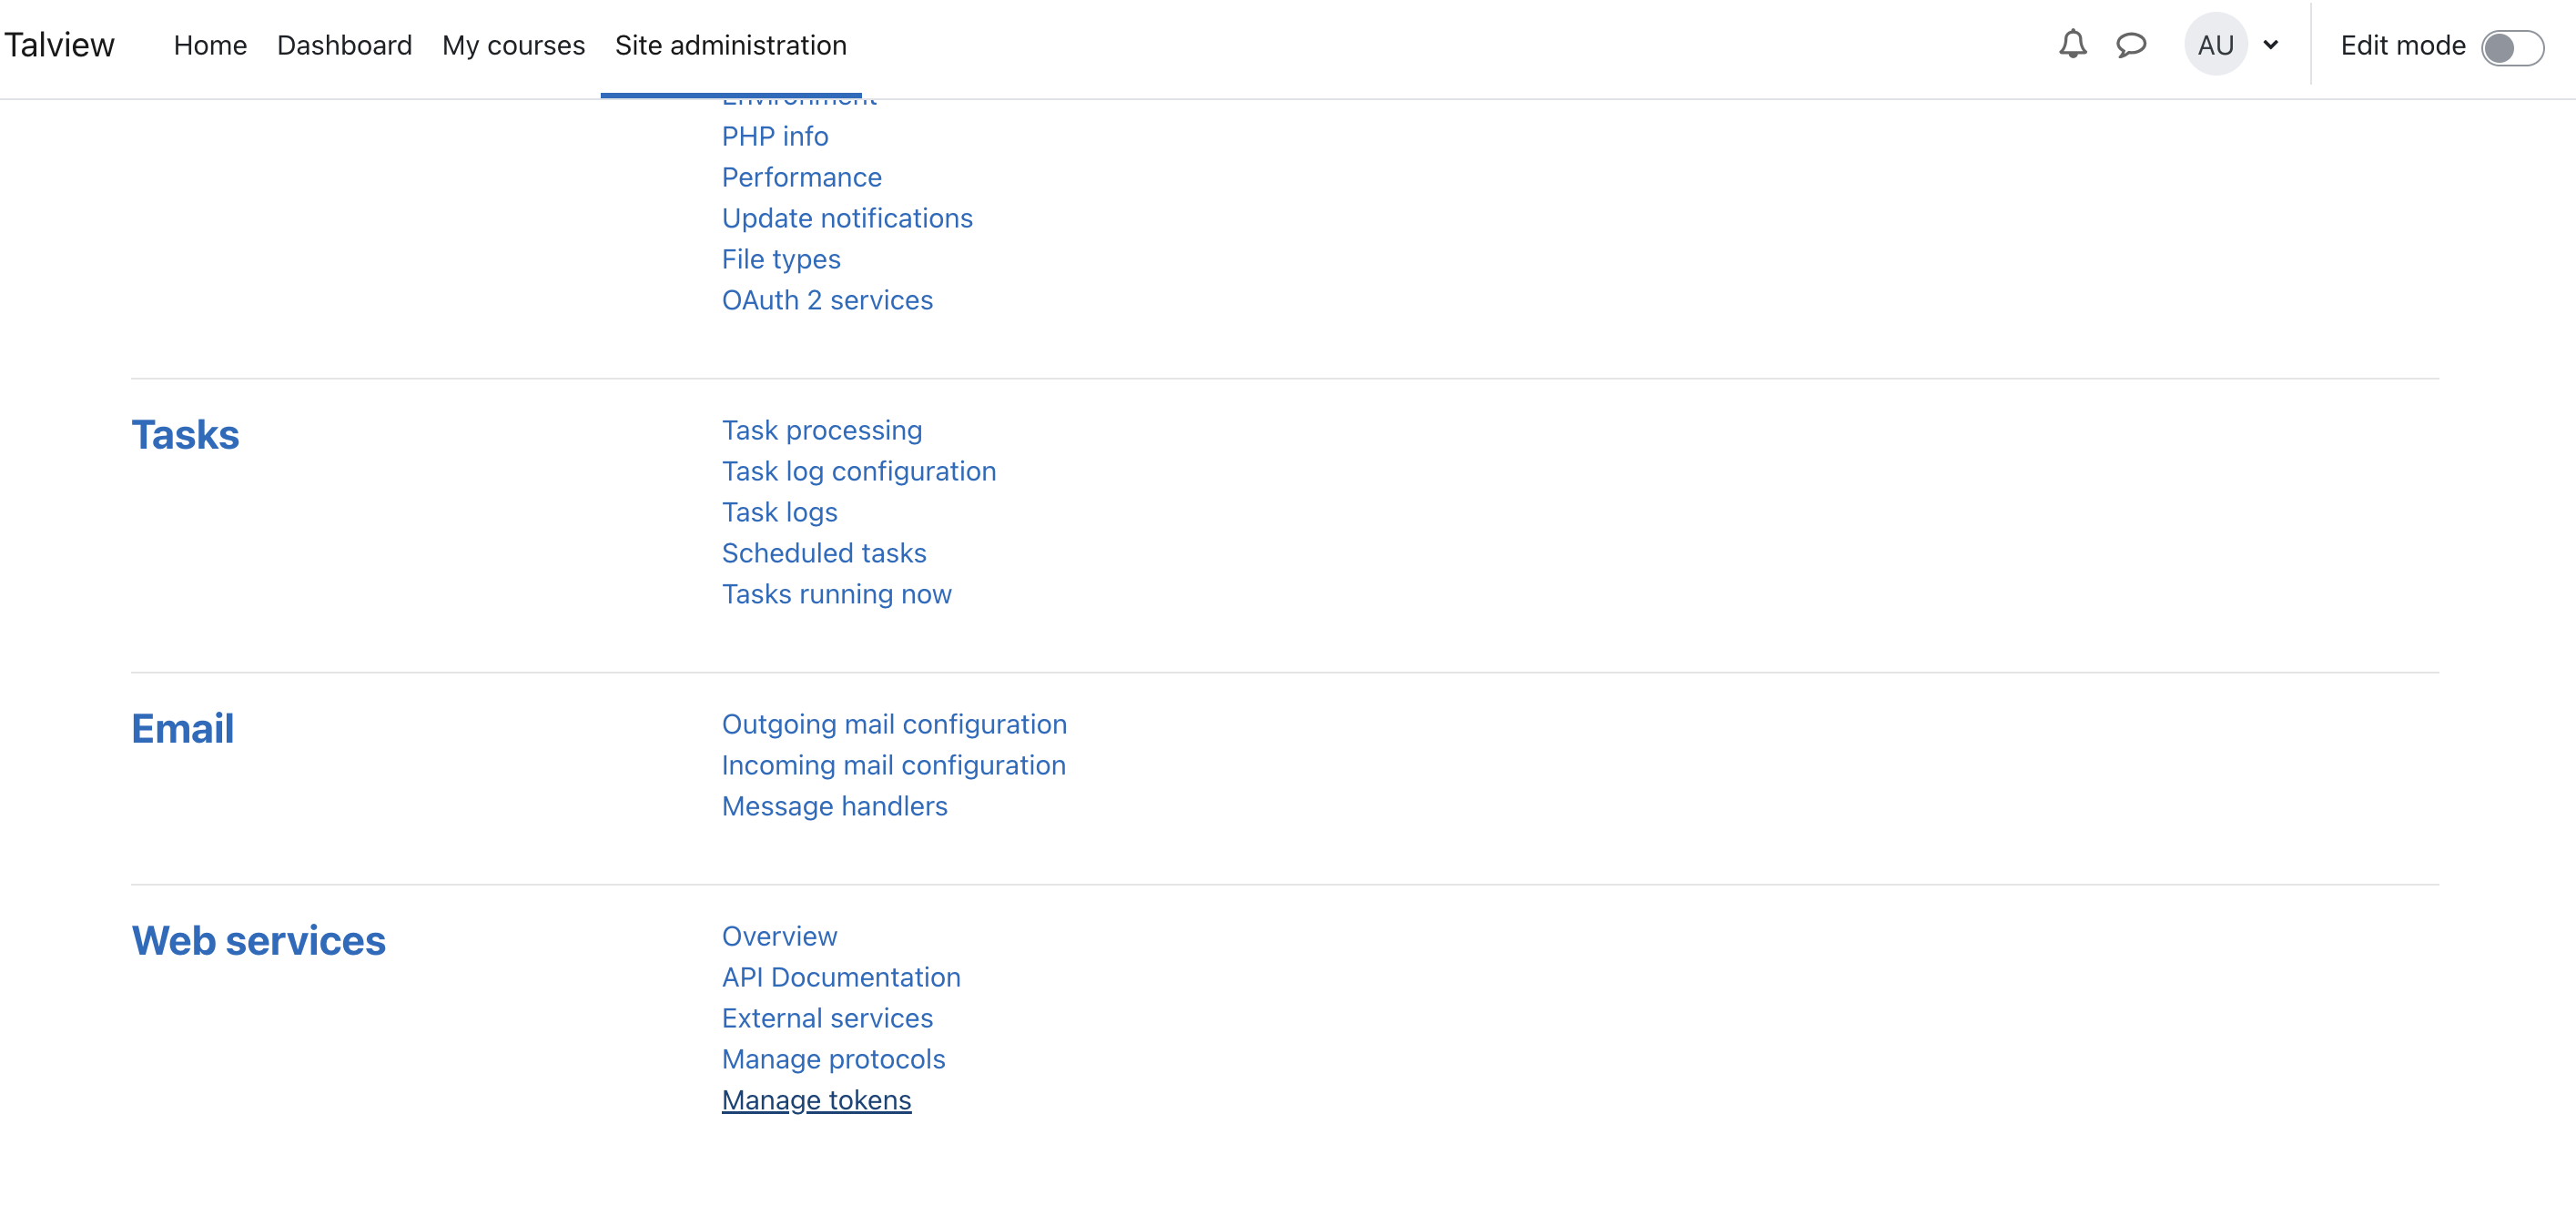 * Click on “Create token” button
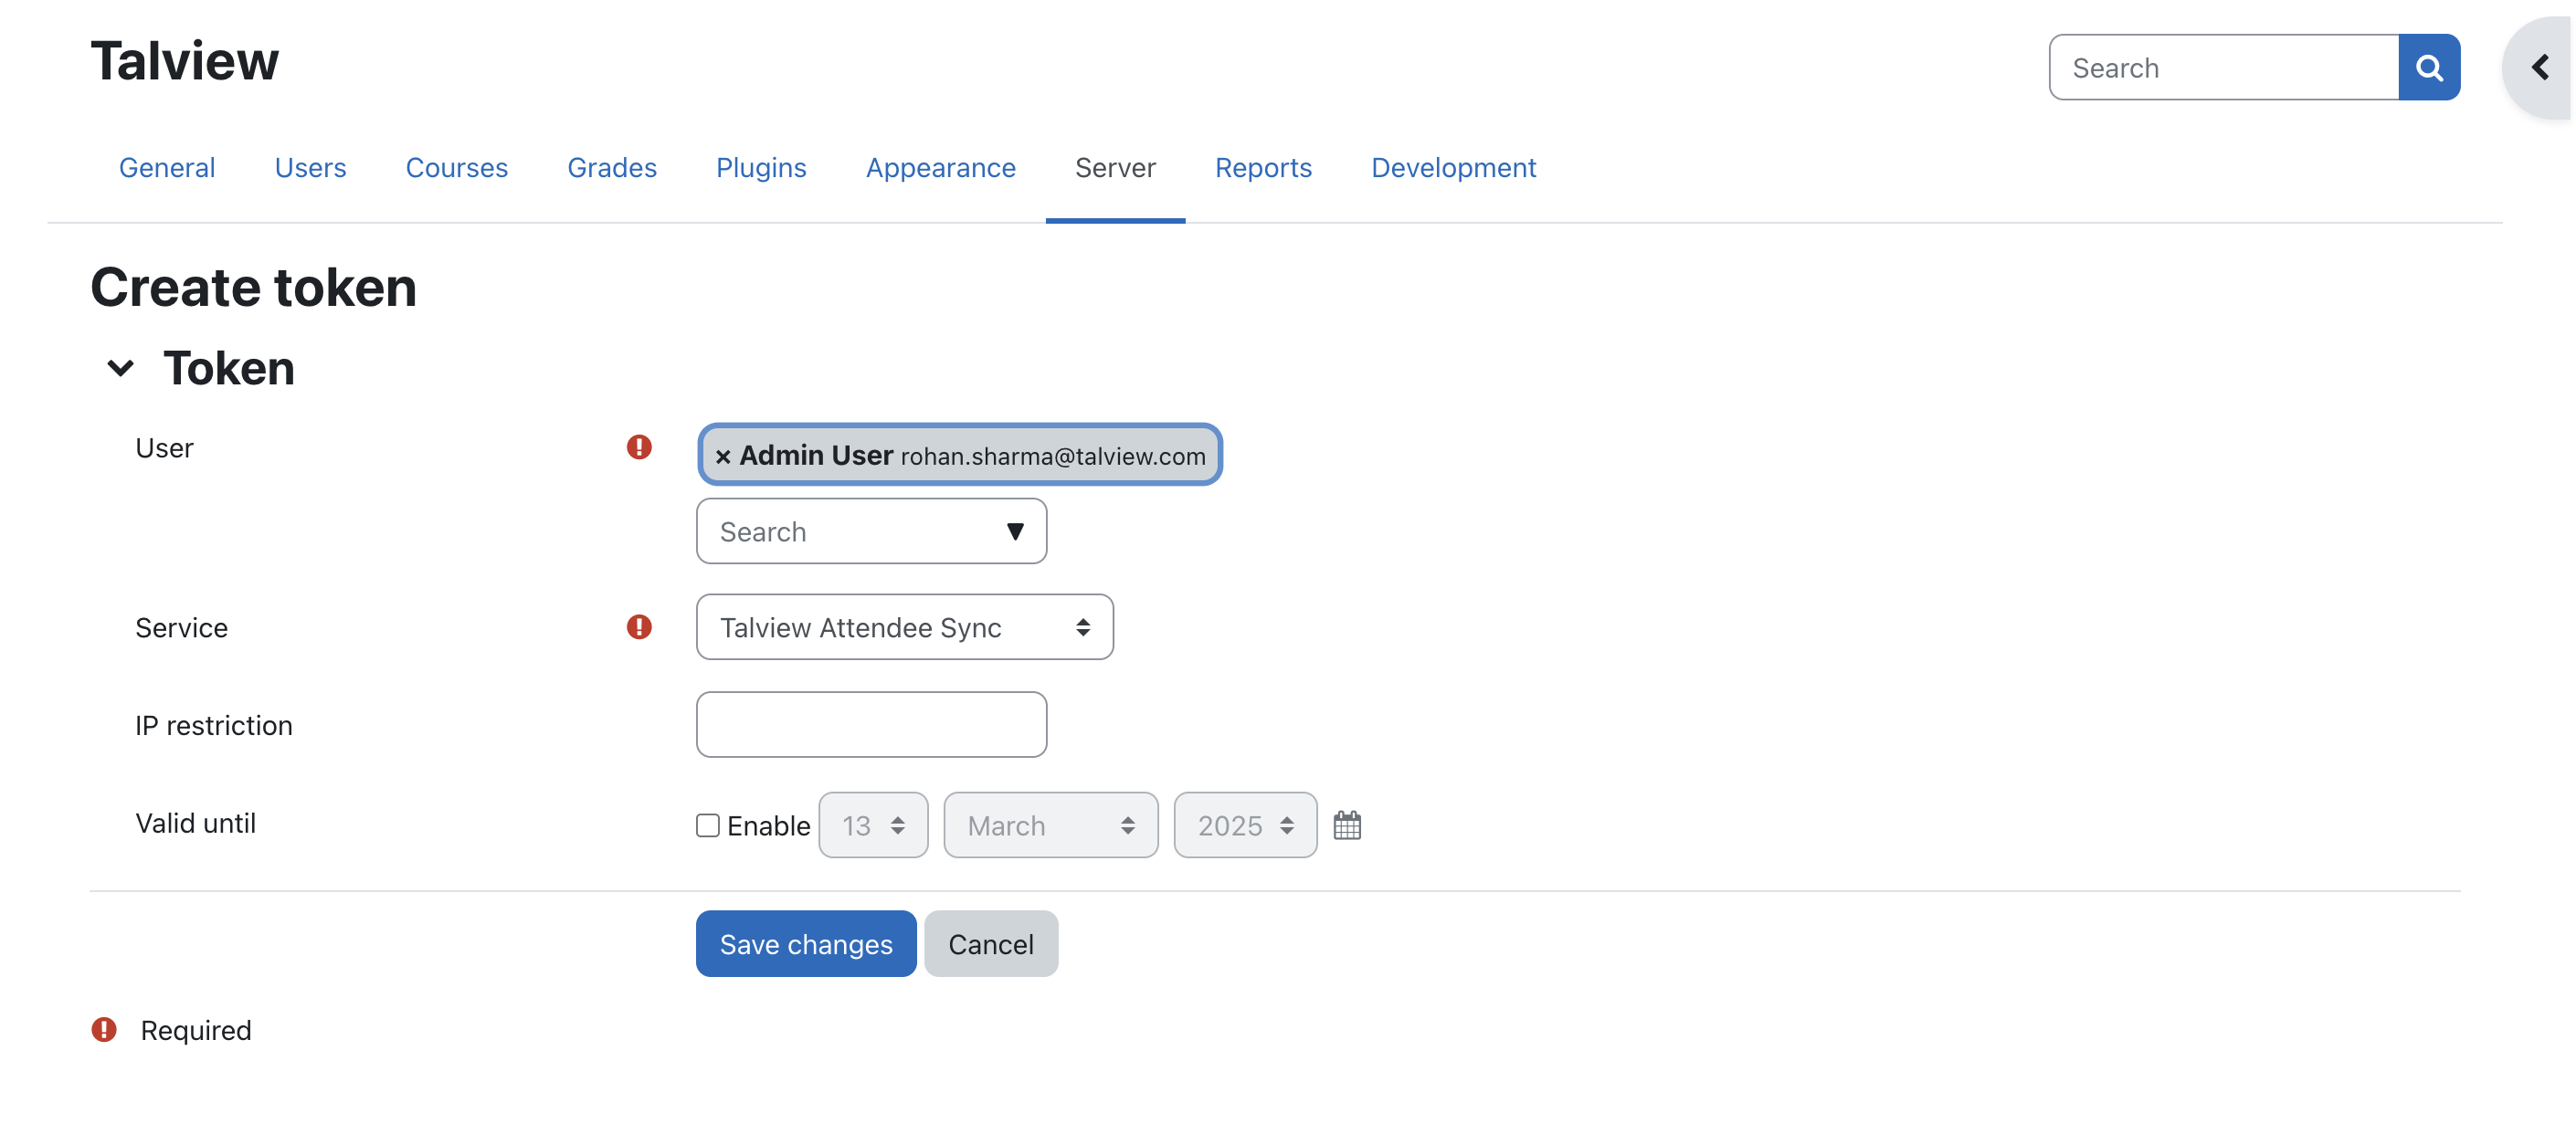
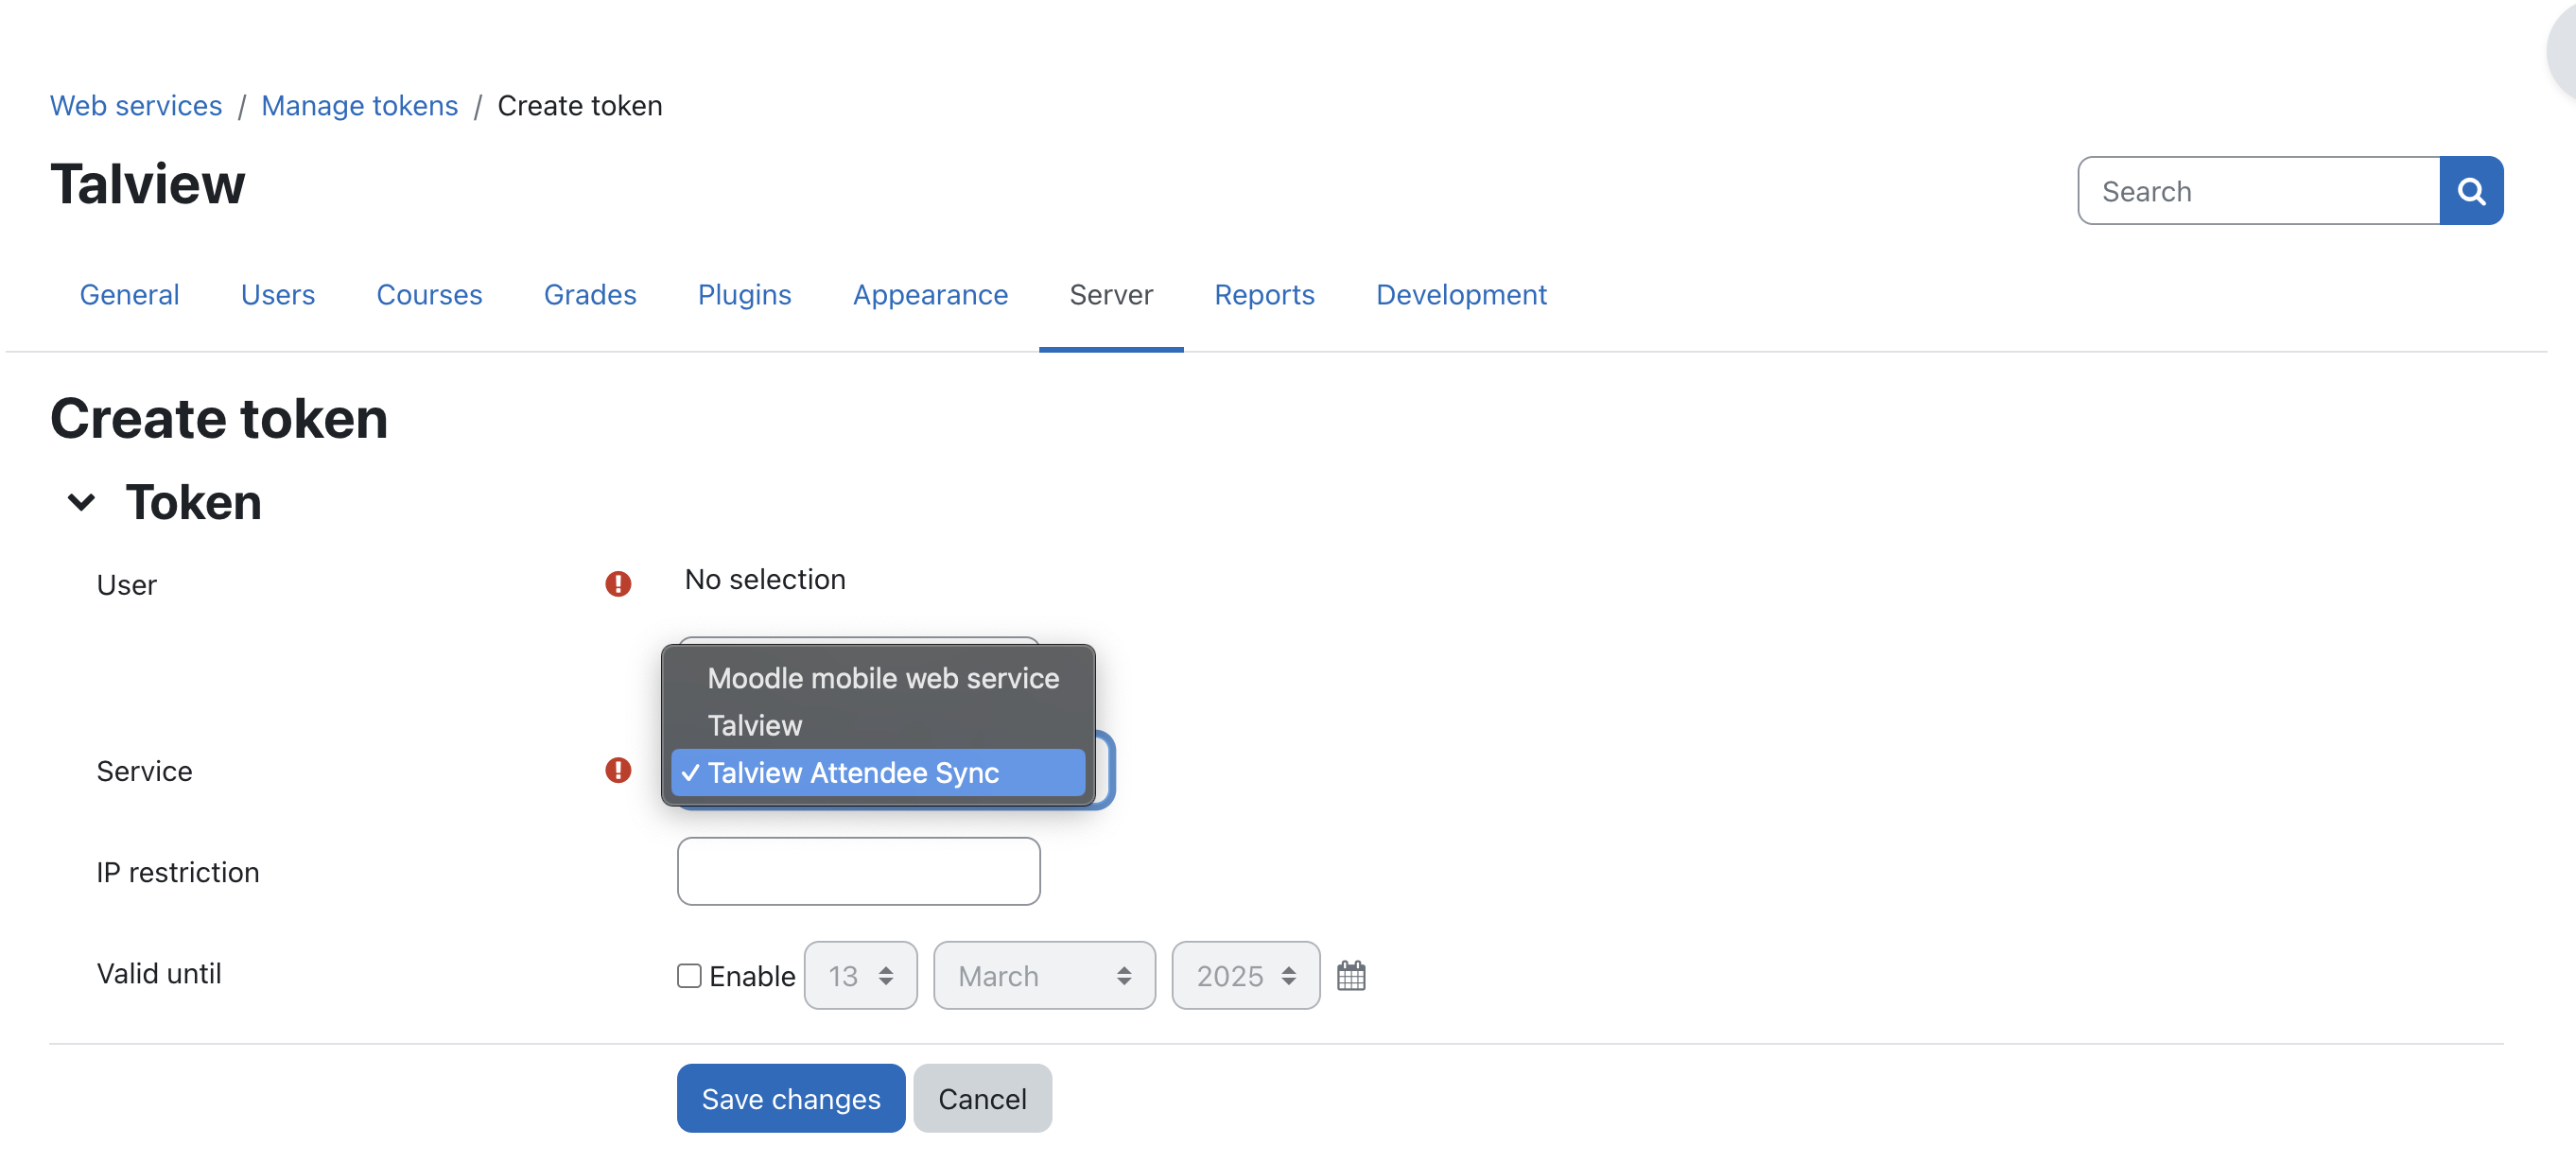
 * Select user who have admin access and Select service that we created in earlier ([Create external web service](/10c3461472f380af8fede190455e2cff?pvs=25#1b53461472f38072893dd53c0305add6)).
 * Click “Save changes” to obtain token
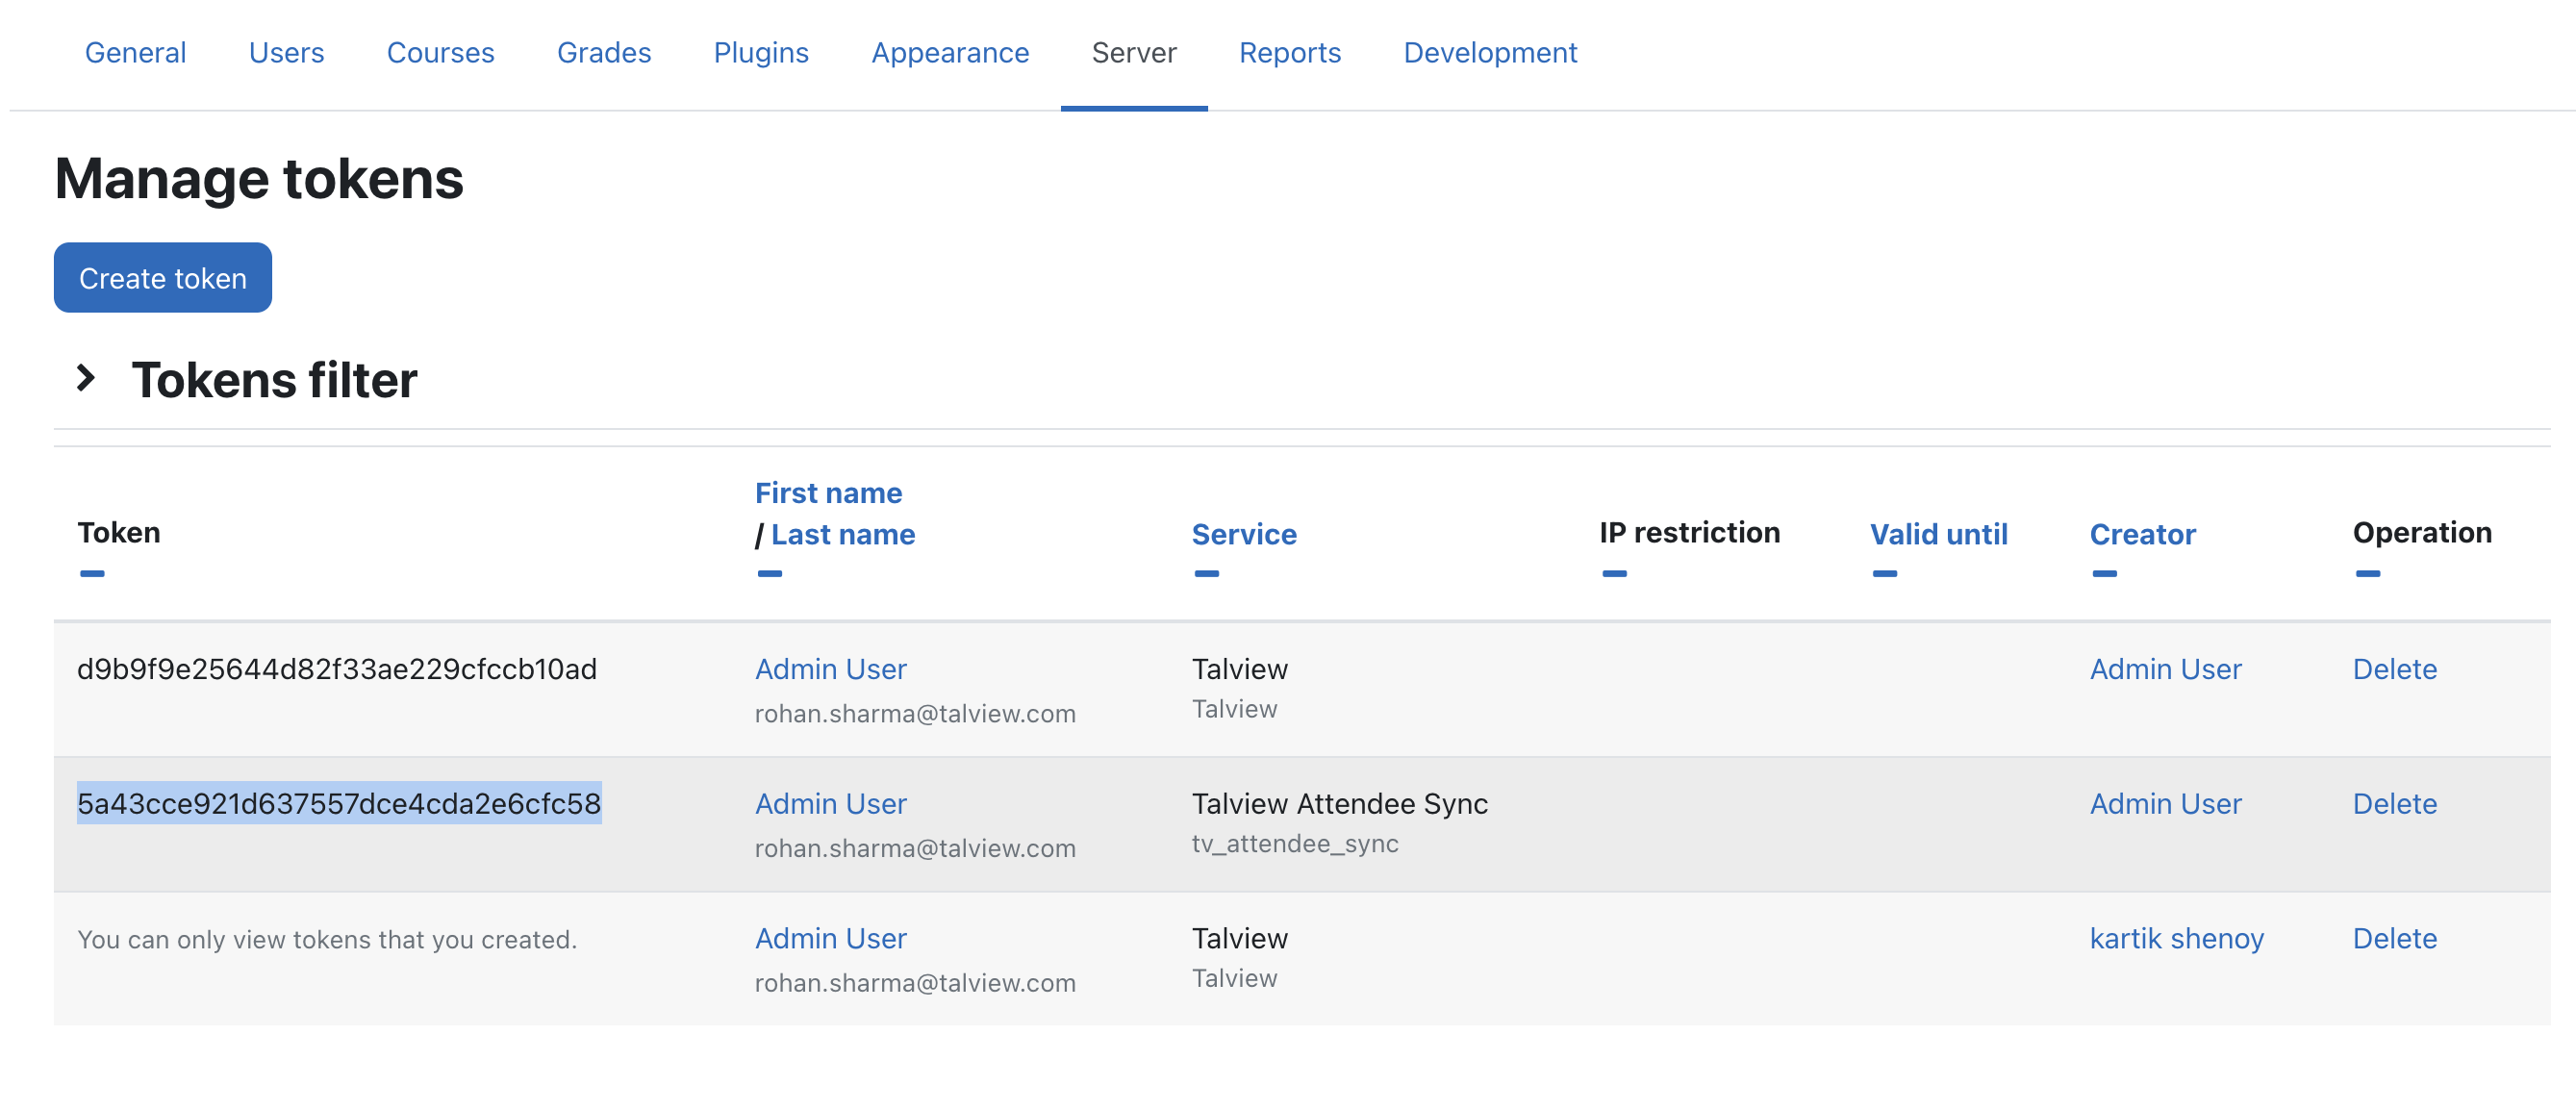 ### 4. Sharing Token and URL with Talview
Use direct email or secure mode to share following information
* Token
* Moodle URL
## Assumptions
Before proceeding with the installation of Talview's proctoring plugins for Moodle LMS, we assume the following:
1. **Active Moodle Environment**: You have access to your Moodle platform with administrator rights. Talview Plugin is currently supported only on Moodle versions 3.9, 4.0, 4.1, 4.2
2. **Talview Subscription**: You have a valid subscription to Talview Proview services. If needed, contact the [Talview Sales Team](https://www.talview.com/contact?hsCtaTracking=6b06eef3-21df-4508-826e-0c77f9922d17%7Cede73d3b-fccd-45f2-abfa-73d38e575dec) or [Talview Tech Support](https://talview.freshdesk.com/en/support/home).
3. **Compatible Browser**: Testers will use a compatible web browser for the proctored quizzes.
4. **Domain Whitelisting**: Your Moodle domain is authorized and whitelisted to use Talview’s Proctoring Services. This security measure ensures that only approved domains can interact with the service.
5. **Instructor Awareness**: Course administrators have informed all course instructors about the necessity of installing the Proview extension. Without this extension, instructors cannot configure proctoring settings for quizzes, which might lead to confusion or incomplete proctoring setups.
Ensure your server and Moodle environment meet the necessary technical requirements for the plugins. Talview utilizes recorded alerts and configured stake to compute the Proview index, based on the candidate's behavior involving their browser, camera, and microphone. For comprehensive information on Talview's Proview flags, please consult the [Proctoring v7-Plus Events/Flags Details](/6fc4b8a03d774654a95b66f76f02a3f9?pvs=25) documentation.
### 4. Sharing Token and URL with Talview
Use direct email or secure mode to share following information
* Token
* Moodle URL
## Assumptions
Before proceeding with the installation of Talview's proctoring plugins for Moodle LMS, we assume the following:
1. **Active Moodle Environment**: You have access to your Moodle platform with administrator rights. Talview Plugin is currently supported only on Moodle versions 3.9, 4.0, 4.1, 4.2
2. **Talview Subscription**: You have a valid subscription to Talview Proview services. If needed, contact the [Talview Sales Team](https://www.talview.com/contact?hsCtaTracking=6b06eef3-21df-4508-826e-0c77f9922d17%7Cede73d3b-fccd-45f2-abfa-73d38e575dec) or [Talview Tech Support](https://talview.freshdesk.com/en/support/home).
3. **Compatible Browser**: Testers will use a compatible web browser for the proctored quizzes.
4. **Domain Whitelisting**: Your Moodle domain is authorized and whitelisted to use Talview’s Proctoring Services. This security measure ensures that only approved domains can interact with the service.
5. **Instructor Awareness**: Course administrators have informed all course instructors about the necessity of installing the Proview extension. Without this extension, instructors cannot configure proctoring settings for quizzes, which might lead to confusion or incomplete proctoring setups.
Ensure your server and Moodle environment meet the necessary technical requirements for the plugins. Talview utilizes recorded alerts and configured stake to compute the Proview index, based on the candidate's behavior involving their browser, camera, and microphone. For comprehensive information on Talview's Proview flags, please consult the [Proctoring v7-Plus Events/Flags Details](/6fc4b8a03d774654a95b66f76f02a3f9?pvs=25) documentation.